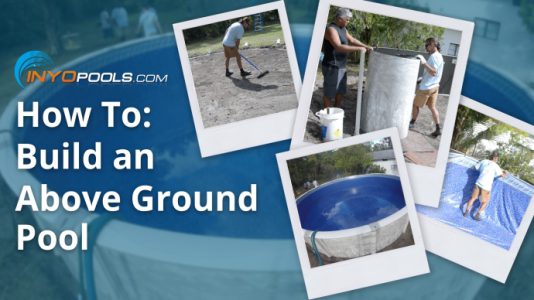
Have you ever seen a pool get built from start to finish? I haven’t and I’ll take a wild guess and say most pool owners haven’t as well. Even if you had your pool built with your house, the odds are you did not sit there and watch them step by step. In fact, you probably were more concerned about when you could take your first swim than seeing your pool contractor install your pool skimmers.
Although we are an online retailer, our goal at the end of the day is to provide as much information to the pool owner as possible. As we sat around our offices pondering new and exciting projects we could prepare for our customers, the idea of filming the entire process of building a pool sparked out interest. What if we could show an entire pool build, from start to finish, and create a tutorial simultaneously?
Not only did that sound informative and useful for customers, it also sounded, for the lack of better word, fun. So here it is a 9 week pool built in less than 3 minutes
Watch the Video
Getting Started
Before we could begin filming a pool being built, we had to find someone building a pool first. Duh. Thankfully, that did not take as long as originally expected. It turns out, a friend of the company was in the process of adding a pool to their home. With their permission, we were allowed to set up cameras and record each and every step of the building process. By the end of the build, we were able to combine the footage and edit the process to create a video that’s less than 3 minutes.
1. Plan and Design: Planning is definitely the first thing you need to do before construction. Here are some questions you should ask yourself first to get a feel of the things you need to think about. What is your budget? Where in the yard will the pool be located? What is the primary purpose of the pool? What shape and which material would you like your pool constructed? Once you sit down with your professional pool builder, he/she will lay out a plan for you and attain any necessary permits required to add your pool.
2. Layout of Design: Draw the shape and layout of your pool. Make sure you include specific measurements. This layout is used to begin defining the location of the pool and ensuring the area is level and secure.
3. Excavation: Excavators are responsible for digging out the outlined area for your pool. Depending on the size and depth of the dig, excavators may use a backhoe or a Bobcat. They also form the steps, benches, and any other structural features for the pool.
4. Form Boards: Form boards are set in place for the layout of the pool. This shows where the piping and rebars will go.
5. Main Drain Plumbing: The main drain inside of a pool is not used to drain your pool. It is an outlet where a PVC pipe is installed to your pump. This is how the water circulates through the skimmer, filter, and heater (if you have one).
6. Lay Steel Rebar Frames: Rebar frames are used to construct the interior brace for the pool and spa shell.
7. Spray Pool Walls and Shell: Next, the crew will spray over the rebar frames to create the pool and spa shell. Typically shotcrete or concrete is used.
8. Grading/ Removal of Form Boards: Form boards are removed once the shell has dried. Next, the crew will grade the land to level the dirt that was pulled from the hole.
9. Trenching for Pool/Spa Return: A pool return allows the clean filtered water back into the swimming pool after it has gone through the filtration process.
10. Tile Preparation: Next, the crew must prep the interior of the pool for the tiles by applying a bonding agent.
11. Install Skimmers and Main Drains: The plumbing for both the main drains and the skimmers was installed earlier. Skimmers and main drains are essential to the flow of your pool’s water. Ensure you follow all safety compliance codes as well.
12. Form Cantilever Boards for Deck: The cantilever boards are used to create and form the desk around the shell of the pool. This also creates the style of coping the customer wants.
13. Accent Tiles and Tile Grout: Accent tiles are applied in the spa and sun shelf. Afterwards, they apply grout to the tile around the pool and spa.
14. Install Collar: Form boards are laid around the perimeter of the pool to create the deck and footers for the screen enclosure.
15. Pour Concrete: First the ground around the perimeter of the pool must be leveled. Once it’s level, you can begin pouring the concrete and laying the expansion joints.

16. Remove Collar: The form boards around the perimeter of the pool are removed exposing the footers for the enclosure.
17. Finishing Touches on Deck: This is the time when the crew will inspect the deck and address any issues if needed.
18. Adding Texture: A desired texture is applied to the deck.
19. Layout for Deck Colors: A taped layout for the different colors for the deck is laid out per the customer’s original drawing.

20. Screen Enclosure: The screen crew will lay out and prep the deck for installation. Supports and tie-downs are used as anchors for the footers and decking. They also ensure the screen is attached to the ground.
21. Perimeter Grading: A final grading of the outside perimeter is done to level the area around the pool. This allows for any gardening the pool owner decides to do later on.
22. Applying the Interior: The finishing color for the interior is selected by the pool owner and is applied to the pool and spa interior shell.
23. Acid Washing: Acid washing is done after the interior of the pool has been applied. It cleans the surface and removes any excess that may have been left behind.
24. Install Main Drains and Returns: The finishing crew installs the pool returns, spa returns, and main drain covers. A final inspection of the interior is also completed prior to the pool being filled.

25. Pool and Spa Fill- Up: Your pool and spa are filled with water before you add any chemicals or operate any equipment.
26. Chemical Start- Up: Once the pool and spa are filled, chemicals are added to the pool to begin balancing the water. This begins the 30- day curing process of the interior finish.
27. Final Deck Preparation: Final inspections of the deck, pool, spa, and screen enclosure are made. Once the final touch ups have been made, a final crew will come in and complete the final deck painting.
There you have it, ladies and gentlemen. A pool that was built in 9 weeks edited to under 3 minutes. For me, this was probably one of the most entertaining videos I have seen during my tenure at INYO Pools. We hear about the troubles faced by the average pool owner on a daily basis. Whether it’s pump issues, your filter not filtering properly, or your salt system not producing enough salt, we pretty much try and cover any scenario you may encounter. What we do not address too often is all the prep and hard work that is completed before you can even swim in the pool.
This year we have decided to expand our topics and broaden our horizon a little. Don’t be left out. We have many new and exciting pieces of content we have in store for you this year. Sign up for our E-book, check out our YouTube page, and don’t forget to check our blog weekly for new content. If you need help with something and can’t seem to find it in our how to guide section, let us know and we will do our best to help you .