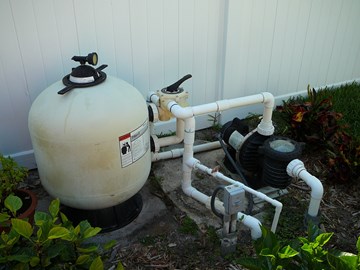
Every 5 - 7 years you will have to replace the sand in your sand filter. The sand actually wears out. The sharp edges of the sand particles become worn and rounded and don't capture the contaminates as well. Also the sand will start to ball up or the water will create channels thru the sand. You will notice that your pool water is not as clean or the interval between required backwashes is shorter. This guide shows you the steps required to replace the sand in a Pentair Triton 2 Side Valve Sand Filter.
Please click here to view the Pentair Triton 2 parts. 


Jim Posted: 10/4/2021
I have no idea the actual size of the Triton in filter that's on my pool. Where the serial and model numbers would be stamped is covered by another sticker that when removed destroyed the label.Reply
InyoPools Product Specialist Matt S. Posted: 10/4/2021
The filter size can be identified by measuring the diameter of the tank, or measuring for the circumference then calculating the diameter. A more detailed instruction guide on how to do either of these can be found in step two of this article - How To Identify the Make and Model of My Pool FilterReply
scott Posted: 10/3/2021
should I replace the gravel when I replace the sand?Reply
InyoPools Product Specialist Matt S. Posted: 10/4/2021
You may be able to re-use the pea gravel depending on its condition. But for me, if I take the time to remove all that sand to start new, I might as well do the pea gravel as well.Reply
Brandon Posted: 5/17/2021
The last time I replaced my sand, I found something online indicating to put a layer of pea gravel in the bottom before the sand. Is this unnecessary?Reply
InyoPools Product Specialist Matt S. Posted: 5/21/2021
No, it is not necessary to add pea gravel to a sand filter.Reply
Steve Posted: 3/21/2021
Hi. I replaced laterals per instructions to fix sand leak on pentair triton II t60. Also replaced the hub which was loose & suspected leak cause because old laterals looked good. I tightened new lats but four not facing down or would have had looser connection to hub. Still leaking sand tho better. Pipe looked ok. What do you suggest other than calling for pro? Thanks!Reply
InyoPools Product Specialist Matt S. Posted: 3/26/2021
The laterals, lateral hub, and elbow pipe are the last line of defense, keeping the sand in the tank. If those are in good shape with no hairline cracks, the only other place to look is the multiport valve. The valve's diverter spring or spider gasket could be busted. But if you do not see water leaking from your backwash hose when the valve is set to normal filtering mode, this is not likely the issue.Reply
Rick Posted: 6/30/2020
Very helpful. I followed each step went smooth. Just now my back hurts. All good. Pool starting to get clearer after 3 hours. ThanksReply
InyoPools Product Specialist Matt S. Posted: 8/27/2020
That back pain is the feeling of a hard-earned win. Pop an ibuprofen and take a victory lap. :)Reply
Anonymous Posted: 9/28/2020
Victory NAP . . . not Lap.Reply
Jay Posted: 6/20/2020
I did all the steps carefully and no steady stream of water shoots out of the relief valve. What an i missing or another step to do?Reply
InyoPools Product Specialist Matt S. Posted: 9/2/2020
It sounds like your pump is not priming. Have you tried filling the pump strainer with a hose to try to give it a boost?Reply
InyoPools Product Specialist Dennis R. Posted: 8/20/2017
BlueHairCj - You may have air pressure building up in the top of your filter tank caused by a suction side air leak (at or before the pump). This may be causing back pressure on the flow of water through the filter. When you replace the sand, check the air relief hose and its top screen for blockages. Also, see our guide on "How to Identify and Correct Air Leaks".Reply
BlueHairCj Posted: 8/14/2017
I am looking at replacing the sand in my unit this coming week. My question is out of curiosity, could the need to replace The old sand have anything to do with the pressure of my vacuum in the pool?I have done all steps to finding any leak that may occur but it seems to be 100% OK. I have noticed that if I release tension off the Triton 2 and the pump starts it goes really good for about five minutes and then slows down or stops
Reply
InyoPools Product Specialist Dennis R. Posted: 7/30/2017
Poolhelp - Try tapping around the sides of the top cap gently with a rubber mallet. If that doesn't loosen it up, try brushing on a diluted solution of TSP around the joint, Let it sit awhile and tap it again with a rubber mallet. Repeat with solution and tapping until it loosens up. If you have lost your hex wrench, try using a strap wrench.Reply
Poolhelp Posted: 7/27/2017
The top of my Sand Filter will not break loose to open any suggestionsReply
Christine Chamberlain Posted: 3/20/2020
I just had this same problem. It came open when I stood over the tank holding down one side of the specialized wrench and hitting the other side with a rubber mallet.Reply
InyoPools Product Specialist Dennis R. Posted: 6/13/2017
mike - I'd question having to buy a new filter. See our guide on "How To Break Chlorine Lock". Look at Step 2, partially draining the pool. Also look at the second comment labeled "Anonymous" on 5/31/2017. This person had good results partially draining her pool.Reply
mike Posted: 6/12/2017
I have had some issues with my filter or chemicals "locking up" as my pool service calls it. That's when the chlorine is high and the water is green or a light green. I ran the pool for 60 hours straight as directed by my pool service company. They thought that would clear it up after a few backwashes. Well it didn't change anything and now they tell me that my filter is bad and needs to be changed out. My TRITON II TR60 is about 15 years old or a little longer. I just cant believe that a filter can go bad and cant wrap my head around that. I changed the sand last year and seem to have this problem every summer (Phoenix, AZ) My plaster is 30 years old and deteriorating and will be redone this winter. Could that be my problem or could the filter really be shot and needs replaced? Thank you for opinionsReply
InyoPools Product Specialist Dennis R. Posted: 6/5/2017
Anonymous (Lid Wrench) - Here is the link to the Pentair Triton 2 Lid Wrench - Plastic.Reply
Anonymous Posted: 6/5/2017
where can I get a new hex wrench to remove top?Reply
Chad2000k Posted: 6/22/2016
Thank you for the reply. I have 12" from the sand to the top. I changed the sand yesterday and ran fine all night with the exception of the endless air bubbles going into the tank which I remedy by leaving the relief valve open slightly. The lid just keeps popping up enough for it to shoot water out of the top of the tank. A replacement lid is $60 and my home warranty charges $60 and hopefully will just replace the filter with a newer maybe the Triton II. Wiser choice is to just replace the whole tank instead of just the lid at the same price.Reply
InyoPools Product Specialist Dennis R. Posted: 6/22/2016
Chad2000k - I don't have information on your older model, but I would assume that if they are both 24" in diameter, they would have to operate with the same free space between the top of the sand and the top of the tank. Triton II specifies 10 1/2'.Reply
Chad2000k Posted: 6/22/2016
I have an older version of this Triton. Triton is the only word I can make out on the data sheet on the side of the filter. It is 24" diameter on the inside of the tank. Can someone tell me how many pounds of sand this older filter holds? The newer Triton II does 300lbs for 24" and that's what I've changed it out with. It seems too much to what was in there but the guy running this before us last year did a number of wrong things to the pool.Reply
InyoPools Product Specialist Dennis R. Posted: 6/12/2016
Laszio - I would think that the Air relief tube would get clogged with sand if it wasn't connected to the bottom. Did you try removing the Upper piping assembly to see if you model has a pivoting joint or if you could free up the pivoting joint? Or you might consider replacing it so your baffle will pivot. If this model does not pivot, can you attach the baffle to the detached Upper assembly, then attach the tube before reattaching the Upper assembly?Reply
Laszlo Posted: 6/10/2016
Thank you for your fast replay.If you are interested and you can feel the challenge I pushed some more photos here with my comments: https://goo.gl/photos/riGEMwuAzLPBLZLi6
I don't have other idea, I will not connect the Air relief tube to the bottom. I will screw back the baffle with the air tube without connecting to the bottom. Than I will put a sac to the baffle. I will fill with 70 kg sand etc. (I talked with a guy, and he said that is not a big problem if I not connect the Air relief tube to the bottom. Maybe the filter will not use the full capacity, but it will work). Do you have any better idea?
Reply
InyoPools Product Specialist Dennis R. Posted: 6/10/2016
Laszlo - I see your filter picture. It's not clear from the picture if this is a Pentair Triton w Side Sand Filter. If not, the baffle may not pivot. Can you take the top pipe assembly out by disconnecting the pipe at the top external connection to the valve. Then you could take a closer look at the pivoting section of the pipe if there is one, and if there is, you might be able to soak it to loosen it up. Like you say, I don't see how to reconnect the breather hose if the baffle isn't able to pivot.Reply
Laszlo Posted: 6/10/2016
I'm stuck with Step 8I can't move the Baffle, only I can unscrew.
So I can't put the air relief back if I can't move the Baffle. Any suggestion? I don't want to brake it.
Reply
Anonymous Posted: 6/9/2016
I'm stuck with Step 8. I can't move the Baffle aside. I unscrew it, I removed the sand, but if I screw the Baffle back, I can't connect the air relief botton part. Should I force the Baffle to left or right? I'm afread I broke it... pictures about the issue: https://goo.gl/photos/8ZAdsPofSu5MP7hj9?Reply
InyoPools Product Specialist Dennis R. Posted: 5/9/2016
Tess - Try adding a 50/50 solution of vinegar to the filter to see if that breaks it up. You do not want to break it out with a hammer and chisel because that will probably break the laterals. If you do have to revert to a hammer, use light taps on a small screwdriver and try to tap horizontally.Reply
Tess Posted: 5/6/2016
I am changing sand my sand is hard. How do it get that out?.Reply
InyoPools Product Specialist Dennis R. Posted: 4/26/2016
Changing sand - Most sand filters just specify sand, and even the picture in the Triton 2 manual (page 6) shows the option of "sand or sand and gravel). We went with what most filters use.Reply
Anonymous Posted: 4/25/2016
I am going to change the sand in my filter but can I ask why 50 lbs gravel and 275 lbs sand is not being used in your demonstration as this is specified by the manufacture.Reply
InyoPools Product Specialist Dennis R. Posted: 1/19/2016
Rachel - This procedure for removing sand will work regardless of which valve you have attached to the filter. The insides of the filter are the same.Reply
Rachel Posted: 1/14/2016
I the same sand filter but I only have a backwash valve. Would I be able to do the same thing or not please help me.Reply
InyoPools Product Specialist Dennis R. Posted: 7/31/2015
hg - Thank you very much for your feedback. It's helpful for us to hear variations on our procedures and how you solved your problems.Reply
hg Posted: 7/30/2015
I followed you instructions for the replacement of the filtering material, Except it should be noted that after opening the filter I noticed that the baffle(diffuser?) would not move to the side as stated on your instructions, but I reached in, felt threads, and proceeded to unscrew and remove it from the plastic tubing. I cover the pipe with a small plastic bag and follow the rest of your instruction. Thanks for your help. P.S. Thanks for mailing the new top so promptly.Reply
hg Posted: 7/30/2015
My filter top was stuck and would not budge with the plastic octagonal wrench. It broke. I decided to order a new top since I knew that I would have to destroy the top. I didn't want to cut it since I was afraid to damage threads on filter casing. I drilled two 3/8" diam. holes through and inserted a 3/8" dia. two foot long steel bar. This worked and I was then able service filter Replaced pea rock and sand, and is now working better than ever.Reply
Anonymous Posted: 7/25/2015
My sand filter top was also very stubborn. I was about ready to cut it off, and then talked to the guys at my local pool store. The had an old style STEEL, not aluminum, wrench that did the trick. This was NOT the Pentair 154510 that you can get on Amazon for $125. That wrench, at least according to the Amazon reviews, is a sand cast non-professional grade tool. The tool my pool store had was older, made of square steel stock, and had rubber handles on eash side for an excellent grip. The cover relented in short order wnen that wrench was uses! Now I'm looking for one of my own, but so far no luck :(Reply