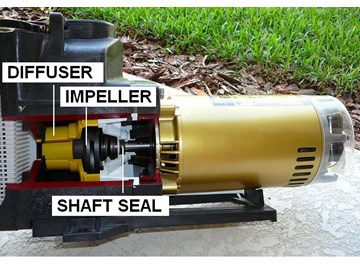
If you see water leaking out of the bottom of the pool pump assembly, it's a good indication that you may have to replace the shaft seal within the motor pump assembly. As shown in the pool pump cut away, the shaft seal is located in the motor pump assembly behind the impeller. Although this description is specific to a Hayward pool pump, many of the steps can apply to other models of pool pumps.
Click Here to View Replacement Pool Pump Parts


InyoPools Product Specialist Robert M. Posted: 2/6/2019
Try wetting the rubber around the ceramic with water. That usually helps slide it into place. If that doesn't work, let us know the model of the pump and the part number of the shaft seal.Reply
Eddie Posted: 2/6/2019
Tried water, did not work. I placed the rubber seal part in the cavity first and then froze the ceramic part in my freezer for an hour, for contraction. After removing it from the freezer it slipped right in the rubber seal already in the cavity. No force was needed. Piece of cake when using that method.Reply
Mark D Posted: 10/14/2022
I would never have thought of that, So I will remember that when i replace Shaft Seal on Pentair IntelliFlo variable speed pump model 011018Reply
InyoPools Product Specialist Matt S. Posted: 10/17/2022
Good plan. The correct replacement shaft is the PS-1000, Heavy Duty (Saltwater Pools) - PS-3865.Reply
Edison Marshall Posted: 2/4/2019
Whoa, I messed up....I was careful not to touch the white ceramic side, but not so with the seal that meets up with it. What can I do? I have not replaced the wet end as of yet.... thxReply
InyoPools Product Specialist Robert M. Posted: 2/4/2019
Hello Edison - Wipe off the seal the best you can. It should be ok.Reply
Tereasa Posted: 12/3/2018
I installed a brand new motor Hayward Tristar motor HP1.85 SP3200EE. When hooked up and turned it on, it hummed. What would be the problem. Any recommendations please. TJonesReply
InyoPools Product Specialist Matt S. Posted: 12/4/2018
Hello Teresa - a humming pool pump motor that is not turning is a common sign of a bad capacitor. Testing for a bad pump motor capacitor is relatively easy. If the capacitor checks out, then you may have a bad phase winding. I would start troubleshooting the capacitor and move on from there.Reply
Tereasa Posted: 12/29/2018
Which motor will be compatible for my pump the pump I do have. SP3210Z2BER, PART#7-K56AA13A04-05 SERIAL#11213J2, FRAME#Y56Y, TYPE CXCP,HP 1.0/.12,VOLT 208-230,AMPS SF 8.5/1.5,RPM 3450/1725, HP 1.85 , CODE N, INSUL CLASS F, ENG/OD,AMB /C FFORM KJM. I am having a hard time finding this pump or compatible one TJonesReply
InyoPools Product Specialist Robert M. Posted: 1/2/2019
Hello Tereasa - It looks like you have a 1HP 2-speed Hayward Tri-Star pump. The replacement motor is part number SPX3210Z2BER. We recommend replacing the shaft seal when you replace the motor. The shaft seal is part number 5250-250.Reply
Tereasa Posted: 1/2/2019
What will be compatible to the SPX3210Z2BER/SP3210Z2BER ? hOW DO YOU LOCATE SPEED/ SINGLE OR 2 SPEED?Reply
InyoPools Product Specialist Robert M. Posted: 1/3/2019
The SPX3210Z2BER is the direct replacement for your current motor. Another option would be a variable speed motor. The variable speed model would be part number ECM27SQU.Reply
John Fitzpatrick Posted: 11/23/2018
I notice there was no impeller ring on this pump. I have an SP3007X10 Super II 1 HP. Should it have the impeller ring or not?Reply
InyoPools Product Specialist Robert M. Posted: 11/26/2018
Hello John - There should be an impeller ring on the Hayward Super II pump. You can view the part schematic on our Super II parts page. The impeller ring is key 7.Reply
ShaftSealHelp Posted: 11/17/2018
Great guide, really helpful! Could you let me know which shaft seal I would require for a Hayward Super Pump being used on a Salt Pool?Reply
InyoPools Product Specialist Patrick P. Posted: 11/17/2018
You would require this Hayward Super Pump Salt Water Shaft Seal.Reply
InyoPools Posted: 8/16/2018
Hello Lori - We have a guide titled "How to Replace the Governor on an A.O. Smith Motor". This would be the only content available that may help you reassemble the governor.Reply
Lori Posted: 7/15/2018
I used a wrench to hold around the governor to turn the impeller off and the springs fell off. We ended up taking off the governor, now in 4 pieces. Can you show me how to put it back on? Thanks!Reply
Anonymous Posted: 5/12/2018
This video was extremely helpful! Thank you for posting.Reply
Inyopools Posted: 10/13/2017
Takashi - No, water heated to 88-90 degrees would not damage your pump motor. It sounds like the bearings are going on your motor. This is usually due to the motor running dry for a period of time or failure to replace the shaft seal when a motor is replaced. The old shaft seal breaks down quickly and sprays the motor coils internally. If this is not the case, I’d talk to the supplier and see if they will replace the motor.Reply
Takashi Posted: 10/9/2017
Hi, I accidentally left my pool heater running for a week which heated the pool temperature to around 88-90 degrees. Now my pool motor makes a loud screeching noise. Do you think the water temperature ruin my motor? I just replaced the motor five months ago. Thank you.Reply
InyoPools Product Specialist Dennis R. Posted: 7/3/2017
Anonymous (shaft seal) - Thank you for your feedback. You are correct. The silver metal piece that is shown in the picture after the seal is removed, does have to be removed to allow the new metal piece to slide on. We do say this in the text, but it may be confusing with it not removed in the picture. I changed the picture.Reply
Anonymous Posted: 7/1/2017
Step 16 makes it look like the silver metal piece should remain on the impeller, but this piece is part of the replacement kit, embedded in the rubber/ceramic part with the spring. After some confusion, I pried this piece off using a small screwdriver blade. Then the kit part fit on perfectly. Now all is well, with a dry pump room floor for the first time this season.Reply
InyoPools Product Specialist Dennis R. Posted: 6/22/2017
Poolprobs - I know of now way to pressure check underground lines by yourself. Have you checked for a clogged impeller? That is one of the most common (and simple to fix) solutions to low water flow. See our guide on "How To Clean Out a Pool Pump Impeller".Reply
Poolprobs Posted: 6/20/2017
Since opening pool this year large amount of air bubbles coming from return jets. Pressure is steady 9/10 and color in pool is good, however it seems not enough suction from Skinner basket especially when trying to vacuum. Have changed vacuum hose, sealed o-ring, replaced pvc union at pump intake and tested for clog in Skimmer line with bladder hose and feeding snake through line. My water level is unchanged and no suds sucked on with soap water test. Is there a way to pressure test the underground lines myself? Otherwise I may be trying shaft seal replacement as last check? Not sure how else to better my suction?Reply
BBHY Posted: 6/4/2017
I just completed this whole process on my Hayward SP2510X15, It was working ok last winter, but this year I was getting bubbles coming through, The intake pipes seemed ok, so I bought the kit and followed your instructions,I'm happy to say it's back to working like normal. Thank you so much for the step-by-step instructions, I wouldn't have attempted this without them!
Reply
InyoPools Product Specialist Dennis R. Posted: 9/10/2016
NC Pool Owner - Replace the housing gasket with a new one. Check for cracks around the housing where the gasket is placed. Then take the motor out again and check that the shaft seal is seated completely in the seal plate and that the two pieces of the seal are placed correctly.Reply
NC Pool owner Posted: 9/7/2016
I replaced the shaft seal and still have dripping under the motor. I replaced the diffuser gasket and lunricated the housing gasket. At a dead end on what is going on.Reply
InyoPools Product Specialist Dennis R. Posted: 8/19/2016
PJP - The spring portion of the seal slides over the hub of the impeller and the white ceramic portion slides into the seal plate which is the side which is closer to the motor.Reply
PJP Posted: 8/19/2016
Which way does the white ceramic portion of the shaft seal face?Reply
InyoPools Product Specialist Dennis R. Posted: 6/30/2016
LeeInHbg - I haven't heard of chemistry causing bubbles. As you say, you could have a blown pipe or connection underground. It doesn't take much of a break to create a suction leak even underground. You might have to have someone come out and pressure test your suction lines.Reply
LeeInHbg Posted: 6/29/2016
I've been battling continuous air bubbles in the pump strainer which also make it through to the returns as a quite obvious stream. Have gone through all suggestions from replacing and lubing all o rings, snugging up gate valves, applying silicone to plumbing joints plus replacing all pump seals o rings and lid. Stumped. Had a pool professional out. He thinks the problem is a chemistry issue. He gets the same results with his stand-alone pump bypassing all my plumbing. Note though that I question his test scenario since his suction side hose was in my skimmer enclosure, albeit loosely. Is this possible? We use a non-chlorinated product that is hydrogen peroxide based - bioguard softswim. The only other cause I can think of is blown pipes. Given they are underground I can't imagine that much air could be entering though. Thanks.Reply
InyoPools Product Specialist Dennis R. Posted: 6/10/2016
Mike - Sounds like you are doing good with motors. Not sure what you mean by "a weep hole at the bottom of the impeller assembly". The only possible "gap" under the impeller might be in the housing gasket. You might pull the motor out again to see if the gasket is seated properly.Reply
Mike Posted: 6/9/2016
I'm on my second motor in 6 years. This time I replaced all the gaskets and seals but I'm getting a drip out of the weep hole at the bottom of the impeller assembly. I have a Hayward super pump. Any sugesstions?Reply
InyoPools Product Specialist Dennis R. Posted: 6/7/2016
peejmeister - I would just wipe each of the surfaces good with a soft cloth.Reply
peejmeister Posted: 6/7/2016
I received a shaft seal set that came in a zip-lock bag. I'm concerned that the person who placed the seal into the bag may have inadvertently touched one or both of the seal surfaces.Is there a safe way to clean off any potential finger prints, etc.? Rubbing alcohol, perhaps?
Reply
InyoPools Product Specialist Dennis R. Posted: 6/3/2016
Val in AZ - I would say that if your pool bubbles go away in 15 minutes, you are probably safe running the system. If you have a suction leak, the bubbles would not go away.Reply
Val in AZ Posted: 6/2/2016
Pump is appx 11 years old, doesn't leak anywhere. Pool has started having bubbles from the return jets when the pump starts up, they do go away after about 15 minutes. Replaced O ring on filter basket lid. Pressure is right where it should be. Any ideas?Reply
InyoPools Product Specialist Dennis R. Posted: 3/23/2016
danshoopty - I have not installed this type of motor. Try giving Jacuzzi a call at 450-250-4500. They should be able to help you.Reply
danshoopty Posted: 3/23/2016
I am trying to replace my pump motor on a Jacuzzi pump. I have the correct pieces installed where they should be and when I try to fit the pump into the proper position, the tabs around the ring will not go all the way into the motor housing with the large nut style retainer. Any advice?Reply