How To Replace A Pool Pump Impeller

WRITTEN BY: 

  3.46 out of 5 stars on 49 ratings
(Click on a star to add your rating)

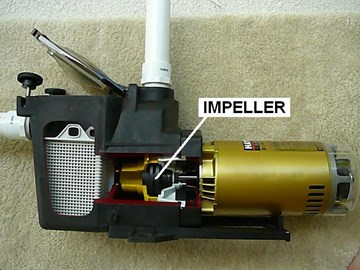
The location of the pool pump impeller is shown in this cut-away of a pool pump. The spinning action of the impeller when driven by the pump motor generates the water pressure in your pool system. Sometimes debris will get into the pump and will crack the impeller. In other cases the threads that hold the impeller to the motor shaft become worn causing the impeller to wobble and rub against the diffuser. This guide explains how to replace a bad pool pump impeller.

Please Click Here to View Pump Impellers 

Video

Step by Step

Top

Step 1

For a quick introduction, this picture shows the operation of the impeller. Water enters the center of the impeller. As the impeller is spun by the motor, a series of blades, like a fan, pushes the water to the outside edges of the impeller where it exits through slots to be collected by the diffuser. For an expanded explanation of how a pump operates click How A Pool Pump Works.

Please Click Here to View Our How a Pool Pump Works How-to Guide 

Step 2

The first step in preparing to remove your pump's impeller is to turn off all power to the motor. For maximum safety turn off the power at the circuit breaker to the motor - usually located next to the timer box.

Step 3

Next you will have to relieve the pressure that builds up in the pump during operation. To relieve pressure turn the relief valve on top of the filter counter clockwise. Water will spray out initally as you see the pressure on the pressure gauge go to 0 psi.

Step 4

To extract the motor pump assembly from the pump housing, first remove the four 9/16" bolts that bind the motor pump assembly to the housing. Keep track of the washers. Note: Some Hayward pumps have six bolts.

Step 5

Pull the assembly apart from the housing.

Step 6

After the assembly is out, you should see the diffuser and diffuser gasket on the end of the assembly. If you do not see the diffuser or its gasket, check inside the housing.

Step 7

If the diffuser came out with the assembly, pull the diffuser off the assembly. It should snap off easily and expose the impeller.

Step 8

To remove the impeller you will twist the impeller off in a counter clockwise motion. However, the impeller cannot be freed from the motor shaft without first securing the motor shaft.

Step 9

Move to the other end of the motor shaft in the back of the motor assembly. Take off the two screws that hold the back cover onto the assembly.

Step 10

You will see the motor wiring and capacitor. To gain access to the end of the motor shaft you will have to remove the capacitor. Capacitors store power. To avoid a possible shock, lay a screwdriver across the two leads to short out the capacitor.

Step 11

Unscrew the single screw that hold the capacitor in place and push it out of the way. No need to disconnect the capacitor from its leads.

Step 12

Place a 7/16" wrench on the flat end of the motor shaft to secure the shaft from rotating. Note: Securing the motor shaft on other non-Hayward type pumps varies. Some pumps provide a slot on the end of the shaft to secure with a screwdriver. This slot is often accessable by simply taking off the end cap of the motor.

Step 13

At the impeller end, twist off the impeller counterclockwise. You may have to use a strap wrench to gently free up the impeller.

Please Click Here to View Our How to Remove Stubborn Pool Pump Impellers Blog

Step 14

With the impeller off you will see the motor shaft seal. One half on the impeller and the other half in the seal plate on the shaft. If you have not replaced the motor shaft seal and the pump is several years old, this may be a good time to replace this seal. For instructions on replacing this seal click How To Replace a Motor Shaft Seal. If you decide not to replace this seal, continue on to the next step.

Please Click Here to View Our How to Replace a Motor Shaft Seal Guide

Step 15

Grab the seal on the impeller and twist it off. Make a note of how the seal is positioned on the impeller so you know how to place the new seal. It is possible to place this seal upside down. Note: You may have to also have to remove the metal collar if the new shaft seal also has one. Several people have written in saying that the new seal won't fit because they were trying to place the new collar on top of the old one. DO NOT touch the bearing (top) surface of the seal. It can corrode the surface.

Step 16

Push the half of the seal that you just removed onto the new impeller. Make sure the new seal on in the same position noted above. Again DO NOT touch the bearing surface of the seal.

Step 17

With the wrench securing the back end of the motor shaft, screw the impeller back onto the shaft (clockwise). Hand tight is sufficient.

Step 18

Replace the capacitor on the backside of the assembly. Make sure the plastic strip is in place between the clip and capacitor so that the capacitor does not short out.

Step 19

Replace cover and secure with two screws.

Step 20

Inspect the diffuser gasket for wear. Replace if required. Put a thin coat of lubrication on the gasket.

Please Click Here to Our Main Pump Parts Page

Please Click Here to View O-Ring Lubricant

Step 21

Snap on the diffuser - no screws are required. Ensure that the part of the diffuser labeled "TOP" is aligned with the "TOP" labeled on the seal plate.

Step 22

Slip the motor assembly back into the housing.

Step 23

Replace the four bolts evenly. If bolts were numbered 1 though 4, replace bolts in this sequence - 1, 3, 2, 4 - to ensure that the motor is set properly inside the housing. Loosely tighten bolts in this sequence, then go back and tighten them down again in this sequence. If pump has 6 bolts, replace bolts in this sequence - 1, 3, 5, 2, 4, 6.

Step 24

Prime pump by removing strainer lid and filling strainer with water. Replace lid.

Step 25

Reset circuit breakers and start pump.

Step 26

Close the relief valve on top of the filter, after the air is purged and water starts to spray out of the valve.

Comments

Top
(41 to 53 of 53)

 Posted: 6/9/2012 

Your page on how to clean the impleller just saved me buying a new pump. I have owned a pool for 25 years and thought I had been through it all. I was wrong. Thank you again!
 Reply

 Posted: 6/6/2012 

pump is making loud noise/I have a 1-1/2 hp power flow Matrix pump...had it for 4 yrs.I bought it off my boss.he had it for 2 then now I have it.please help
 Reply

InyoPools Product Specialist  Posted: 6/5/2012 

impeller - An impeller works against the water so it is self-tightening. Hand tightening is sufficient. You can break the impeller if you over tighten it with a wrench on the impeller end.
 Reply

Anonymous  Posted: 6/4/2012 

Can you over tighten the impeller to the shaft how do you know when you have over tightend?
 Reply

 Posted: 5/24/2012 

Wow I almost bought a new pump, unclogged the propeller in 5 minutes!!
Thank you!

 Reply

Anonymous  Posted: 5/22/2012 

Thank you so much for this information!! Our impeller clogged up & only hummed when we turned the motor on. Your instructions were so easy even a girl (i.e. me) can do it!! Thanks Again!!!
 Reply

 Posted: 4/28/2012 

Excellent information. Your how to instructions definetly saved me time and money, and avoiding costly wrong installation errors.
 Reply

InyoPools Product Specialist  Posted: 4/28/2012 

John - This is a problem on our side. We are in the process of correcting this printing issue but in the meantime try this. Copy the 6 six pages, move them to Word, and print the guide from Word. That has worked for me.
 Reply

Anonymous  Posted: 4/27/2012 

How to replace a pool pump impeller, pages 1 thru 6: Only page 1 is viewable in print review and the only page that prints. Pages 2 thru 6 print but none of the information viewed on the screen for these pages prints. Can you tell me why or if I am doing something wrong, please. Thanks
 Reply

Anonymous  Posted: 1/2/2012 

People, save some money and replace your pool pump impeller. Thanks for this information my pump is up and running.
 Reply

Anonymous  Posted: 11/6/2011 

Thanks very much, impeller was clogged. Took me 2 minutes.
 Reply

 Posted: 10/6/2011 

saved me a lot of money and was very helpful.
 Reply

 Posted: 6/21/2011 

Thanks for your help....
 Reply