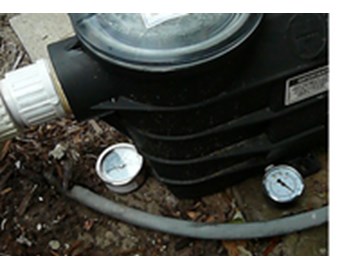
When pool water flows through the recirculation system, resistance to that flow is created in the pipes, the valves, the fittings, the pool filter and basically anything in the flow path. That resistance is called Total Dynamic Head, TDH, and it has a large impact on determining the size of your pool pump and filter. Your pool's TDH was estimated when your pool was first installed. This guide shows you how to accurately measure the TDH of an existing pool system to verify that your pool pump and filter are correctly configured.
Click here to view back-mounted pressure gauges.


Mark R Posted: 4/19/2020
This was a very enlightening line of discussion. First I was not aware that the drain plug that is on the side of a Hayward Super-pump is actually tapped into the pressure side in the pump impeller area and that the front is considered a suction area! It was designed that way to drain each area however if they also did it to calculate the performance of the pump, if needed, they have not said much about it at least that I have seen in normal consumer pool sites or their web page. Having said that what a GREAT bit of info this is, really really GREAT. The heck with the gauges I am going to put a sensor in each port and use the digital signals from them (along with other sensors) to make all kind of valuable calculations about flow rate, THD and others. This really re-ignites my thinking about digital control and optimization pool systems i.e. pump speeds -vs- performance, evaluating any changes in plumbing flow optimization as well as determining the effect of changes in any aspect of the system that effects flow be it solar heaters on the roof or different configurations in plumbing design (change 1 fitting) and determine instantly its effects on flow etc. I have never seen a Hayward digital control system but they must use this data too. I have thought long about ways to do various things but I was just not sure that these two areas had that type of differential in pressures (feel kinda silly for not seeing it already) or where they were actually tapped into and I not only learned that but a good start on the rudimentary calculations as a starting point for programming! Now I just realized the integration of the current sensors to also use the changes in current (amperes) and see the effects on power consumption changes .... I am really excited, THANKS.Reply
Chris - Pentair Intelliflo 2 VST Posted: 8/28/2018
A flow gauge? Ok...I thought the gauges in this article were the recommended way to measure flow? I'd of just purchased the flow gauge instead. Thanks,Reply
InyoPools Posted: 8/27/2018
Hello Chris - The head changes proportionally to the speed squared. Let's say you reduce the speed by 50%. This means that the head will be 25% of the full speed head. However, we would recommend installing a flow gauge on your system. A flow gauge is easy to install and gives you the most accurate reading.Reply
Pentair Intelliflo 2 VST Posted: 8/27/2018
I just put in the two gauges as described, but I am still having trouble determining the GPM. I am getting different TDH for various RPMs I set the pump for: The second reading I am posting for VAC and PSI is after the multiplier. RPM: 3450, VAC: 29 (33), PSI: 21 (49), TDH: 81 RPM: 2350, VAC: 16 (18), PSI: 13 (30), TDH: 48 RPM: 1500, VAC 7 (8), PSI: 8 (19), TDH: 26 Q1: Shouldn't TDH be constant across all RPMs? Q2: I'm not clear how to read Pentair's Performance Chart for the Intelliflo 2 VST. For instance, the TDH values for 2350 and 1500 RPMs do not intersect with the 2350 and 1500 performance curve lines. Unfortunately, Pentair doesn't seem to publish an easy chart like that of which you illustrated above from Hayward. Perhaps I am doing something wrong or misunderstanding how I should be reading the chart. Thank you.Reply
InyoPools Posted: 8/16/2018
Hello Danny - The two drain plugs are located on the lower left side of the pump housing if you are looking at it from the front of the strainer. The plug closest to the front would be used for the vacuum gauge. The one further back would be used for the pressure gauge.Reply
InyoPools Posted: 8/15/2018
Hello Danny - Yes, a clean filter is ideal if you want the most accurate reading.Reply
Danny Posted: 8/10/2018
Won't the cleanliness of the filter also affect the different pressures? Seems like any obstruction could skew the readings. Perhaps one value when the filter is clean and another before the filter is ready to be cleaned?Reply
Danny Posted: 8/8/2018
Where are the ports located on the Hayward EcoStar to test the TDH with gauges? I can see a pair below the strainer, but not sure where the other port is at.Reply
Inyopools Posted: 5/8/2018
For the gauge method to work well, it's best to run the pump on high speed. The feet of head will change with the speed. The head changes proportionally to the speed squared. Let's say you reduce the speed by 50%. This means that the head will be 25% of the full speed head.Reply
AJB Posted: 5/8/2018
Wouldn't the speed you were running your pump at effect the #s? Should I run my pump at full power when I am taking these readings?Reply
Inyopools Posted: 3/26/2018
Hello JD - As long as the filter is clean, the filter gauge should give you a good enough reading to get you in the ballpark.Reply
JD Posted: 3/26/2018
The pump I wish to test is a Astral Maxim 5 hp it only has a drain plug on the suction side. in this case can I use the pressure reading from the sand filter?Reply
Cosme Posted: 7/8/2017
Excellent article and easy to perform.Trick:
To not dismantle the pump I had used suitable nipple.
Thanks!
Reply
InyoPools Product Specialist Dennis R. Posted: 12/2/2016
Todd - You need to take the PSI reading at the pump port.Reply
InyoPools Product Specialist Dennis R. Posted: 12/2/2016
Dynamic Head - Like you say, I don't think this is a problem for the amount of time you will have the gauge attached.Reply
Todd Posted: 11/29/2016
For PSI, can I use the reading off the filter gauge or do I need to connect a separate gauge at the pump?Reply
Anonymous Posted: 11/29/2016
Hi. Thanks for this information. It is very useful. For the vacuum gauge, is there one that you recommend? I've been looking and can't seem to find one that will work for pool applications. I actually bought a SPAN 5ULR0 vacuum water/air gauge. However, on the box it states "WARNING: Do not use this gauge for applications involving strong oxidizing agents including (but not limited to) chlorine, nitric acid and hydrogen peroxide. These materials can combine explosively with the liquid filling which can cause property damage and personal injury. Misuse of product may cause explosion and personal injury. Read ANSI-B40-1 and apparatus installation/operation instructions before using." Um....should I be worried? I mean, it will not be permanently connected and will only be used for several minutes to record the gauge readings. Thanks in advance!Reply
InyoPools Product Specialist Dennis R. Posted: 7/5/2016
Teflon tape - You are correct. Teflon tape should not be used for sealing connectors that have O-rings. I've pulled this out of other guides but missed this one. Thanks for your observation.Reply
Anonymous Posted: 7/5/2016
In step 8 the teflon tape is being wrapped around the threads of a union. The union should seal by a gasket/O-ring and not by those threads; that could cause a suction leak. Sorry for nitpicking.Reply
InyoPools Product Specialist Dennis R. Posted: 4/29/2016
eb1 - I would use water pressure gauges since we are measuring water pressure.Reply
eb1 Posted: 4/28/2016
I will attempt to measure my pool TDH using the gauges method that you have described. I will purchase the two required pressure/vacuum gauges but some manufacturers clearly spec their gauge unit as being water pressure only or air pressure only gauge. Which type should I purchase for your TDH measurement method?shall I used air pressure gauges or water pressure gauges for
Reply
InyoPools Product Specialist Dennis R. Posted: 3/7/2014
dell - Yes. This is a good idea. You should be able to find adapters at a hardware store to attach a short hose to the gauges and pump drain ports.Reply
dell Posted: 3/1/2014
since pumps are not always installed with unions, can a short hose be installed with a threaded by barb fitting on each gauge for easy testing?Reply