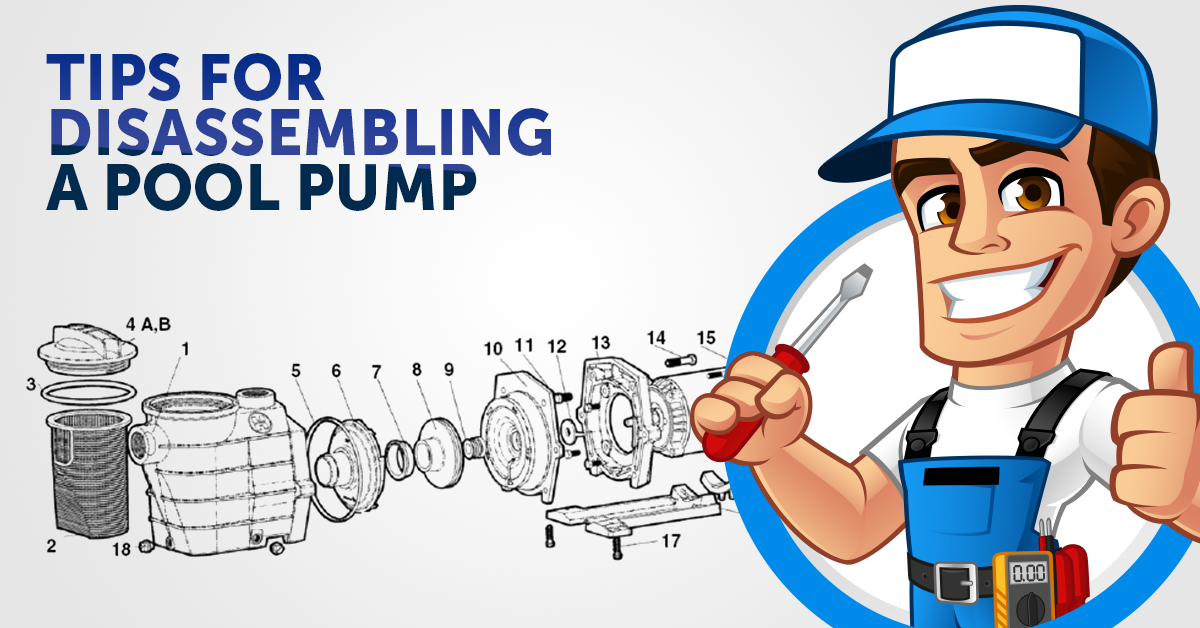
We here at INYO pride ourselves in being upfront about pool and spa maintenance and being more than willing to help newcomers, and even seasoned vets, figure out how to work on their pools. Many of our how-to guides, articles, and videos focus on your pool pump. We discuss changing the impeller, maintaining your gaskets, and changing the motor. In those steps, we invariably guide you through how to take apart your pool pump. A few screws there, a couple of screws here, and it is all done. But in all the years we have faced one fatal flaw with these guides, and that’s not all pumps are built the same.
So, with that being said, this article will show you how to disassemble a pool pump—hopefully showing you the quirks of some designs, as well as tips and tricks for dismantling some of the trickier parts of the pump.
For example, we have a “How to Replace Your Pool Pump Motor” guide that shows a Hayward Super II being disassembled and reassembled. The Hayward Super II is a popular pump that has pretty much a standard design for a pump, except it uses a wear ring. This little piece pictured is a cuff that sits over the impeller opening. The wear ring is not entirely unusual for a pump to have in its design, but it is uncommon enough to cause someone to be unsure what it is when they come across it.
Well, throughout the years, the homeowners who are following this guide as they take apart their pump (that is not a Super II) will call in a panic trying to figure out what this part does and how to order a new one, fearing they misplaced it when they took it apart, or the ring just disintegrated because of its age. So, to ease their worries, we ask for their pump model so we can show them a parts listing that shows there should not be a wear ring in their pump.
So, with that being said, this article will show you how to disassemble a pool pump—hopefully showing you the design quirks, as well as tips and tricks for dismantling some of the trickier parts of the pump.
Every good craftsman should know his subject inside out. And after you read this article, I hope to have you able to break down and slap together your pump with the same proficiency as a marine and his carbine. Let’s do it.
The Pump
The two main components of a pool pump are:
- Wet End (that includes the strainer, pump housing, and all the plastic bits inside) and the other part is the
- Electric Motor
The pump is the heart of your pool, making sure water is turned over, filtered, and sanitized for safe swimming. Luckily for us, disassembling a pump is a little less complicated than heart surgery. So, without further ado, let’s crack this bad boy open.
How to Separate the Pump Housing from the Motor Mounting Plate
Pump Housing
Associated how-to guides: (Fill in WP)
Almost every how-to guide (bearing strainer lid and motor capacitor) involves opening the main pump housing. The pump housing is the main hull of the pump. It contains all the impellers and diffusers and provides a mount for the motor itself.
There are two types of pump housings found on standard pool pump designs – the bolt-on housings (like the one found on the Hayward Super Pump) and the locking clamp style (found on the Pentair Challenger). Most of our guides thoroughly cover the bolt-on ones but let’s dig into a few tips to help you crack open both types.
Bolt-on Pump Housings
Tip 1: For calcified (white crusty) bolts, spray CLR cleaner or simply lemon juice on the bolts. Let it set then use a socket wrench on the bolts. Use a steel wool pad to remove as much of the build-up as possible between the soaking and the wrench.
Tip 2: For rusted bolts, use a silicone-based lubricant spray, like Liquid Wrench, to free bolts before using the socket wrench. For heavy rust, apply a dose of lube, let it sit, use a steel wool brush, then apply another set of lube and let it soak before taking the wrench.
The most common pumps with the bolt style are Hayward Super Pump, Hayward Super II, Hayward TriStar, Hayward NorthStar, Pentair WhisperFlo, Pentair SuperFlo, and Jandy Stealth, Plus HP, Sta-Rite Max-E-Pro and the PureLine Prime.
Band Clamp
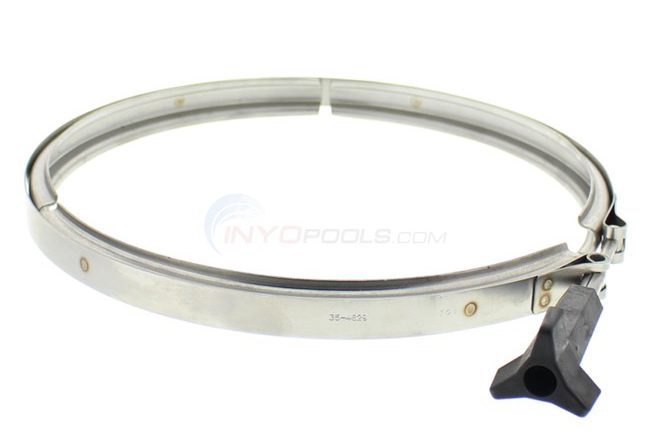
A band clamp is a metal C-ring tightened by a knob to crimp the pump housing and mount plate. The band clamp is notorious for being brittle and/or stubborn. Brittle and stubbornness are a dangerous combination. When working on one of these, you must find the sweet spot between forcing a stubborn part and knowing the breaking point.
By the time you need to crack open the pump, it will like be years after the initial installation. Between service, guck and grime have molded onto the pump parts, sticking them in place. This can also mean rusted bolts, grimy screw threads, and an oxidizing band ring.
Tip 1: Knob Won’t Turn
Spray oil or silicone-based lubricant on the bolt threads and let the application soak in for a few minutes. A second application may be necessary for especially grimy threads. Simple WD-40 will work, but a few of our techs have had better luck with the silicon-based Liquid Wrench.
Also, petroleum-based lubricants can damage O-rings. Any seepage on the clamp ring may harm the large housing O-ring.
Tip 2: Clamp Ring Is Stuck on Housing
So, we have managed to get the clamp ring bolt unscrewed, but the clamp is stuck to the pump housing. It’s not glued-on, but probably just old and stubborn. Here are the steps to take in that case:
Take the Head of a screwdriver, and tip, and insert it between the ring and housing.
Wiggle the screwdriver to loosen the clamp’s grip. Repeat this around the circumference of the housing (reach permitting).
Popular pumps: Pentair Challenger, Sta-Rite Max-E-Pro, Dura-Glas, Dura-Glas II, and American Products Ultra Flo.
Diffuser
Applicable how-to guides:
Your diffuser is designed in one of two ways. Either it is screwed into your seal plate, or there is a set of tabs that keeps it from spinning but doesn’t actually “hold” in place. The tabbed diffusers have no real trick. Instead, they sit relatively free on the seal plate to prevent it from spinning. If the diffuser is “stuck,” use a screwdriver to loosen the grip.
When replacing the diffuser, be mindful that the diffuser is marked with a “Top” that needs to be pointing towards the discharge. Some diffusers’ designs try to make it foolproof by making the tabs various shapes to prevent them from being improperly installed.
Tabbed diffuser pumps: Hayward Super Pump.
Diffuser Screws
In this scenario, you have jammed or stripped the diffuser screw. The diffuser screw is anchored into the seal plate, plate it extra important not to damage the seal plate threads, or you’ll need to replace the seal plate as well.
Tip 1: Clean and Lube Screws
Apply a cleaner, like CLR or lemon juice, if you suspect calcium build-up is the material sticking to the screw. Next, spray a generous application of spray lube, let sit, and remove the screws.
Tip 2: Break Off Diffuser to Save Impeller and Seal Plate
If all of the above won’t work and you fear fiddling with the screw, more may strip the screw threads in your housing and break the diffuser. This is Plan Z on the list.
A diffuser is a lot cheaper than a seal plate. If you strip the threads on the plate’s diffuser screw holes, there is no way to screw a diffuser. This isn’t so much a fix as it is a business decision. The preferred method is an angle grinder to help you shear the diffuser without striking the impeller.
Impeller
Impellers are the finned disks secured to the motor shaft, turning the spinning motor force into water pumping action. The modern impeller designs include the screw-on impellers and the lock screw.
Threaded Impellers
Tip 1: How to Stop an Impeller from Spinning While Unscrewing an Impeller
A big part of impeller questions is how to stop the shaft from spinning. Use a 7/16″ wrench to hold the shaft in place, and split you unscrew the impeller.
Tip 2: Impeller Won’t spin – Strap Wrench
OK, so the shaft is isolated, but the impeller won’t unscrew. Chances are it is not going to unscrew your hand. Years of grime and tightening from water compression will make sure of that. A strap wrench is one of the safest ways to remove an impeller without damaging the equipment.
A strap wrench is a tool that allows you to add leverage without using a metal wrench.
Tip 3: Impeller Won’t Unscrew – Teflon Tape and Channel Locks
The challenging part about using metal tools like channel locks on a plastic impeller is the possibility of scoring or breaking the part. When attempting to torque an impeller, the teeth of the channel locks will dig into the impeller, possibly leading to chipping or a break.
Do two to three turns of Teflon tape around the impeller; this allows you to use a tool with a less abrasive grip. Teflon tape is used on plumbing to secure threaded sockets; it’s grippy and cheap.
To prevent scoring, apply two to three turns of Teflon tape. This will prevent slipping and allow the tool to grip the impeller without digging into the plastic. Also, you’re less likely to be bearing down to maintain a grip on the impeller to turn it.
Tip 4: Impeller Still Won’t Budge – Hammer and Screwdriver
Using a screwdriver and hammer, leverage the screwdriver against the vane. Then, lightly tap the side of the screwdriver’s handle. Hopefully, a few whacks will pop it loose.
This is one of the riskier methods on the list because of the probability of unintentionally breaking the impeller. But if all other attempts have failed, this last-ditch effort to get the impeller off in one piece is the only play left in the playbook. A strike that is too heavy can crack a vane or fracture the impeller.
Tip 5 – Break the Impeller
If your previous attempts to remove the impeller have failed or ended in a broken impeller, then you can break out the hammer or angle grinder. This method is most helpful for someone who is planning to replace the motor as well. Once the impeller face is removed, the old motor can be removed from the seal plate and motor mount. You do not need to fiddle with the remaining impeller nub on the shaft threads.
Impeller With Lock Screws
Tip 1 – Impeller Screw Head is Stripped
When a screw’s Head is stripped, it prevents the screwdriver from gripping the Head for torquing the screw. An inexpensive way to give your screwdriver grip is to press a rubber band between the screwdriver and the Head. The rubber provides traction to the screwdriver, gripping the screw head. This is a quick tip, and it only costs you a rubber band.
Tip 2 – Stripped Impeller Screw
If your impeller lock screw head is stripped, there are only two routes that I have seen work. Firstly, retap the screw. If you need a good video on how to tap the screw, watch this great
how-to made by (INSERT LINK AND CREATOR)
But if retapping the screw fails, the only option I have come across is to break or shear off the impeller face. An angle grinder is ideal because you can fit the blade between the impeller and seal plate to cut the impeller at the stem.
Motor Mount
This plastic piece is the flange that connects the motor and seal plate. The motor is bolted with four bolts; the only thing left is to hold the motor in place.
Tip 1: Clean and Lubricate the Bolts
Cleaning the bolts can ungum the bolts making removal easier. Use CLR and your spray lube to loosen the mounting plate bolts.
Apply a generous dose of any of the above chemicals. Let it sit, then brush with a steel wool pad. The chemicals should penetrate the calcification and corrosion encrusting the bolts, and the steel wool breaks it down and wipes it away.
Tip 2: Lube Spray
If the cleaning didn’t budge the bolts, apply spray lube and let it soak. The lubrication coupled with the pre-clean usually gives the bolts the initiative they need to get going.
Shaft Seal
The most crucial seal of them all! The shaft seal prevents water from seeping into your electric motor.
Tip 1: “My new shaft seal won’t fit over my impeller stem.”
Use a set of pliers to remove this crimped piece of metal on the base of the impeller; it’s a piece of the old shaft seal.
We get this call many times from customer who thinks they bought the wrong shaft seal. In reality, they have the correct part, but this shaft seal cuff stayed on the impeller from the old seal. This makes it almost impossible to fit the new shaft seal over the impeller.
Tip 2: How does my shaft seal fit into the pump?
It depends on the shaft seal design, but the figure (TO THE LEFT) shows.
A shaft seal is made of two parts – the spring-loaded side called the Head and the white ceramic piece called the seat. The orientation of the shaft seals the pump determined by the heat. If your Head sits in a stainless steel cup like FIGURE A, it is set in the seal plate, with the white piece fitting into the impeller’s back. If your seal’s Head resembles the Head in FIGURE B, the spring side will fit over the impeller stem with the white ceramic Head fitting in the seal plate. Figure B is the motor common.
Figure A, Common Pumps: Hayward Super Pump, Super II, TriStar, NorthStar; Pentair Challenger, SuperFlo; Jandy Stealth, Plus HP.
Figure B, Common Pumps: Pentair WhisperFlo, American Products Ultra-Flo, Polaris Booster Pump PB4-60 (1994-2011), and Waterway Pumps.
Tip 3: How Do I Extract the Shaft Seal
Figure A: A flat head screwdriver in between the seat ring and lightly prying it out.
Figure B: Remove the seal from the motor, flip it upside down and place an inch-wide pipe or adapter on the base of the shaft seal. With the palm of your hand or a tool, bump the pipe until the head pops out of the seal plate. The shaft seal heads are siliconed into place.
Lid
The pump lid should be easy to remove as it gets the most fiddling for maintenance.
For Stuck Filter Lids
Tip 1: Strap Wrench
Tip 2: Stick and Mallet
Tip 3: Stick and Mallet
Tip 4: Teflon tape vice grips

while installing a new pool pump motor one of the bolts that secure the motor to the housing will not tighten and the brass insert spins around any ideas how to remove the bolt Ive tried everything
What’s the make and model of the pump housing?
After removing the 6 nuts from the studs, iam having trubble removing the pump housing. It Will only open up about a quater of an inch. How do I separate these two parts ?
What is the make and model of your pool pump?