Every 5 - 7 years you will have to replace the sand in your sand filter. The sand actually wears out. The sharp edges of the sand particles become worn and rounded and don't capture the contaminates as well. Also, the sand will start to ball up or the water will create channels through the sand. You will notice that your pool water is not as clean or the interval between required backwashes is shorter. This guide shows you the steps required to replace the sand in your pool filter.
Click Here to View our Available Sand Filters
Click Here to View Replacement Sand Filter Parts


Brian Posted: 7/25/2020
I was wondering, after you finish adding the new sand to the filter, do you fill the rest of the filter with water? I saw another site say to do so, but these instructions seem to leave that out. Which is correct? Thanks.Reply
InyoPools Product Specialist Matt S. Posted: 9/3/2020
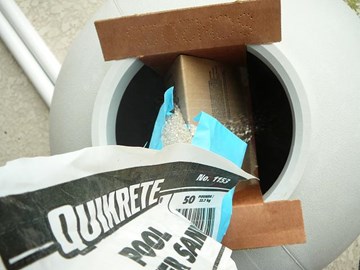
You can do that. Another tip, before adding sand, fill the tank halfway with water, it will help prevent laterals from cracking as you pour hundreds of pounds of sand onto them.Reply
Josiah Lester Posted: 6/5/2019
Does it matter if your sand filter directions say to fill half the tank full of water then put the sand in it. If you do it in reverse does it matter?Reply
InyoPools Product Specialist Matt S. Posted: 6/6/2019
Part of the point to adding the water before the sand is to soften the blow the laterals take when you pour hundreds of pounds of sand onto them. If you do not do it this way, there is a higher chance of busting a lateral; which means you have to remove all that sand to repair it.Reply
Mark Posted: 5/31/2019
Is there any benefit to replacing just the sand that's above the laterals? We just bought s house with a 20x40 pool with a Hayward sand filter. Not sure when it was last changed. Seems simpler to get the multiport off and just empty enough sand down to the laterals, then replace that amount, than do the whole tank right now.Reply
InyoPools Product Specialist Matt S. Posted: 6/6/2019
That old dirty sand is going to be jumbled up and mixed with the new sand during backwash cycles, so it is going to put your sand age back a step from the get. If you are going to take the time to dig out 185 pounds of sand, why not just get out the last 20 or so?Reply
James Posted: 11/14/2018
Hi JKM, I find that the bottom of my pool gets covered in dust / fine sand within 2 days of a clean. Based on comments in here I have checked all the laterals and downpipe for damage but all seems ok. Is there any other potential problem? I have a Astral E650 media filter, which looks like it is no longer available. It came with the house. ( I have also recently replaced the sand) Your help is really appreciated. Thanks JamesReply
InyoPools Product Specialist Matt S. Posted: 11/27/2018
Hello James - is your pump and filter draining when the pump turns off? If so, sand could be backwashing from the filter and pump, then through to the skimmer and main drain. This is a commonly seen with DE filters as well.Reply
Matthew Posted: 9/18/2018
Hello JKM - using the waste port in that way is not possible because the valve plumbing routing is not designed to do that. The waste option is only for water disposal. The spider gasket is included on key 9 on this parts listing: Pentair - Pac Fab Top Mount 1 1/2" 26-1124, 26-1130, 26-2506Reply
Rob Brewer Posted: 3/19/2019
Clarification- While the step seems to say WASTE, the previous step says to turn to BACKWASH.Reply
JKM Posted: 9/16/2018
Why can't I pump the sand out of the tank by using the waste port selection on the top mount unit? What is the O ring reorder number for my SD 80 Pentair?Reply
InyoPools Posted: 9/12/2018
Hello Geoff - It sounds like you may have a cracked lateral or standpipe. Unfortunately, those parts are no longer available for the GM-245. You'd want to look at a complete replacement when the time comes. We'd recommend something like the Hayward S244T.Reply
Geoff Posted: 9/10/2018
Recently I'm seeing a small amount of sand in each backwash waste cycle (once per week) and I'm unsure of what's causing it. It's a 25 year old Hayward GM-245 filter and the sand was replaced about 10 years ago. No pump change or pressure change has occured and it has been working well up until now? Do I have a bad lateral? Am I better to replace the entire sand filter given it's age or can I even get a replacement lateral?Reply
Matthew Posted: 8/20/2018
Hello Phil - a raise of 1-2 PSI on a 25-year-old filter is nothing to be concerned about. As we say in other comments, PSI for each pool is different from pool to pool. Comparing PSIs between pools is an apples and oranges situation. But if the filter was working fine for almost 3 dacades then there is nothing to be concerned with.Reply
phil Posted: 8/19/2018
Are the inyopool comments on pressure specific to a given filter?: I have read/heard various opinions on pressure readings after changing sand, with the most common guideline being that your baseline will be the initial reading (assuming the installation is correct). My Tagelus filter holds 250 lbs of sand. When it was first set up by my installer 25 years ago, the baseline reading was 26 psi. I just changed the sand (correctly, thanks for the excellent guidelines) and my new reading is 27-28 psi. This did not concern me until I saw the numbers (as low as 10-15 psi) quoted here. Do I have a problem?Reply
InyoPools Posted: 8/16/2018
Hello Joanne - If water is bypassing the filter and returning to the pool when the valve is set on backwash, you may have a bad spider gasket. I would open up the valve and check that gasket first. After that, you'd want to possibly replace the sand or standpipe/lateral assembly.Reply
Joanne Posted: 8/10/2018
I have a problem. No matter what setting I have my valve on, the water seems to go back into my pool. It’s so cloudy and even when I vacuum, it’s dirty again the next day. Do you think this is a sand problem or is there another reason that the water could be bypassing the sand. I am wondering if it could be the valve cracked.Reply
Inyopools Posted: 7/18/2018
Hello Don - You can move the the standpipe back and forth until it lowers enough for the valve to fit correctly. If that doesn't work, you'll need to remove the sand and reinstall the standpipe.Reply
Don Posted: 5/27/2018
Thanks for the great instructions. I'm in the process of changing my filter sand and I've just completed pouring the new sand in. It looks like my standpipe is sitting about 1/2" too high to get the valve back on correctly. I assume some sand is sitting under the laterals. Is there an easier way to fix this than removing all the sand, re-seating the standpipe and then putting the new sand back? Thanks!Reply
Inyopools Posted: 3/21/2018
If your laterals only have slot openings on one side, they should be facing down.Reply
Anonymous Posted: 3/16/2018
When replacing the laterals do the slot opening go up or down to the bottom of the filterReply
Inyopools Posted: 12/27/2017
Susanne - If you have unions on the pipes to your filter, or if you have an above ground setup, you could change your filter sand in an hour or two.Reply
Susanne Posted: 12/21/2017
How long should it take to undergo this procedure?Reply
Inyopools Posted: 11/2/2017
Deryk - If your laterals are that high up off the bottom, you are losing a large part of your filtering capacity. Check the parts list for your filter. The length of the standpipe will vary with the size of your filter by 7". And I would use any sand that is labeled for filter use.Reply
Deryk Posted: 10/26/2017
Great instructions. I am a new pool owner and decided that I would change the filter sand while I have it winterized. I am glad I am doing it but I have 2 questions. First, the pipe and laterals in my filter were no where close to sitting on the bottom of the filter, more like 10 inches from the bottom so about 10 inches of sand below and above. Setting it on the bottom will leave the center pipe about 10 inches short. Is it fine to reinstall the same depth or should I make the center pipe longer? Second question, is all filter sand the same or do I need to find a certain coarseness? I have seen different options and confused about which to go with. Thanks.Reply
Inyopools Posted: 10/12/2017
Jethro - Try using WD40 on the screws and tap them gently with a screwdriver and hammer to loosen them up. Your filter gauge will typically read between 10 - 15 psi after changing the sand.Reply
Jethro Posted: 10/7/2017
Hello Bllinger. Thanks for the site's info. I've moved into a house with an existing pool and so am learning everything from scratch. I doubt whether the sand have ever been replaced and the pressure guage is so old and worn, it's unreadable and most likely does not work. I need to replace the sand (thanks for the steps to do this) but the screws holding the cover are not able to undo so I'm thinking I will have to cut these and get new screws?I will get a new guage too and when I do, what pressure should it ideally read? Thanks
Reply
InyoPools Product Specialist Dennis R. Posted: 7/19/2017
Tarner - If you are unsure of the age of the sand, try replacing the top 6" and see if that helps. If not, I would replace all of the sand.Reply
Tamer Posted: 7/17/2017
Hello, The gauge on my filter reads 19-20 PSI with or without backwash, the sand in the filter is probably 3 years old as I have a sticker on the filter that shows 2014 ( I am new to the house)...I have had recommendation from my chemical supplier to change the sand as I have been told the pressure should be around 10 PSI...would this make sense?...Reply
InyoPools Product Specialist Dennis R. Posted: 7/13/2017
Jessica - Many people use a screw extractor method. Here is a link to a video on "How to remove a damaged screw with a broken screw extractor".Reply
Jessica Posted: 7/11/2017
Great guide! Our laterals were not the rotate up kind, ours twisted off the pipe one at a time. Our only problem was one of the screws holding the clamp on was Stuck! No amount of WD40 or elbow grease budget it. Our local pool store said there was no way to get it loose, we'd have to cut it. We have a rotary cutter so that made it easy, although it did melt the plastic some. Got it back together ok but it was very tough. We will have to replace the clamp next time we change the sand for sure! Any tips for removing stuck screws like that?Reply
InyoPools Product Specialist Dennis R. Posted: 7/10/2017
Dan - Your problem is probably related to what you did when you changed your filter's sand. Go back through the process again. Look for actions that could have blocked return flow. I don't think you have to actually take the sand out but check the rest of the process against the guide. Did you shut off any return diverter valves? Did you leave at least 6" between the top of the sand and the top of the tank? When you shut off your pump, do you get a backward surge of water from the filter to the skimmer? This would indicate a suction air leak before the pump. Check that the O-ring on the pump's strainer cover is good and not causing a suction leak.Reply
InyoPools Product Specialist Dennis R. Posted: 7/10/2017
MKitch - Give us a call at 407-834-2200 and talk to one of our service reps. The service rep will probably ask for a picture to identify the filter.Reply
Dan Posted: 7/9/2017
Hi. We just changed the sand in our filter. After some back wash and rinse we try to start the pump with the ordinary filter function. But the pressure increases way to much.and the water is leaking out from the top. It wasn't like that before. Do you have any idea what.could be.wrong?Reply
MKitch Posted: 7/8/2017
My sand filter has 2 labels on the outside which are faded past being legible. How do I tell what sand filter I have? I have been in my house 6 years and would like to replace the sand.Reply
InyoPools Product Specialist Dennis R. Posted: 6/26/2017
Birdy - No, I would not change the sand again. Just backwash and rinse it a couple of time to remove any impurities.Reply
Birdy Posted: 6/24/2017
I put sand in my fikter. Ran it for three days.i had magnesium in my water...I drained the water got new water...Sand is 3 days old.. should I change it after running that nasty water in it?Reply
InyoPools Product Specialist Dennis R. Posted: 6/22/2017
bollinger - If you haven't changed your filter sand in 6 years, I would do that now. Sand loses its ability to filter after 5-7 years. If you see no improvement, see our guide on " How To Go From Cloudy To A Crystal Clear Pool".Reply
bollinger Posted: 6/20/2017
I had my sand changed 6 years ago, but this year we have battled cloudy water. I've done everything except change sand. Is this usually the next step short of throwing dynamite it?Reply
Smellis Posted: 6/18/2017
Thanks for the step by step instructions... It was easy to prepare for and follow. It took less than 2.5 hours and my pool was back up Ann's running.Reply