How To Install A Hayward HeatPro Heat Pump

WRITTEN BY: 

  3.1 out of 5 stars on 10 ratings
(Click on a star to add your rating)

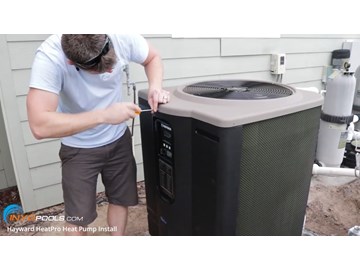
The decision to go with a Hayward HeatPro Heat Pump can be an easy one. The decision to hire someone or install it yourself can be harder. There are several factors that need to be considered. This includes warranty, installation experience, and cost. The intention of this guide is to present the steps required to install a Hayward HeatPro. Hopefully, it will make your installation decision a little easier.

Note: This guide is intended to give you a visual reference to supplement the Hayward HeatPro owner's manual, not replace it. Make sure you read and understand your owner's manual before installing your unit.


Click here to view Hayward HeatPro heat pumps

Video

Step by Step

Top

Step 1

Before installing the heat pump, check out the warranty details. Some manufacturers will offer a longer warranty if the unit is installed by a licensed professional.

Step 2

In this video/guide we are replacing an existing heat pump. The electrical work was already in place. If you are not replacing an existing heat pump and need a larger breaker installed, we strongly recommend contacting an electrician.

Step 3

TURN OFF POWER - Before you start, make sure that the power to the equipment is turned OFF. For maximum safety turn off the power at the circuit breaker.

Step 4

Loosen the unions on the old heat pump. A large set of channel locks or strap wrench may be required.

Click here to view the strap wrench. 

Step 5

Open up the service panel in order to gain access to the electrical wiring.

Step 6

Remove the two hot lines and ground line from the terminal block. Pull those lines out of the conduit knockout.

If you have a communication cable, remove that as well. A communication cable would have been used if you had the heat pump connected to an automation system.


Step 7

Remove the bonding wire.

Step 8

Slide the old heat pump back and remove it from the pad.

Step 9

The Hayward HeatPro has certain requirements in regards to the location placement. The heat pump is designed for outdoor installation and should not be installed in a fully enclosed area, such as a shed, garage, etc. Recirculation of cold discharged air back into the evaporator coil will greatly reduce the heating capacity and efficiency.

Step 10

Mount the unit on a sturdy base, preferably a concrete slab or blocks. The base should be completely isolated from the building foundation wall to prevent the possibility of sound or vibration transmission into the building. The size of the base should not be less than 36”x36”.

Click here to view diverter valves. 

Step 11

Air is pulled through the evaporator coil and discharged through the top grille. A minimum clearance of 72” should be allowed above the unit. The sides of the unit should be at least 24” from a wall or any other obstructions. This allows air intake and service access.

Step 12

Move the new heat pump into place. Make sure that the ports are facing your pvc plumbing. The heat pumps are very heavy and you don't want to be adjusting it several times.

Step 13

After the heat pump is in place, check out the location of the "Water In" and "Water Out" ports and make sure they align with the flow of water. The pipe coming out of the filter should go to the "Water In" port and the line going back to the returns should come from the "Water Out" port.

Step 14

Before plumbing, open up the service panel and remove the bag with the couplings and anchors. To gain access to the inside, remove the 3 screws at the top of the front panel and two at the bottom. Remove the panel and set it to the side. Pull the panel towards you and reach in to grab the parts bag.

Step 15

Screw on the couplings from the parts bag to the ports on the Hayward HeatPro.

Step 16

Adjust the plumbing so that it will match up with the ports on the heat pump. This step will require some cutting and gluing. If you are not familiar with how this is done, check out our guide titled "How to Glue Pool Fixtures Together".

Step 17

Glue the plumbing into the couplings on the heat pump.

Click here to view check valves. 

Step 18

The next steps will involve wiring the heat pump. Locate the conduit knockout at the bottom of the HeatPro. Punch one out using a hammer and screwdriver.

Step 19

Feed the two hot lines and ground line through the knockout and into the heat pump.

Step 20

Open up the door to the control box

Step 21

Feed the wires up through the knockout at the bottom of the control box.

Step 22

Connect one hot line to L1 and the other hot line to L2. It doesn't matter which hot line goes to L1 or L2.

Step 23

Connect the ground line to the grounding lug.

Step 24

Close the door to the control box.

Step 25

We didn't connect this heat pump to an automation system. However, there is a control terminal block if you do plan on controlling the heat pump via automation. Check the manual for your automation system for wiring instructions.

Click here to view Pool & or Spa Automation Systems. 

Step 26

Place the front panel back on the heat pump and tighten the 5 screws.

Step 27

Connect the bonding wire to the external bonding lug. For more information about bonding, check out our guide titled "How to Add a Line to the Pool Bonding Wire".

Step 28

In order to test the heat pump, prime the pool pump and turn the power back on.

Step 29

Turn the heat pump on. You should immediately see the fan turn on. The temperature will be displayed shortly after. 

*The desired temperature can be adjusted by pressing the up and down arrow keys.

Click here to view Hayward HeatPro heat pumps

Step 30

If everything is working correctly, the compressor will kick on after 3-4 minutes. There will be a heat indicator symbol on the display.

Comments

Top

Be the first to add a comment