How to Replace a Pool Light Gasket

WRITTEN BY: 

  4.18 out of 5 stars on 11 ratings
(Click on a star to add your rating)

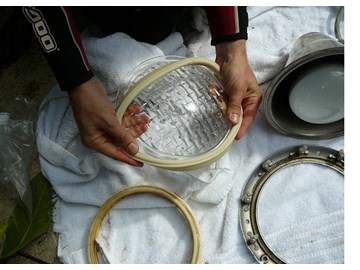
The purpose of a gasket in a pool light fixture is to seal the light bulb from the pool water inside the light fixture. Many bulbs fail because the gasket deteriorates from the heat and harsh pool chemicals. Some light bulbs are expensive - in the range of $300-$400, so you might think about replacing the pool light gasket every 3 years or so. This guide provides step-by-step instructions for replacing a typical pool light gasket.

Click Here to View Pool and Spa Light Parts (Includes Lenses, Gaskets, Bulbs & More)

Click Here to View Our Full Selection of Pool & Spa Light Fixtures

Things You'll Need

Step by Step

Top

Step 1

CAUTION: Possible Electrical Shock or Electrocution: For your safety please use the necessary precautions before attempting to work with water and electricity. If you are unsure about how to tell if the power to your pool light is off, find someone that is familiar with electricity to ensure it is off before you start working with your pool light.

Click Here to View Pool and Spa Light Parts (Includes Lenses, Gaskets, Bulbs & More)

Step 2

PURCHASE GASKET - You should order you light gasket ahead of time to have on hand for replacing the old one. If you already know the make and model of your pool light, go to our Light Parts page to find the proper gasket.

Step 3

IDENTIFY POOL LIGHT - If you don't have any information about your pool light, check for an identification on the face ring and on the lens as manufacturers sometimes have part numbers or their name molded into the parts. In this case the manufacturer's name, American Products Company, can be seen on the lens.

Step 4

IDENTIFY POOL LIGHT - If you don't see identification information on the outside of the light, you will most likely need to follow the steps below to remove the light from the pool wall. The manufacturer name, model number, voltage and wattage of pool lights are typically found on a sticker on the back of the light housing (usually where the cord of the light attaches to the housing).

Step 5

MEASURE GASKET - If above attempts fail to identify the gasket through the identification of the light, Try measuring the outside diameter and thickness of the gasket and see if it matches the gaskets for the most common pool lights, the Hayward Astrolite or Pentair Amerlite.

Click Here to View Pool and Spa Light Parts (Includes Lenses, Gaskets, Bulbs & More)

Step 6

TURN OFF POWER - Before working on your light fixture, be sure to turn OFF power to your lights at the circuit breaker.

Step 7

UNSCREW LIGHT FIXTURE - Your first step in replacing the light bulb is to remove the pool light fixture from the niche in the pool wall. Most pool light fixtures are secured to the niche with a single screw at the top of the light. Remove this screw. If the pool light is just below the surface, you may be able to remove the screw by leaning over the pool deck. In this case I had to get in the pool with a snorkel and goggles.

Step 8

PULL FIXTURE OUT OF NICHE - Pull the pool light fixture out of the niche. You should have enough excess cable to be able to lay the light fixture on the pool deck. Note how the excess cable is stored in the niche so you can replace it the same way when you reinstall the pool light fixture.

Step 9

LAY LIGHT FIXTURE ON DECK - Lay the light fixture gently on a soft surface on the pool deck and dry it with a clean towel.

Step 10

DISASSEMBLE THE LIGHT FIXTURE - The older models have a series of brass retainer clips and screws around the perimeter of the light fixture to keep it together. Remove all the clips. Note: the newer models are held together with a unitension wire clamp with one bolt and nut. See Pentair Amerlite Pool Light for examples of both models.

Click Here to View Pool and Spa Light Parts (Includes Lenses, Gaskets, Bulbs & More)

Step 11

REMOVE FACE ASSEMBLY RING - Gently pry the Face Assembly Ring off of the lens and gasket.

Step 12

REMOVE LENS AND GASKET - Gently pry the lens and gasket off the light fixture housing.

Step 13

REMOVE GASKET - Remove the old gasket from the lens.

Step 14

CLEAN LENS - Clean any old gasket residue from the surface on the lens using a damp rag.

Step 15

CLEAN LIGHT HOUSING - clean any gasket residue from the light housing that comes in contact with the gasket. Do not use hard scraper to clean. If you score the surface of the housing, it may not seal properly.

Click Here to View Pool and Spa Light Parts (Includes Lenses, Gaskets, Bulbs & More)

Step 16

ATTACH NEW GASKET - Wrap the new gasket around the edge of the lens.

Step 17

ADD GASKET AND LENS TO LIGHT HOUSING - Place the gasket and lens on top of the light housing.

Step 18

REASSEMBLE LIGHT ASSEMBLY - Set the light housing (with lens and gasket) on top of the Face Assembly Ring. Reassemble the light housing assembly by screwing in the brass retaining clips. Alternately tighten the screws/clips to allow the gasket to seat properly - two on one side then two on the other side. Do not over tighten. Hand tighten only. If you find that the gasket is not fitting into the groove of the Face Assembly Ring, you might try stretching the gasket a little.

Step 19

TEST BULB - Find a friend to watch the light while you briefly turn on the electricity. This is to confirm that the new bulb actually works. These lights are not made to be turned on out of the water, so this has to be a very quick check.

Click Here to View Pool and Spa Light Parts (Includes Lenses, Gaskets, Bulbs & More)

Step 20

CHECK FOR LEAKS IN HOUSE ASSEMBLY - Now check for leaks by placing the light underwater. A few bubbles may float up initially, but air should not be coming from the sealed outer edges.

Step 21

REPLACE LIGHT FIXTURE - Replace the light fixture by first recoiling and storing the excess cable as observed in step 5. Then push the light fixture back into the niche.

Step 22

SECURE LIGHT FIXTURE - Replaced the single screw at the top of the light fixture to secure the pool light fixture to the niche

Comments

Top
(1 to 2 of 2)

 Posted: 2/20/2018 

Anonymous (light gasket) - You have three options. See key 7 in this parts list. Note: American Products was bought out by Pentair. This product is now called Pentair Amerlite.
 Reply

Anonymous  Posted: 2/18/2018 

I have the same American Products enclosure as the one photographed here. Which gasket do I need?
 Reply