3.52 out of
5 stars on
25
ratings
(Click on a star to add your rating)
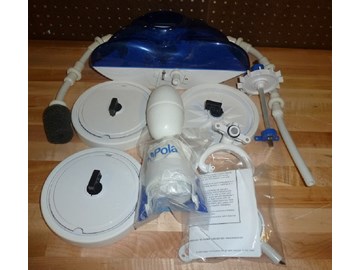
If your Polaris 280 pool cleaner is not working properly, it may need to be replaced or tuned up. A Polaris 280 rebuild kit will have all the parts you’ll need to get your pool cleaner running like new. This guide will walk you through the process.
Turn off the booster pump and remove the cleaner from the water. Disconnect the hose from the head of the cleaner. Ideally you may want to let the cleaner dry before working on it.
Step 2
Mark the position of the head float on the feed mast then remove the head float.
Step 3
Next, remove the bag from the head of the cleaner.
Step 4
Makes sure to mark the position of the sweep hose adjustment screw with a marker before removing it.
Step 5
To remove the sweep hose, pull the clamp apart. Once the clamp is off, you can pull the hose off.
Step 6
Remove the top half of the cleaner. There is a single screw that holds it in place.
Step 7
Label the single side and front double side wheels so that once removed you can tell them apart. Note the position of the axles when you take off the wheels.
Step 8
Remove the axle screws and the wheel assemblies for the three large wheels.
Step 9
Set the screws and axle plates aside for reassembly.
Step 10
Remove the clamps and turbine hose from the feed mast elbow and turbine cover.
Step 11
Remove the turbine cover. Set the screws and turbine cover aside for reassembly.
Step 12
Remove the turbine and shaft shield. Retain the shield and two screws.
Step 13
Remove the screws for two turbine bearings. Retain the screws.
Step 14
Next remove the drive shaft assembly.
Step 15
Remove the bottom of the cleaner. Retain the screws.
Step 16
Remove the water management system. Once you remove the screws, you can pull it out. Retain the screws.
Step 17
Place the new turbine bearings and drive shaft assembly into position and replace the four screws. The “Made in USA” should be facing outwards.
Step 18
Do not remove the clear covers on the drive shaft, they are designed to ensure proper turbine spacing.
Step 19
Re-install the turbine cover using the three screws that were removed earlier. Attach the new turbine hose to the feed mast elbow and turbine cover.
Step 20
Install a new hose clamp at each end of the hose. Pull the clamp tight and cut off the excess length. I recommend using the needle nose pliers.
Step 21
Using two screws, re-install the turbine shield. The lip on the turbine shield goes under the turbine cover.
Step 22
Lay the old front double side wheel next to a new wheel/sand guard assembly. Point the axle on each wheel in the same direction.
Step 23
Install the new front double side wheel with the axle plate and the new lock washers. Make sure the grooves in the axle line up with the ribs on the frame. Leave the screws loose enough to adjust the wheel position.
Step 24
Adjust the wheel so the spline of the drive shaft assembly engages 3/4 of the wheel gear teeth. It is easier to see the engagement if you peel back the tire.
Step 25
To test the wheel placement, spin the wheel; it should spin freely. Also, hold the wheel and quickly rotate it back and forth. The gears should not slip or chatter.
Step 26
Repeat steps 23-25 for the single-side wheel.
Step 27
Align the threads on the frame and install the rear wheel assembly (this wheel does not have a sand guard) using the axle plate and lock washers.
Step 28
The longest part of the wheel axle should point toward the rear of the cleaner. Leave the screws loose enough to adjust the wheel position.
Step 29
Install the new idler wheel onto the swing axle on the bottom. Use the new wheel washer and plastic wheel screw. Do not over tighten the screw; the wheel should spin freely.
Step 30
Make certain that you line up the water management with the grooves on the body. Slide the new water management system, with thrust jet installed, into the keyed area on the bottom of the frame and secure with two long screws.
Step 31
Secure the new bottom onto the frame using the 2 screws that you removed earlier.
Step 32
Slide the rear wheel forward until it just contacts the idler wheel and tighten the axle block screws. When you spin the rear wheel, it should slip slightly against the idler wheel. When you spin the front wheel, all the wheels should spin freely.
Step 33
Install the new blue top. Do not over tighten the screw.
Step 34
Screw the sweep hose adjustment screw into place. Attach the new sweep hose with the attach clamp.
Step 35
Position the new head float to the mark on the feed mast. .
Step 36
Position the thrust jet straight back and tighten the screws
Step 37
Lastly, attach the new all-purpose bag.
Step 38
Your repair is now complete and you Polaris 280 is ready for a swim.
I need 2 screws that attach the bottom of the Polaris280 pool cleaner, and 1 screw that attaches the top of the cleaner. The bottom came apart but everything works perfectly.
Reply
InyoPools Product Specialist Matt S.Posted: 10/6/2020
You guys are just the best. My pool cleaner bag broke off and I need a new one. I had bought from you before so I knew you would have the information. Polaris ???. Right! I'll go to my local store to get the bag but later this year when I want to buy a rebuild kit I know where to go. I've done it once before but this time I see you've got picture by picture instructions. Thanks a bunch.
Reply
InyoPools Product Specialist Dennis R.Posted: 4/6/2015
Polaris 280 - The easiest way to find "Polaris 280" is to type it in the search page at the top right side of the page.
Reply
AnonymousPosted: 4/5/2015
nice ad where can you buy the dam thing not under Polaris or parts guess you want us to find it somewhere else
Reply


etransform Posted: 9/26/2020
I need 2 screws that attach the bottom of the Polaris280 pool cleaner, and 1 screw that attaches the top of the cleaner. The bottom came apart but everything works perfectly.Reply
InyoPools Product Specialist Matt S. Posted: 10/6/2020
Do you see the parts you need on the following parts diagram and listing? Polaris 280 & 280 Tank Trax - HeadReply
Joe Pool owner Posted: 1/20/2019
You guys are just the best. My pool cleaner bag broke off and I need a new one. I had bought from you before so I knew you would have the information. Polaris ???. Right! I'll go to my local store to get the bag but later this year when I want to buy a rebuild kit I know where to go. I've done it once before but this time I see you've got picture by picture instructions. Thanks a bunch.Reply
InyoPools Product Specialist Dennis R. Posted: 4/6/2015
Polaris 280 - The easiest way to find "Polaris 280" is to type it in the search page at the top right side of the page.Reply
Anonymous Posted: 4/5/2015
nice ad where can you buy the dam thing not under Polaris or parts guess you want us to find it somewhere elseReply