Model # 009219
Warranty 1 Year
Manufacturer Code P-R406A-EN-C #50
Think about being able to use your pool or spa at the perfect comfort level even when Fall arrives...or when the first chill of Winter is felt in the wind...or in the Spring or Summer when evenings can turn chilly in a minute! Helping you get more enjoyment from your pool or spa is the smart idea behind the Raypak heaters.
BENEFITS:
Digital control with liquid crystal display (LCD) for temperature selection and heater settings
Capron resin headers prevent rust stains from harming pool surface
Plumb directly from provided 2" PVC threaded union
Smart microprocessor controls diagnostic read-out and continuously monitors operating status
Completely field serviceable
Small footprint
High efficiency
Guaranteed high wind reliability
Looks smart and works smart
Thermal Efficiency of 83%
Elevation: 0 Ft. – 2000 Ft. Click Here for High Altitude Pool Heaters
California Customers Please Note: South Coast Air Quality Management District (SCAQMD) Area of Jurisdiction REQUIRES a Low Nox Heater be installed. The following 6 California Counties are affected: Los Angeles, San Bernardino, Ventura, Orange, Riverside, & Kern. Installing a non-compliant heater in these counties will void the manufacturer's warranty and could result in a fine from your local code enforcement.
Click here for RayPak Low Nox Heaters
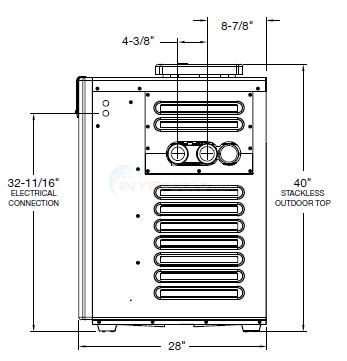
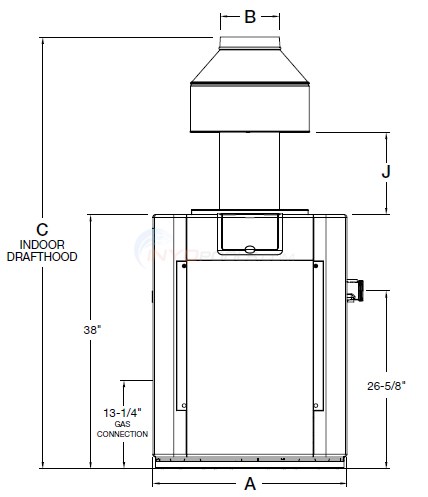
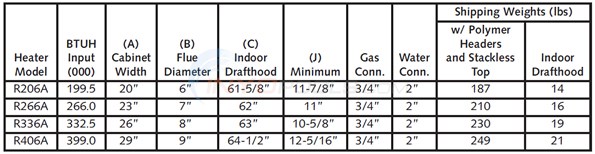
Dimensions:
WARRANTY EXCLUSIONS
This Limited Warranty does NOT apply;
1. if the product has been moved from its original place of installation, or if the original
owner no longer owns the property where the original installation was made;
2. if the product is not properly installed with a pool or spa by a qualified licensed installer in
accordance with applicable local codes and ordinances, good trade practices, and the
manufacturer’s installation instructions;
3. if the rating plate(s) or serial number(s) are altered or removed;
4. if the product is modified in any way, or non-factory authorized accessories or other
components are used in conjunction with the product;
5. to damage, malfunctions or failures resulting from failure to properly install, operate or
maintain the product in accordance with the manufacturer’s instructions;
6. to damage, malfunctions or failures from abuse, act of nature, accident, fire, flood, freeze,
lightning or the like;
7. to damage, malfunctions or failures resulting from [or due to] connected system control
devices;
8. performance problems caused by improper sizing of the heater or electric service
voltage, wiring or fusing;
9. use of any attachment, including any energy saving device not authorized by the
manufacturer.
10. to damage, malfunctions or failures from misuse or neglect, including but not limited to,
freeze-ups, operating the heater with the cabinet door off, having flow restrictions or
obstructions between the heater outlet and the pool/spa, or not maintaining a proper
chemical balance (PH level must be between 7.4 and 7.8 and total alkalinity between 100
and 150 PPM. Total dissolved solids (TDS) must be no greater than 3000 PPM)
What size natural gas line should be used on a Raypak 406,000 BTU heater?
Reply
The 406,000 uses a minimum of 1" natural gas line and this would be if your run of pipe is 20 feet or less. If your run of gas pipe is 21' - 95' you would require 1 1/4" pipe and if your run is between 96' and 215' you would require 1 1/2" gas pipe.
Reply
Will a gas heater operate at the low speed of a dual speed motor?
Reply
Probably not - Most gas heater will shut off at low GPM levels (20-40) to keep the heater cores from overheating - 20 for 200 BTUs, 40 for 400 BTUs. Depending on your pool system you might get these GPM levels at the low speed but generally these heaters must be run at the motor's high speed.
Reply
What is the difference between an Electronic and Millivolt ignition?
Reply
The basic answer is that Millivolt is the old style of ignition, using a standing pilot light. While the electronic ignition uses a spark start system like a gas grill. Electronic ignitions are more efficient in gas usage and also are better suited for high wind areas where a pilot light might get extinguished.
Reply
Can you provide me the dimensions for the Raypak RP Series model PR406AEN?
Reply
The Raypak 406 BTU RP2100 Series the cabinet measures are as follows: Width - 29 inches, Depth - 28 inches, Height - 38 inches. Any further technical data, like gas line size or voltage be found in the Raypak Specifications Guide
Reply
4 to 8 hrs
Screwdriver, Nut Drivers, Pliers, Adjustable Wrench, pipe wrench, power screw / bolt driver
2 0
We had to shut off the gas at the curb as the valve by the heater was frozen. After shutting off the gas I run the stovetop until all gas was evacuated from the lines going into the house. Next we shut off power to the pool pumps which also power the heater's digital control board. From this point the job of disconnecting the old heater was not too bad. The worst part was getting the gas line disconnected. I guess that was to be expected as it had been in place for more than 20 years! Next the power lines and water lines were disconnected. From here we took the old unit to the curb where it was picked up by a salvage team the next day. The bottom of the old unit had rusted out so there was quite a mess to clean up before we could install the new unit.
We cut the new unit box off around the base following the instructions on the box, and removed the packing material. As hoped the new units connection points we identical to the old one with the minor exception of the wiring. This was great news as it meant that the water and gas lines were at the appropriate levels. Next we moved the new unit onto the slab were the old one was. We used all new 3/4 inch black iron pipes, unions, and a brass gas line valve to reconnect the gas line. A sediment trap was also added as per the installation manual recommendations. The joints we sealed with white gas line compound and checked for leaks. The water lines were able to be connected back up identically as they were on the original units. Lastly we connect the power in the same 240V configuration as was used on the old unit.
After turning on the gas and electric, we turned on the gas at the heater inlet and then the valve on the unit itself. Next we flipped the heater one, set a temperature higher than the waters current temperature, and it worked like a champ. We have a 15,000 gallon pool and this heater raises its temperature 3 to 4 degrees an hour. That's about twice as fast as the old one did before it died.
2 to 4 hrs
Screwdriver, Pipe wrench
1 0
Closed the gas valve. Disconnected the gas pipe going to the Raypaks gas valve.
Disconnected the 240V wiring and low voltage control wiring to the control board.
Disconnected the two plumbing pipes.
Pushed the thing over and drug it off!
Gently rolled the new unit into place and lined it up with the water plumbing.
Hooked up the plumbing pipes first.
Hooked up the electrical. 240V was what I had at the pad. Used the Red/Black wires
Put in a new galvanized steel gas pipe from the local big box hardware store. Had to use a union to line it up properly. Put some pipe dope on the threads and took a 12" pipe wrench to it until it was tight.
Turned on the gas and sprayed the joins with "ammonia solution" to make sure there were no leaks also used my nose.
After that, I turned on the power breaker, hit the switch, and set it to a temperature and it fired up!
It's been a few days and still going good.
4 to 8 hrs
Screwdriver, Nut Drivers, Pliers, Socket Set, Adjustable Wrench, Pipe Wrench


The Most Helpful Review
13 1
(5 out of 5 stars) Efficient and effective pool heater
Reviewed By: Paul from West Palm Beach< FL ()
This heater works quickly and will accomodate a pool and a spa. We use it only for the pool, but we heat the pool almost to spa temperature. Great for groups and entertaining.
Was this review helpful to you?
The Most Recent Reviews
2 0
(5 out of 5 stars) Wow! What a great heater!
Reviewed By: Inyo Customer ()
Wow! This unit is so nice. The unit also has a smaller footprint than our old Jandy unit. The heater is super quiet and fired up easily after installation. The instructions were very clear and helpful. Our unit is tied to a Jandy control system and works perfectly. The unit also looks very nice, and the controls are simple to use. Putting the heater in remote mode if you configure it that way is as simple as holding down the up and down arrows for 3-5 seconds. The instructions for remote mode are clearly spelled out in the control panel also. Very very happy with this heater. It is heating the water quickly and hopefully more efficiently than our old unit.
Was this review helpful to you?
4 0
(5 out of 5 stars) Five Stars
Reviewed By: Inyo Customer ()
Just ordered this to replace an older version of the same unit. First time doing this myself, and had no issues with the install. Previous unit was 12 years old and corroded. This installed with the exact same dimensions as the old one. All piping (PVC and Gas) and electric lined up almost 100% making it incredibly easy to DIY. Fired up on the first try and heated the spa in record time.
Was this review helpful to you?
4 0
(5 out of 5 stars) Reliable Heater
Reviewed By: Inyo Customer ()
This is my 3rd heater in 12 years. However, the Raypak has been working for 4 years with no issues. This heats up faster than my two other Pentair's I replaced. Installs easily. Would highly recommend.
Was this review helpful to you?
4 0
(5 out of 5 stars)
Reviewed By: Inyo Customer ()
WORKS VERY EFFICIENCTLY. NICE DIGITAL READOUT. EASY TO OPERATE. BIG IMPROVEMENT OVER MY OLD PENTAIR MINI-MAX WHICH THIS REPLACED AFTER 19 YEARS OF SERVICE.
Was this review helpful to you?
12 0
(5 out of 5 stars)
Reviewed By: Inyo Customer ()
I replaced an 18 year old Raypak heater of the same model. Because they run on natural gas, the heater can raise the temperature of my pool water significantly in several hours. My pool is just over 20,000 gallons and within three hours the pool temp will rise four or five degrees with the heater running. once the desired temperature has been reached, the heater than only has to run occasionally to maintain it. My wife likes the pool temp in the low 80's. Of course having southern exposure helps this process. The first heater was as good as this one, although this new model has some improvements in the materials used. My old heater ended up rusting out and the new model changed the materials from steel to stainless steel. If you're in a cooler climate like I am, (Near Boston) an electric heater will not allow you to extend your season because it is somewhat dependant on the air temperature to keep the pool warm. We open our pool mid April and close it the end of September.
Was this review helpful to you?
2 5
(5 out of 5 stars)
Reviewed By: Inyo Customer ()
Have not installed it yet
Was this review helpful to you?
5 1
(5 out of 5 stars) Works beautifully so far!!
Reviewed By: Peter L from Gilbert , Arizona ()
Pros: Design,ease of instillation. Performance
Cons: For me nothing
I highly recommend Inyopools !!! And I have already. On all equipment I have order they have been spot on. Now about the heater, I had a raypak before and it gave us excellent service for 15 years in the Arizona climate. I am very pleased with the look and performance of our new one purchased from Inyopools. It was easy to install!!!
Was this review helpful to you?