In this article, we’re showing you common pool hose troubleshooting tips for issues like tangles, pump-priming problems, and reduced suction. If you have any tips or tricks for pool hose issues, feel free to leave a comment below.
Hose Tangles
If your trusty pool hose has begun to tangle more frequently, this is a sign of “bad hose memory.” This memory sets in over time when a hose is repeatedly used or rolled up then stored the same way. The hose will curve naturally in that direction when in use, leading it to double back on itself then tangle. Bad hose memory is reset in a few easy steps.

Steps to Reset Hose Memory
- Disconnect your vacuum hose – Lay your hose on flat ground, preferably cement or a surface that holds heat. If your hose is in sections, disconnect them and lay them side by side.
- Set the hose in direct sunlight to reset memory – Allow the hose to lay in direct sunlight for 2 to 3 days. Then, to ensure the hose memory is reset evenly, turn over the hoses on the second day and the third day if necessary.
- Test your hose – Collect your hose, reconnect to your vacuum and test it out.
- If the hose is still tangling, you can repeat steps 1 & 2. If the second reset doesn’t fix the issue, it may be time for a new vacuum hose.
Pressure Issues / Pump Losing Prime
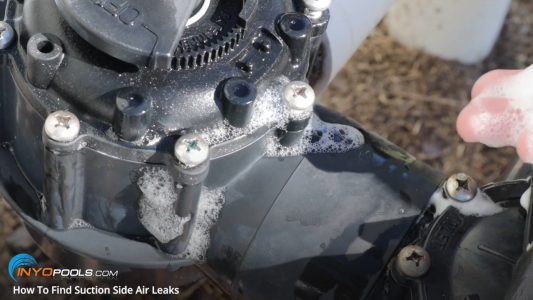
Does your pump lose prime after you connect your vacuum hose? If so, your hose may have a pinhole air leak. These small holes, caused by general wear and tear, can lead to your pump pulling in more air than water. Prime is list when air replaces water in your plumbing; the pump will be in danger of running dry. A pump running dry for as little as a couple of minutes can create enough heat to melt internal parts, skyrocketing repair costs. So, what do we do?
Steps to Finding Pinhole Air Leaks in a Vacuum Hose
- Disconnect the hose from the vacuum head – If the hose is a section, disconnect the hose sections; we’ll test the sections individually.
- Use duct tape to cap off the end of a hose section – Make sure the hose is relatively air-tight. We will be doing this for each hose section, so make sure you have enough tape on hand.
- Check hoses for air leaks – Hold the hose at each end, then completely submerge it in the pool. Air bubbles forming around the hose body is a sign of pin hole air leaks.
- Repeat steps 2 & 3 for each hose section
- Replace the damaged hose sections- A hose mender can be used to patch the hose (1 1/4IN, 1 1/2IN, 2” Hose Mender)
Reduced Vacuum Suction
Has your vacuum suddenly lost a portion of its suction? A drop in suction is generally a sign of a blockage in the line debris-filled baskets, or a loose hose to suction port connection.
What to check if suction strength has dropped
- Pump & Skimmer Baskets – these baskets are the first lines of defense for trapping debris, so they can fill pretty fast.
- Clean Your Filter – check your filter’s pressure. If the current PSI is 8-10 PSI above your filter’s “clean” pressure reading, give it a backwash or hose off the cartridges.
- Check Hose to Suction Port Connection – the hose cuff that connects to your dedicated suction line or skimmer can get worn and warped with age. If the cuff is not sitting tightly on the suction port, a portion of the pump’s pulling force will bleed off, leading to a drop in suction. Use hose cuff replacement, if necessary. (1.25”, 1 1/2″, 2″ Cuff sizes.)
- Check plumbing lines for obstructions – How To Identify and Correct Low Water Pressure.
Have you completed the above pool vacuum troubleshooting but still can’t figure out what’s wrong? Leave a comment down below, and we’ll help you as best we can.


I stored my Aquanaut overnight on the pool deck with the hose attached. The hose is made of 8 sections, 4 feet each. I didn’t arrange the hose carefully. Next day, all the sections were crooked, deformed. I read that placing them in the sun would straighten them back to their original form, which is straight. The heat of the sun helped but after one day, the sections would not straighten completely if at all. So I placed a stick inside each of the sections to keep them straight … I used a broom stick and seven golf clubs. I left them 2 days in the sun on a tile floor. It worked. They all ended up being straight as when I bought them.