Model # W3HP21404T
Warranty 1-Year Parts-Only Warranty

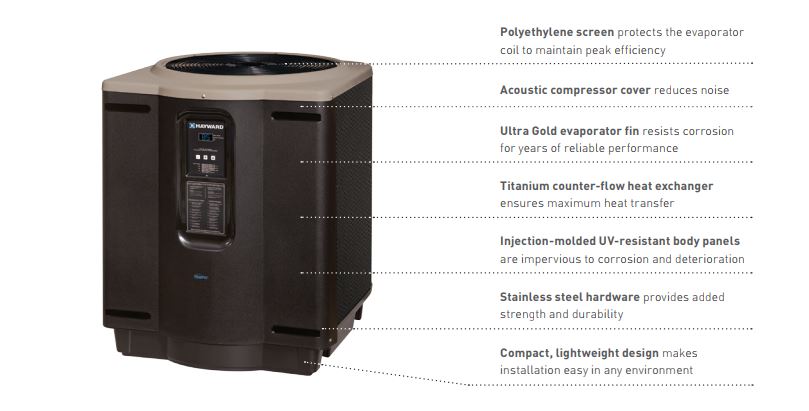
Extend your pool season with a Hayward® HeatPro® heat pump. Quiet and economical, heat pumps use the outside air and a titanium heat exchanger to generate heat for a fraction of the cost of gas. Save up to 80% on operating costs.
Replaced by Model # W3HP21405T
Features:
Warranty:
If I have a large pool pump will I need to have a flow meter for the heat pump?
Reply
According to Hayward their heat pumps have a flow rate range of 30 to 70 GPM, with an optimum flow rate of 45 GPM. If your pump is capable of significantly more flow than this, a flow meter is recommended to insure the flow rate is within the prescribed range.
Reply
Can a heat pump be installed indoors?
Reply
Generally no. Heat Pumps work by transferring heat from the surrounding air to the pool water. If a heat pump is installed indoors there must be a continuous supply of warm air from which the heat pump can extract heat. If you must heat the air in the room before the heat pump can extract that heat to heat the pool, there would be no benefit to the heat pump.
Reply
Can a heat pump be installed under a deck?
Reply
No. Any installation that causes the air being discharged from the top of the heat pump to be recirculated back into the heat pump will cause a loss of capacity and efficiency in the heat pump. Installation of a heat pump under a deck, or a low over hang will allow the air being discharged to be drawn back in by the heat pump.
Reply
2 to 4 hrs
Screwdriver, Pliers, Adjustable Wrench
I ordered the heat pump and received it 5-days later — fast delivery. The heat pump with packing is very heavy - over 300 pound with the wood pallet. Delivery instruction indicates truck will drop at bottom of residential driveway - a problem if you must move it from there to your pool (especially if its uphill as mine is). [I’ve had many deliveries of big heavy stuff to my house and delivery has always been to at least my garage door] The truck driver had no problem backing up driveway to garage and off loading with a pallet hand truck and rolled it to the pool - Grateful for that help and gave a nice tip to driver. The hardest part of job is getting the unit to the pool location because of weight - thankfully the pallet truck made that easy - done in 10-minutes.
Unboxing is easy - I watched video from INYO. I read the instruction & operations manual several times.
I watch several youtube videos on installing heat pumps and one specific to this unit. The replacement was simple as I had all required electric and piping in place from the old unit. I took a picture of the wires on my old unit and moved the wires to the Hayward. Access to wire connection required a screwdriver for the panel and pliers to connect wire cable to access hole in unit. I purchase new pvc primer and glue and some new pvc pipe to make plumbing connections, I already had the valves in place that were used for the old heat pump. I checked flow rates of the variable speed pump. I opened valves and ran water through unit to check for leaks. I used the units keypad to start and run unit. I checked output to pool and found warm water discharging.
4 to 8 hrs
Screwdriver, Nut Drivers
2 0
I added the Hayward Pool Heater to our pool by cutting into the existing plumbing at the pool pump / filter and installed 2 new valves to divert the water to the pool heater as needed. The heater has it's own electrical breaker to provide power. The whole job took me about 8 hours including the electrical and plumbing. This pool heater uses approximately 6 kWh of energy per hour of operation. Our pool is about 33,000 gallons and has a pebble finish. This heater has been able to consistently raise the temp about 1 degree per hour of operation. We have been able to keep the pool easily above 87 or 88 degrees by cycling the days and number of hours we run the heater. We are very happy with this pool heater and will not be without one going forward.
More than 8 hrs
Screwdriver, Nut Drivers, Pliers, Socket Set, Wrench Set, Adjustable Wrench, saws, plumbing supplies, shutoffs, electrical, etc,etc
7 0
We have had an inground pool for 35 years but never had a pool heater. Our Midwest summers are not as hot as they were when we first put in the pool, so most summers it would be mid-July before the pool temp would reach the 80's.
We live in the country so our options were propane or heat pump. We decided to go the heat pump route. After an in-depth search (both local pool dealers and online) we decided to do the project ourselves. As this was a new heat pump installation, there were numerous hurdles, including running a new 220 electric line the 120ft length, pouring a concrete pad and replumbing all the plastic piping, etc.
The most difficult part was getting the heavy heat pump into position, but with a little help from my brother, it went right in to place. Finally, we were in the pool almost every day last summer, maintaining a pool temp of 85 degrees, all the way up till October. Buying the heater from Inyo pools saved us about $1,000.00.
I was so pleased with Inyo Pools that later in the year I purchased a custom pool cover and was again very pleased dealing with them. Thank you for being so streamlined in my dealings with your company.
Oh by the way, having a pool heater is not a cheap endeavor as the equipment was the least expensive part. To heat our 25,000 gal pool costs about $10.00 a day, and not being able to have a daily use cover (LAZY L) there was a lot of evaporation, so added costs for water and chemicals. Overall worth it as we are able to use the pool for 100+ days compared to a normal 10-15 days.
1 to 2 hrs
PVC cutter
2 0
Purchased the heat pump pool heater and it arrived within a few days. I then headed to the local hardware store to purchase the pvc Reiser for install. I purchased one ten foot section and about 8 90 degree elbows (I always purchase more than I need and return the rest). And some pvc glue.
I measured twice and cut once all of the pvc and dry fit them together before I used the glue. Once everything fit perfectly I glued everyone together and call my local electrician to hook up the bonded grounds and electrical connections (well worth the $$$ for safety reasons). Then next day the electrician had everything hooked up in about an hour and I turned the system on. I have been very happy with the results and highly recommend. Do it yourself! Took about 2 hours.
More than 8 hrs
Screwdriver, Wire stripper, cutter, PVC cutter, PVC glue
11 0
1. The hardest part of the whole process - getting the pool heater into position. This thing is big and heavy - over 300 lbs. Complicating matters is the fact that you are warned repeatedly to not tip the heater, to the extent there is an indicator on the box that shows if it has been tipped during shipment. So if you don't have a portable forklift, or you don't have a clear path to where it will be installed, plan on getting several strong people to help move it into position.
2. Once in position, it is, conceptually, very simple. Water in one port, water out the other. 220v power to the heater. The front comes off with 3 screws on the top and 2 in the bottom - this isn't specifically called out.
3. Plumbing was relatively simple, but with a couple of things to focus on - make sure you have a way to isolate the heater if you need to repair or replace it, and if you have any sort of inline chlorination system, make sure it is downstream of the heater, and separated by a check valve. And as with any pool plumbing - spend some time thinking through the arrangements of pipes and valves both for the convenience of usage, as well as minimizing the amount of pipe and the number of fittings so as to keep head pressure as low as possible.
4. Electrical is pretty simple with the big huge caveat that if you don't know what you are doing, hire a professional, or if it is required by local law, hire a pro. The concept isn't hard, but you need to make sure you use the right wire (6ga in my case), the right size breaker (50 amp) and that everything is hooked up and grounded correctly. The downside of doing something wrong here could be fatal, or best case, wreck your brand new (and expensive) heater.
5. The heater has to be connected to the bonding grid. Basically, everything metal in, or around the pool has to be connected together, so that there isn't a chance that two metallic objects with different electrical potentials get connected through you. This is SEPARATE from the electrical grounding that you've done as a part of the install. There is a wire clamp on the right side at the bottom. If you don't know what this is - another good time to call in the pros. Better to spend a little more up front than to electrocute someone on memorial day.
6. And that's about it. Turn it on, make sure it works.
1 to 2 hrs
hacksaw and PVC cement
4 0
I was having the pool surface redone as well as the pool deck. The company I contracted offered to install a pool heater for $5100.00. I found the exact same Hayward Heat Pro Heat Pump 140,000 BTU on INYOpools for $2995 including tax and shipping. It was delivered flawlessly. I had an electrician run the 220v wire and circuit breaker and simply did the PVC plumbing myself. very simple install on these heaters. Pipe into the heater from the filter, and out of the heater back to the pool, add a bypass valve and BAM, there you go= heated pool with a savings of over $1000!
4 to 8 hrs
PVC tools, cleaner and cement
4 0
Replace an old 15+ yr old heater. I removed the old cutting PVC tubing, replacing with new to new heat pump with the help of my 17 yo son. The only thing I hired out for was the electrical as I know it was already wired to the heater but wanted it inspected anyway from a licence electrician as this is dealing with water and electricity. Very simple to install with provided PVC coupler, I was slower than a professional as I took my time and do not do this type of work much. What a difference with this heat pump. Either technology has changed drastically or this Hayward is far superior. The old heat pump would be on all day long unless the temp outside was 85+ degrees. The Hayward even on 75 degree days, it quickly gets the pool to temp and shuts down. Much better on electric bill.
1 to 2 hrs
Screwdriver, large spanner wrench
7 1
I researched heat pumps for quite awhile. Liked the idea of this larger pump for my small 10,000 gallon pool. I called INYO with some questions. Since they are located in Florida I figured they would understand my Florida issues. They were quite helpful. When I explained that I only had one day off to receive the package they assured me their trucking firm would call and arrange. I ordered this heater from them because of three reasons:
1) Their price was the same as others (actually lower considering sales tax)
2) They knew the product and sounded knowledgeble
3) They accepted pay pal which helped my decision.
The trucking company called as promised. They arranged my delivery on my day off. They performed as promised.
The best feature of the purchase was the video I received from INYO in how to accept delivery of a large package and how to inspect the product. Very helpful.
The Heater itself was a breeze to install. The 2" pipe fittings worked perfectly. The only issue was that the electrical connector screws were so tight that it took four strong men to untighten them. I guess there are worse problems than that. Get a large handle screwdriver so you can loosen these screws.
The heater works as promised. I heat up about 2 degrees an hour. This heater cost me about $3 per day to run. My old one was $10 per day.
The most difficult part of this job is moving the heater in position. I used a two wheel dolly with large wheels after uncrating the heater. It is a two man job to wheel it around your yard and place it in position. A one man job after that. I am a novice and have never done a job like this before. It is easy. Just screw down the electrical wires and tighten the screw on plumbing connectors. The exact opposite of how you remove the old heater.
I could not be more pleased with my experience.


The Most Helpful Review
20 6
(4 out of 5 stars) Easy setup
Reviewed By: nes30 from Long Island, NY ()
Pros: Easy setup
Cons: electrical wire was not supplied
I was able to install this heater in 2hrs. Runs great.
Was this review helpful to you?
The Most Recent Reviews
1 0
(5 out of 5 stars)
Reviewed By: Inyo Customer ()
I ordered the Hayward HeatPro 140K BTU Heat Pump on a Friday and it was delivered to my home the following Wednesday — fast delivery. I installed it by removing my old heat pump and hooking the Hayward up in its place. The controls to operate the heat pump are very simple to use and understand, basically a keypad for inputs to turn on/off and adjust desired pool temperature. It has a simple to read digital readout. The heat pump raised the temperature in my 18K gallon pool very quickly, exceeding my expectations. I use a solar cover when not using the pool and this year the pool as been at 90 to 92 degrees. The heat pump hasn’t run much as we have had an unusually consistent hot and sunny days. I am happy with the Hayward HeatPro.
Was this review helpful to you?
(5 out of 5 stars)
Reviewed By: Inyo Customer ()
Good value, easy hookup
Was this review helpful to you?
(5 out of 5 stars) Works good
Reviewed By: Inyo Customer ()
Works good. Temperature goes up about two degrees every two hours
Was this review helpful to you?
7 0
(5 out of 5 stars) No more will I be waiting for the pool to warm up before I can go swimming !!
Reviewed By: Inyo Customer ()
Just received my W3HP21404T last week. Once order was placed, it took about a week to arrive. Packaging was great, no damage to unit. Installation was straight forward (as long as you have knowledge of plumbing and electric). At unit startup, my water was 62 degrees. 2 days later I was at 86 degrees (my filter and HP only run 7am to 8pm daily) Not too shabby ! The Heat Pump is incredibly quiet, you can barely hear it run. To be honest, my filter pump makes more noise that the Heat Pump! Depending on humidity, the heat pump will generate a considerable amount of condensation (completely normal), so be aware and possibly have a drainage solution in mind. My unit is in the yard next to the pool so the condensation just runs into the grass, no big deal. If you're on the fence about this model Heat Pump, I HIGHLY recommend it ! Well made, quiet operation and relatively easy to setup and operate. If you do purchase this unit remember, once you un-package it from its box, you need to remove the black front cover (5 screws) to retrieve the setup instructions and plumbing unions. Electrical and plumbing connections are straight forward and easily understandable. I ran a 60 amp 240 volt circuit from my house out to the pool. I have a service disconnect right next to the Heat Pump (very similar if not exactly like your home heat pump disconnect). My filter system is running with 1.5 inch PVC pipe so the only thing i needed to add was two 1.5 inch to 2.0 inch slip adapters. I also installed the recommended check valve (1700C15) after the heat pump but prior to the salt chlorine generator. I have a 30 foot round pool 52 inches deep (@ 22000 gallons). All in all, I'm very satisfied with my purchase ! Placing the order and communicating with InyoPools was a breeze ! As I stated earlier, I highly recommend this unit if you're on the fence contemplating a purchase. (And no, I don't work for InyoPools or Hayward. As a consumer, I feel we should provide feedback so that potential buyers can make an informed decision) No more will I be waiting for the pool to warm up before I can go swimming !!
Was this review helpful to you?
2 0
(5 out of 5 stars) Seems well built and works great.
Reviewed By: Inyo Customer ()
Seems well built and works great.
Was this review helpful to you?
(5 out of 5 stars) Excellent product!
Reviewed By: Inyo Customer ()
Excellent product!
Was this review helpful to you?
(5 out of 5 stars) Awesome
Reviewed By: Inyo Customer ()
Awesome. Works great. Easy install and very quiet
Was this review helpful to you?