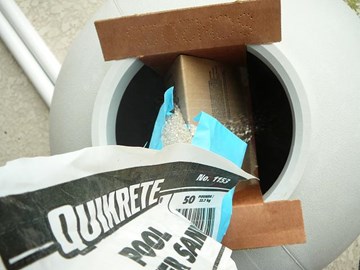
Every 5 - 7 years you will have to replace the sand in your sand filter. The sand actually wears out. The sharp edges of the sand particles become worn and rounded and don't capture the contaminates as well. Also, the sand will start to ball up or the water will create channels through the sand. You will notice that your pool water is not as clean or the interval between required backwashes is shorter. This guide shows you the steps required to replace the sand in your pool filter.
Click Here to View our Available Sand Filters
Click Here to View Replacement Sand Filter Parts


InyoPools Product Specialist Dennis R. Posted: 5/4/2013
lisa - There will always be some loose sand initially, but that problem should go away after a couple hours of use. To minimize this problem, try running the filter is RINSE mode again for 2 more minutes. This compacts the sand. If you still have sand in your returns, you may have to take the sand out again to look at the laterals attached to the bottom of the standpipe. They are somewhat fragile and are often a source of sand leaking into the pool.Reply
lisa Posted: 5/4/2013
after completing this process, i can see sand in the glass when back washing. is this a problem, i don't want to start filtering if something is wrong.Reply
Anonymous Posted: 4/22/2013
great instructions - keep it simple always works!! Thank youReply
anixon Posted: 1/18/2013
Thanks so much for this information. I completed this process without a hitch. It was much easier than I anticipated. Thanks for saving some big dollars!Reply
InyoPools Product Specialist Dennis R. Posted: 9/16/2012
Mike - You may have to take the sand out again to look at the laterals attached to the bottom of the standpipe. They are somewhat fragile and are often a source of sand leaking into the pool. Also check your spider gasket in the multiport valve and make sure it is sound. When you refill the tank with sand , make sure to leave at least 6” of space at the top of the tank and backwash the new sand to remove fine sand and dust.Reply
Mike Posted: 9/13/2012
After changing out sand I was getting sand distributed into my pool through the filter. I would vacuum and it would just re-enter immediatley. Lived with it this season but now upon winterizing I can find no breaks within the system?Reply
InyoPools Product Specialist Dennis R. Posted: 8/27/2012
Bob - No, a sand filter does not take iron out of the water. We would recommend using Jacks Magic Iron, Cobalt and Spot Etching Stuff at this link: http://www.inyopools.com/Products/06800006044637.htmReply
Bob Posted: 8/26/2012
My sand replacing job is well over a decade past due and now that I have seen the instructions clearly laid out, I'll take on the task.Question.
Does the sand filter take iron out of the water?
The reason I ask is that I have had a serious iron deposit stain show up on the side of the pool this year that was never there before.
Reply
InyoPools Product Specialist Dennis R. Posted: 7/31/2012
Concord - If you have a large pump and a unmatched smaller filter, the pump can drill channels through your sand over time and cause a drop in pressure. If your pump and filter are matched, you might have too much equipment on your system. Did you recently add a suction cleaner to your system? One filter manufacturer commented that his water pressure dropped significantly when he added a suction cleaner.Reply
jray Posted: 7/29/2012
wow i didn't think it would so easy to change the sand. my was so bad it looked like mud thanks for the clip it made the job much easierReply
Anonymous Posted: 7/29/2012
Thanks so much for this information. My pool has been cloudy all summer even with a myriad of treatments suggested by the pool store techs. I think this is the final "fix" for my pool problem and it will save me a few hundred dollars.Reply
Concord Posted: 7/26/2012
After five years my filter pressuer came down from 18 to 10 and I in jets I see bubbles, so I change almost all o rings and gasket of the pump , but still the same, I am wandering if filter has to do with it.I open the sand filter drain the water, it was about 10 water above the sand but water was dripping from the release portion of the filter at the bottome , need to know If I have to change the sand or not to bring the psi back to normal.thanks in advance.Reply
emeryplumbing Posted: 7/15/2012
Thank you for posting directions on how to change sand, it was very helpful.Reply
InyoPools Product Specialist Dennis R. Posted: 7/9/2012
shop vac - Good suggestion to use a shop vac to extract the sand! I added it to step 10.Reply
Anonymous Posted: 7/7/2012
Easy peezy thanks so much the directions are very good and step by step is good. Took hubby and I about 3 hrs to complete .Thank - youReply
Anonymous Posted: 7/7/2012
Generally very good directions. I would add the idea of using a wet and dry shop vac.Reply
InyoPools Product Specialist Dennis R. Posted: 7/7/2012
Sony - You may have particles suspended in your water. Try using Floc to clear these particles out of the water. Follow the instruction carefullyReply
Sony Posted: 7/4/2012
My pool water looks milky not as clear as it should be. I tested the water and they were good but then I went a couple of days ago and a few things were off. But the whole time the pool maintaines a milky cloudy color. I put the filter on backwash and it doesn't seem bad. I bought this house three years ago and I think they changed the sand before we bought this house. They also left over some sand bags. Any suggestions???Reply
LD Posted: 6/30/2012
Having a green tinge problem? I had the same a couple of years ago. Nothing I did would get rid of it until the local pool company told me I had low calcium. I purchased a 5 gallon tub of calcium increaser, strips to confirm level and green went away. It was not algae. Another sign could be that your pool is consuming metals especially uncoated skimmer basket handle. It was explained to me that the green is micro particles and the calcium helps the filter remove them. I don't know but, it worked for me.Reply
InyoPools Product Specialist Dennis R. Posted: 6/26/2012
green tinge - If you haven't changed you sand in 5-7 years, I would change it to improve filtering. However, that's probably not your algae tinge problem. It's often slow to clear completely. Try shocking your pool again and add algaecide. It may take a couple of shocks. If there is any residue in your filter sand, the shock should also clear it.Reply
Anonymous Posted: 6/25/2012
Excellant directions...thanks.Reply
InyoPools Product Specialist Dennis R. Posted: 6/23/2012
Big Mac - Before you buy a new filter check theses common causes for sand in your pool: one or more of your laterals may be broken; there is less that 6" space between the top of the sand and the top of the tank; your the spider gasket in your multiport valve is worn or broken.Reply
Anonymous Posted: 6/22/2012
The water in my pool has a green tinge to it. After having everything tested my readings are good. Could this be because the sand in the filter needs to be changed? Really frustrated and in need of some advice.Reply
Big Mac Posted: 6/20/2012
I having problems of late with my pool sand filter.I changed the sand a couple of years ago.
It seem to have sand coming into the pool this year.
My sand filter is 12 years old.
I was wandering if it was time to change the filter.
Reply
JW Posted: 6/13/2012
After 7 years, I finally did it. These instructions were perfect. I saw the comment where someone had used a shop vac instead of a cup. I did that as well and I know it cut down on the work. I had 300 lbs of sand to remove. To keep the tube centered while pouring the new sand in, I used duck tape with an "X" pattern accross the middle and attached it to the lip of the tank on 4 sides. It held with no problems while I poured the sand. The hardest part still was removing the old sand. I don't look forward to doing this again in 7 years but at least I know how now.Reply
InyoPools Product Specialist Dennis R. Posted: 6/12/2012
play sand - No you should not use play sand in your filter. Pool sand is manufactured with sharper edges for better filtering. Lowe's has pool sand for around $7 a bag.Reply
Anonymous Posted: 6/11/2012
Is it acceptable to use play sand. I've heard both ways.Reply
InyoPools Product Specialist Dennis R. Posted: 6/5/2012
PoolNewbie - We are working on this printout problem. In the meantime as a work around, I have copied the whole guide into Word and printed it from there.Reply
PoolNewbie Posted: 6/5/2012
These seem like excellent directions. However, when I tried to print them: the 1st page is blank, the 2nd page contains the start of the instructions and the rest of the pages are blank.Could you redesign this web page so that it is printable? Thanks.
Reply
Bobcat Posted: 6/3/2012
I think I have an issue with my Sand Filter, but I think I will just buy a new one.Reply
Rudy Posted: 7/10/2011
Perhaps the spider gasket needs to be replaced.Reply
Anonymous Posted: 6/21/2011
I have a Haywood Power Flo lx Pump and filter. The Mod on the Filter "Multiport Valve is Mod DF1710 Haywood Ari-Flo Valve. All the ports work except the filter. Why? All the hoses are on correct, no power through the hose entering the pool, just a trickle.Reply
Angela Posted: 6/19/2011
I have the same problem as Chris, but I didn't see the solution. We replaced our sand, but sand & debris continue to shoot back into our pool when it is set to filter or when we backwash. We now have an algae problem & can't vacumn because it just shoots back into the pool. How do we fix this? We have a Hayward S180T sand filter on our above ground pool. any help would be appreciated as we have never had a problem for 5 years and the pool store cannot fix this either.Reply
Chris Posted: 6/19/2011
We change our sand every year when we are opening the pool. It doesn't cost much and helps keep the pool cleaner. This year we have sand shooting back into the pool. We have had our above ground pool for 10 years and never had this problem before. Do you know why it is doing this and how do we stop it?Reply
LBASIC Posted: 6/12/2011
Thanks for the help. My sand was only 5 yrs old but didn't seem to clean last year. After reading your "how to" it was easy. Takes less than 1 hr. hard part is removing old sand. ThanksReply
Task complete after 8 years! Posted: 5/30/2011
Thanks for the step by step guide, it made all the difference! We have a different filter than the one pictured but the steps are pretty much the same. We used a shop vac to get the sand out which went much faster. We ended up starting over after the center pole shifted after we poured the first 100 lbs. of sand in! But everything went well the second time. It took 3 hours from start to finish but we were swimming before the weekend was over! Thanks!Reply
clueless pool virgin Posted: 5/6/2011
I have put off doing this chore for about ten years past when I SHOULD HAVE DONE IT. I was afraid of what I did not know about. Now that I know what to do, how to do it and what to expect and inspect; I'm gonna get me some sand!!!Reply
H.HUMMEL Posted: 4/9/2011
Great Information. I couldnt explain it any better myself. I dont think very many pool owners are familiar how when or why they would change the sand.Reply