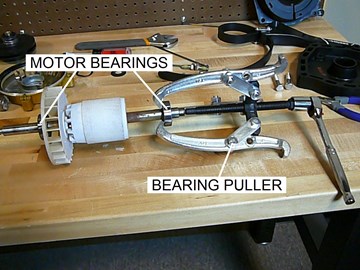
When your neighbors start complaining about your screeching pump, it's a good sign that the bearings in your pool pump motor have failed and it's time to either replace the motor or replace the bearings in the motor. This guide is broken up into two parts. Part I shows you a step by step approach to removing the bearings of your pool pump motor. Part II shows you how to replace the bearings and reassemble the motor. Although this guide is specific to the Hayward Super Pump Motor, many steps are applicable to other brands of motors.
Click Here to Find Your Motor Parts (Including Bearings, Capacitors, Switches & More)
Click Here to Find Your Replacement Pool Pump Motor & Gasket Kit


Jamie Carsten Posted: 7/19/2021
I need to know the bearing part numbers for a Century Pool pump (purchased from you), SP3210Z1BE, Part 7-196336-20. I used your guide but don't see those listed.Reply
InyoPools Product Specialist Matt S. Posted: 7/20/2021
The SP3210Z1BE uses two of the 10000353 - Bearing, 203.Reply
Mark Posted: 9/24/2020
I got everything I need to replace the bearings. I got to the part to remove the 4 long screws. I got 2 out but the other 2 are rusted in. Do you have the P/N for this screw if I have to drill it out. Thank youReply
InyoPools Product Specialist Matt S. Posted: 9/24/2020
What is the part, model, or catalog number on your motor's label? A picture of the motor label would be most helpful.Reply
Mark Posted: 10/1/2020
I got everything I need to replace the bearings. I got to the part to remove the 4 long screws. I got 2 out but the other 2 are rusted in. Do you have the P/N for this screw if I have to drill it out. Thank you C48K2N143B1 SP1601Z1MReply
InyoPools Product Specialist Matt S. Posted: 10/19/2020
I believe this is the crew you are looking for: UST1102 Thru Bolt 8-32 x 8.63" - TBA832-863Reply
Mark Posted: 9/24/2020
Model C48K2N143B1 SP1601ZReply
InyoPools Product Specialist Matt S. Posted: 10/5/2020
The C48K2N143B1 pool pump motor uses two of the 62032RS bearing.Reply
Kenny Posted: 1/16/2020
looking to see what size bearings I need for a Century pool pump. Model is B2853 with serial # 22013CH. Part 0-F56AA37A0-04. Type is CX. Frame is P56Y 1.0Hp. 60Hz. 3450 RPM. 230/115 Volts. 6.6/13.2 Amps.Reply
InyoPools Product Specialist Robert M. Posted: 1/20/2020
Hello Kenny - A B2853 poll pump motor would require two 6203 bearings. Click Here to view all of the available parts for the B2853 motor.Reply
Anonymous Posted: 8/13/2019
I’ve replaced my sea and both bearings, but didn’t pay close attention and forgot to put back the white washers and the rear bearing spring load (or something like that). I know the spring load is important and will fix it tomorrow, but what about the two white plastic washers ? ThanksReply
InyoPools Product Specialist Matt S. Posted: 8/14/2019
If it was in there, it was likely in there for a reason. When you take something apart and then put it back together, you shouldn't have spare parts.Reply
Anonymous Posted: 11/26/2018
What bearings would go with a A.O. Smith Part 7-193994-06 Type CX, FR Y56Y? ThanksReply
InyoPools Product Specialist Matt S. Posted: 11/27/2018
Hello Hicks - the 7-193994-06 pool pump motor requires two, 203 style motor bearings.Reply
david crowe Posted: 10/17/2018
Do you have bearing for the century v-green 165?Reply
InyoPools Product Specialist Robert M. Posted: 10/17/2018
Hello David - The V-Green 1.65 uses two 6203 double sealed ball bearings.Reply
Anonymous Posted: 8/22/2018
great how to but I demolished the threading on the shaft rod(at the male threaded impeller end and the female threaded end that takes the governor screw)with the bearing puller. after much effort I managed to rethread both. would advise to buffer the shaft ends with scrap nuts/threads/sockets(?) before applying all that pressure from the bearing puller.Reply
Inyopools Posted: 12/11/2017
In N Tx - Give us a call at 407-834-2200. If we can identify your motor from the motor label we can usually specify your motor bearings.Reply
In N. TX Posted: 12/5/2017
So this is a great article. I am in need of replacing bearings, but what I can't seem to figure out is where do I find part numbers for the pump bearings without having to pull the whole pump apart to get the part numbers off the bearings themselves. I don't really want the pump pulled apart that long (to get part #s then order and wait for shiping, etc) if possible.Reply
InyoPools Product Specialist Dennis R. Posted: 6/11/2017
Unknown home - It sounds like your motor bearings are out of alignment and if the armature has been rubbing on the windings, you may need a new motor.Reply
Unknown home Posted: 6/9/2017
My pump motor is very loud, I checked the bearings and they are fine. It seems that the armature is rubbing on the windings . I had the motor on a bench and as I turned it by hand I could hear the rubbing. Is the motor bad? Why is the armature covered with a white compound?Reply
InyoPools Product Specialist Dennis R. Posted: 3/23/2017
Zachary - Rust on the shaft will make it difficult to remove the bearings. Try squirting it will WD-40. Also, rust indicates that water got into your motor and it might also have shorted out the motor windings. You may be looking at replacing the motor.Reply
Zachary Posted: 3/23/2017
Why are the bearings so hard to remove there is rust on the shaft is that a bad thingReply
InyoPools Product Specialist Dennis R. Posted: 6/6/2016
Jim - Thank you for your comment and you raise a good point. If your motor is heavily corroded as you point out, your chances of saving it are slim. Even if you were able to get to and replace the bearing, there is a good chance that something else will go wrong with a motor that far gone.Reply
Jim Posted: 6/3/2016
Do yourself a favor and just buy a new motor. They used a new motor in the repair video for a reason. Your old motor everything will be corroded and the thru bolts will snap when you try to remove them. I've tried on two different occasions and two different motors with the same result. (Yes I soaked for long time with penetrating oil)Reply
Dave G Posted: 5/26/2016
Great site, pics are awesome but there is another plastic washer behind rear bearing that was not shown or discussed. I hope it is not just my pump that had this.Reply
InyoPools Product Specialist Dennis R. Posted: 5/18/2016
bearings - The screeching sound is an indication that your bearings are close to failing. I would replace them or the motor and the shaft seal. Your apparent vacuum air leak may be due to a loose or broken hose connection. Try holding the hose that floats on top of the water under the water. If that stops the air leak, you probably have a bad hose connection.Reply
Anonymous Posted: 5/17/2016
I noticed air was getting in when I was vacuuming but pump runs fine when I'm not vacuuming. My took a flashlight out and noticed a small drip,of water from bottom of pump. Then when I turn pump on, it makes a screeching sound for about 5-10 seconds and then stops. Should I replace bearings as well as seal?Reply
InyoPools Product Specialist Dennis R. Posted: 7/13/2015
novice - If your motor is making loud metal noises that's probably your motor bearings going bad. Failing capacitors might hum but nothing loud. You might also take the motor out of the pump housing to see if the impeller or diffuser is rubbing on the inside of the housing. As to the location of the capacitors, the run capacitor is usually on the top of the motor under the bump. The start capacitor would be under the electrical cover at the back of the motor. See our guide on "How To Replace a Pool Pump Capacitor" for more information.Reply
novice Posted: 7/12/2015
after replacing the capacitor, motor starts in slow speed, but not normal. when in normal pool mode it makes loud loose metal rubbing sound and shuts off to restart every 5 minutes until it runs, what else can be wrong? and if there are 2 capacitors, where are the located? I have AR smith two speed motor with capacitor on top which I replaced and it is a 25/ 370. thanksPS, your article email link is not working.
Reply
InyoPools Product Specialist Dennis R. Posted: 6/28/2015
Martin - You could pull your pump's motor out of the pump housing to see if the impeller or diffuser are damaged and might be rubbing on the housing. See our guide on "How To Replace A Pool Pump Impeller" for instructions on pulling the motor. You would not have to remove the impeller to see if it was damaged.Reply
Martin Posted: 6/28/2015
How do you distinguish between failing bearings and other issues (such as maybe a small bit of debris caught and rubbing somewhere in the mechanism? Our pop-up motor suddenly started sounding louder than usual but does not screech and still seems to have almost full power. Perhaps one clue is, when it turns off instead of immediately going silent you can hear it spin down rather noisily for a couple seconds.Reply
InyoPools Product Specialist Dennis R. Posted: 4/15/2015
Bearing washer - Unfortunately, we do not sell that part. You may have to go to a motor shop to identify and buy it.Reply
Anonymous Posted: 4/13/2015
Your website is very informative. The photos are great but my pool motor has a rusted metal washer behind the rubber water slinger. I can't find a parts list or diagram which shows this. I think they are inside the hub of the front bell. I measured the rusted washer and it looks like 5/8 id and 1.25 od. There is a another rubber washer under the rusty metal washer. Thanks. JoeReply