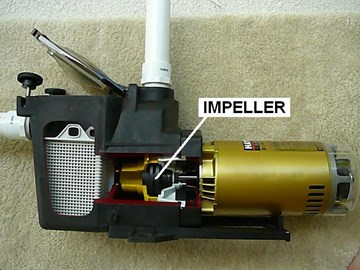
The location of the pool pump impeller is shown in this cut-away of a pool pump. The spinning action of the impeller when driven by the pump motor generates the water pressure in your pool system. Sometimes debris will get into the pump and will crack the impeller. In other cases the threads that hold the impeller to the motor shaft become worn causing the impeller to wobble and rub against the diffuser. This guide explains how to replace a bad pool pump impeller.
Please Click Here to View Pump Impellers


Claudia L. Duncan Posted: 4/21/2022
Hooked up my new pump with new impeller, gaskets, etc. It ran great for a few minutes then began to cycle on and off. Any idea what could cause this?Reply
InyoPools Product Specialist Matt S. Posted: 4/21/2022
First, I'd check to ensure your wiring and voltage settings are correct. If that checks out, I'd confirm the motor and impeller you are using are matched correctly. Motors and impellers have two total horsepower scales, uprate and full rate. So, if you purchased a 1 HP full rate impeller but installed a 1 HP uprate motor, your motor has a max total HP output of 1.25, and the impeller is a total HP of 1.65. Due to the higher drag, the smaller motor will have trouble spinning the larger impeller. Also, the motor cycling on and off could be a sign it is overworking itself; its overheating cuts out, cools off, restarts, and then shuts down when it starts to overheat.Reply
Claudia L. Duncan Posted: 4/21/2022
Thanks for the response. I used the parts sold to me by the pool store--I brought the new pump in to show them, so I assume they gave me the right stuff. And it pretty much looked like the parts I was replacing. I think it's a wiring/voltage problem, beyond the pump. I need to call an electrician---Reply
InyoPools Product Specialist Matt S. Posted: 4/22/2022
If you believe it is a wiring problem, I'd call an electrician. But I wouldn't rule out mismatched impeller and motor. It's happened to every pool tech who has been working for a while. A 1HP and 1.5HP impeller look very similar, and if you're not careful, you could pick up the wrong part. It is just like any other profession; we can make mistakes. If the electrician finds no wiring issues, you need to open the pump to check the part numbers.Reply
Claudia L. Duncan Posted: 4/22/2022
Thanks so much for the responses!Reply
InyoPools Product Specialist Dennis R. Posted: 2/27/2017
wayneb56 - Here was the response from the Century motor rep. "On a question like this, you really need to know the whole story. We don’t build the motor, but I believe it is a three phase, induction motor. The torque will vary, depending upon the speed selected. The torque will be more than adequate to overcome the seal drag at the lowest speed setting, with acceptable operating voltage. Pentair should be able to advise on the actual torque. Due to possible hand injury, I don’t think anyone would recommend trying this procedure.Reply
InyoPools Product Specialist Dennis R. Posted: 2/26/2017
wayneb56 - I wouldn't think you could prevent a motor from spinning by holding the impeller. They have to generate pretty good torque to move the water. But I don't know. I have a call into the motor rep. When he responds, I will get back with you.Reply
wayneb56 Posted: 2/20/2017
Experiencing low pump pressure. Pump sounded like it wasnt generating all the power it normally does (Pentair Superflo VS). Removed basket and found impeller bolt laying on bottom. Separated pump and reinstalled impeller bolt. Question - should I be able to keep motor from spinning simply by holding onto impeller when i turn it on?Reply
InyoPools Product Specialist Dennis R. Posted: 6/3/2016
Concretedad - First check to make sure you bought the right replacement shaft seal. Then check the impeller shaft and seal plate for any wear that would offset your shaft seal. Also, check step 15 of this guide to make sure that the shaft seal isn't mounted upside down.Reply
Concretedad Posted: 6/2/2016
Replaced my shaft seal but now when I start the pump it tightens up so much on the impeller it locks upReply
InyoPools Product Specialist Dennis R. Posted: 4/29/2016
danny - Look at Step 15 of this guide. It sounds like the old metal collar did not come off with the old shaft seal. You may be trying to force the new collar over the old one.Reply
danny Posted: 4/28/2016
I ordered and received a Hayward 1 1/2 hp motor and shaft seal for a Hayward pump Model number SP 2810X15. I have watched your excellent video but cannot get the seal on the impeller. The seal looks different than the one I took off. the new seal has a metal bottom with a rubber seal inside. the indents (I guess keeps the seal from spinning) are up towards the ceramic seal and it seems I would have to force the seal passed the lower metal to get to the indents? How could I do this correctly?Reply
InyoPools Product Specialist Dennis R. Posted: 5/26/2015
Jerry - If the nick is substantial, I would replace the impeller so it is sound and balanced. The nick itself would not cause an air leak, but it does indicate that the inside of the pump had some problem like a stone or acorn. Check the pump body for possible cracks. Recheck the cover lid and O-ring to make sure it is set correctly. Check the top of the basket cavity to make sure it has not cracked from over tightening. Then check all your suction connections. One owner temporarily packed plumber's putty around each connection to see if that stopped a leak. Then pulled off putty in sequence to see what connection generated air in the system.Reply
Jerry Posted: 5/25/2015
My pump will not prime. Purchased new lid and and gasket and replaced them. Pulled out pump and noticed a nick in one of the impeller bladed. Could this be the problem? Must be taking on air somewhereReply
Iyopools Posted: 4/6/2015
impeller - I don't know why the impeller is able to spin both ways when you are holding the shaft and keeping it from rotating. Does the shaft rotate when you move the impeller?. When you hold the other end of the shaft, it should not be able to move. Then from the impeller side, rotate the impeller COUNTER-CLOCKWISE to screw it off the shaft.Reply
Anonymous Posted: 4/5/2015
I have learned a lot from your page. Thank you!So, here's my problem. I am trying to take the impeller off the motor. I have tried holding the back screw and turning clockwise. But, while holding bolt,impeller spins both ways, so I can't unscrew. Thoughts?
Reply
InyoPools Product Specialist Dennis R. Posted: 12/21/2014
Pickles - I am not familiar with this pump but going to a hammer sounds a little extreme and you may end up damaging the pump. Give us a call and we will line you up with a technician at the pump manufacturer.Reply
Pickles Posted: 12/18/2014
Hello there! Thank you for the GREAT information and video. My question is how best do I separate my old leaking shaft seal (and impeller) from its metal bracket/motor mount. I have an older pump that is completely metal (brass I think?). My keyed shaft CK1102 motor just died and I am replacing it, but a tech at a local pool store tells me that the pump & impeller are still in great shape and do not need replacing. I have all new seals ready to go and I've removed the impeller and pump from the dead motor, now I want to ensure I separate these two parts without damaging either.There is a metal ring/piece I have access to from the shaft side of the impeller and the only thing I can see would be to force it out with perhaps a deep well socket and a hammer. Is that my best bet, or am I missing something? Thanks!
Reply
InyoPools Product Specialist Dennis R. Posted: 8/11/2014
Susan - If your diffuser is not damaged, you only need to buy the diffuser gasket, called the Bulkhead O-ring for this pump. If this is an older pump, you might want to consider also buying the other gaskets and shaft seal. These include: the Strainer Cover O-ring, the Housing O-ring, and the Shaft Seal.Reply
Susan Posted: 8/11/2014
I'm ordering parts to replace an impeller on its way out for a Hayward Max Flo II, I'm not sure which diffuser gasket to order. Do I have to order the whole diffuser, or can I just order the gasket? I'm looking at part 5110-82. Thanks!Reply
InyoPools Product Specialist Dennis R. Posted: 8/4/2014
Ken - According to the pump manufacturers, if the oil on your fingertips gets on the ceramic bearing surfaces of the shaft seal, it will cause the surfaces to burn and deteriorate during operation.Reply
Ken Posted: 8/2/2014
How would touching the ceramic bearing surfaces corrode them? Also, you might want to specify what type of lube to use on that gasket (silicon, I believe would work). Great article and many thanks for the closeups.Reply
InyoPools Product Specialist Dennis R. Posted: 5/27/2014
HygienePool - That's a long time for an impeller. I would pull out the motor and check it. If there are any cracks or pieces broken off on the impeller, it needs to be replaced. Also if the threads are worn causing the impeller to wobble on the shaft, replace it.Reply
HygienePool Posted: 5/26/2014
I have a Purex 2hp Whisperflow pump. I believe it is about 16 years old. I replaced the motor last year. I was wondering if the impellar could have degraded due the materials that flow through it? What is the useful life of an impellar?Reply
InyoPools Product Specialist Dennis R. Posted: 5/25/2014
medic 1655 - I have no idea what your three metal gaskets are either?? But if you broke any part of your impeller, you should replace it. If your haven't replaced your motor shaft seal and gaskets, I would also do that. The repair kit for that pump is "GOKIT66".Reply
medic1655 Posted: 5/24/2014
I lost prime on my Hayward Northstar pump. I took out the impeller cleaned it out... I ended up with 3 metal gaskets that I don't know where they belong and cannot find them on the schematic and still have no prime. Impeller moves easy, motor runs quite. The impeller was on very tightly and in the process of trying to get it off, a part of the outer edge snapped off. Could this be the problem and it needs to be replaced? TYReply
InyoPools Product Specialist Dennis R. Posted: 6/11/2013
Smitty - If this is the first time you have run this motor, it may be configured for the wrong voltage. Check your incoming voltage. You may have 115V at the breaker box and your pump may be set up for 230V.Reply
Smitty Posted: 6/10/2013
When turnin the pump on, the motor runs at a slow speed for the first 20 seconds, then it shuts down completely. Any advice?Reply
InyoPools Product Specialist Dennis R. Posted: 6/2/2013
dlc - If your motor is not making excessive noise, it and the impeller are probably not the problem. And if your impeller was clogged, you would not have good flow initially. I would guess this is a filter issue. If you water was dirty and you ran that water through the filter, the filter may need to be cleaned several times to clear the fine debris out of the filter. If you used chemicals to clear your water, these chemicals may be clogging your filter. Try soaking your filter with a TSP solution to help clean out the fine residue in the creases of the filter.Reply
dlc Posted: 6/1/2013
When I clean my filters and reinstall them and turn on the pump, the flow is good for a short while but then it starts to slow down. I have a filter that is a little larger and it works better. I was wondering if the pump could be losing flow when the back pressure in the filter starts to increase due to problem with the impeller. I do not believe it is the filters one is 6 months old and it does the same thing. the flow starts slowing down about 2 hours after the pump is restarted.Reply
InyoPools Product Specialist Dennis R. Posted: 5/10/2013
loss of prime - If you are truly losing prime to the point that your pump can no longer suck in water - no water flow, you may have a leak in your vacuum hose. Try disconnecting all hoses except the one coming out of the skimmer. Make sure that hose is completely under water. Your pump should maintain prime. Add the rest of your hoses without attaching the cleaner. Hold all of the hoses under water. Again your pump should maintain prime. Now add the cleaner and let the hoses float to the top. If you lose prime now, you have a leak in one of the hoses. Check hose connections then take out one hose at a time to try to isolate the leak.Reply
Anonymous Posted: 5/9/2013
My Hayward super pump loses its prime when I attach the pool vacuum at the skimmer. The pump doesn't seam to have the suction power when the vacuum is connected. What could the problem be?Reply
InyoPools Product Specialist Dennis R. Posted: 4/23/2013
ds1 - If you have a leak between the impeller and motor, you probably have a bad motor shaft seal. I would take the motor out of the pump housing per the above instructions. Then check that the impeller is sound (is not cracked or wobbles) and not clogged. Then rotate the impeller. If the motor shaft does not rotate freely, the bearings are probably bad. Most people replace the motor when the bearings go but they can also be replaced with the right tooling.Reply
ds1 Posted: 4/23/2013
I purchased a new above ground pool with a 1 1/2 HP 2Sp pump, last year. I drained for the winter. After reinstalling hoses and pipes, there is a leak between the motor and impeller. There is also a loud noise coming from the motor. Any suggestions? Do you think it's a bad bearing or a pump seal?Reply
InyoPools Product Specialist Dennis R. Posted: 1/4/2013
mckyd68 - Sounds like the bolt is stripped. Try putting some pressure under the head of the bolt with a flat screwdriver as you are turning the bolt. If the bolt or socket is stripped, you may have a problem getting it to hold when you reassemble your pump. Talk to a local hardware store about your options or you may be at the point of buying a whole new pump.Reply
mckyd68 Posted: 1/3/2013
I am trying to remove the motor on my Hayward Super pump. One bolt just keeps spinning and is not losing up. Any suggestions?Reply
InyoPools Product Specialist Dennis R. Posted: 8/27/2012
kfcrandy - The impeller is not your problem unless it is clogged. See our guide on cleaning out an impeller Also if you have low pressure, you may have developed a suction leak in your pump or in the piping coming into your pump. Finally make sure that your skimmer and strainer baskets are clean.Reply
kfcrandy Posted: 8/25/2012
My pump ran dry due to my pool running low on water and now it has very low pressure, will replacing the impeller be the fix I need to regain the pressure I need to filter the water...?Thanks, Randy
Reply
InyoPools Product Specialist Dennis R. Posted: 8/10/2012
stuck motor - Most pumps come apart easily. If you have an old pump and it hasn't been pulled for a while, it may be corroded shut a little. Try hitting around the joint with a rubber hammer. If something is jammed inside, you may have another issue. Try prying the motor out gently. Have a new housing gasket ready if you have to put this together right away.Reply
Anonymous Posted: 8/10/2012
Unbolted the motor to check the impeller for trash but couldn't pull it apart. didn't try to force it. Is it necessary to pry the motor away?Reply