How To Install a Beaded Pool Liner for an Oval Pool
How To Install a Beaded Pool Liner for an Oval Pool
WRITTEN BY:
Inyo Pools
2.82 out of
5 stars on
11
ratings
(Click on a star to add your rating)
This guide shows you how to install a Beaded Pool Liner in an Oval Pool. There are some subtle differences covered here between installing a Beaded Liner in as Oval Pool versus a Round Pool.
UNPACK LINER - Take the liner out of its shipping box and lay it out in the sun to make it more flexible and help get the winkles out. If you use a knife to open the box, be very careful that you don't cut the liner. Check the liner seams and surfaces for tears and holes. It's easier to fixed then now than in the pool.
Step 2
VIEW LINER - Liners are typically identified by how they are attached to the top of the pool wall. Many liners come as what is called a UNIBEAD liner. They can be used as a SNAP BEADED liner or a V-BEADED liner. These styles are shown here. The V_BEADED liner fits over the top of the wall. The SNAP BEADED liner fits into a special bead track added to the top of the wall.
Step 3
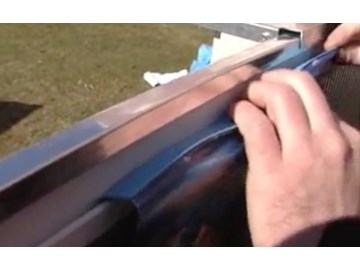
CONVERT TO A SNAP BEADED LINER - To covert the Unibead liner to a Snap Bead liner, make a two inch cut in the seam of the V-Bead as shown here and start to separate the V.
Step 4
SEPARATE V - Starting at the 2" cut in the seam, pull the top of the V off the top of the liner.
Step 5
INSTALL TOP TRACK - Push the liner track onto the top of the wall. The liner bead will be snapped into this track. 4:52
Step 6
REBUNDLE LINER - After the Liner has become warm, re-roll the liner so that it can be transferred inside the pool. Fold it along the long side of the Oval so you will be able to roll it out across the long length of the pool inside the pool.
Step 7
LIFT LINER INTO POOL - Transfer the liner over the top of the wall to a person inside the pool.
Step 8
ROLL LINER OUT - Open the liner down the middle of the pool along the longer length. Then spread the liner out towards the pool walls. Do this in your stocking feet. DO NOT step on liner with your shoes. Make sure the oval shape of the liner lines up with the oval shape of the pool.
Step 9
BACK KICK LINER INTO CORNER - There should be a seam in the liner between the liner floor and the liner wall. Stand at the wall facing toward the center of the pool and gently push the seam into the corner of the pool by hopping up and kicking your heals into the corner. Do this all around the pool until the corner seam in in the corner of the pool. This action should remove the major wrinkles in the liner floor.
Step 10
PUSH SNAP BEAD INTO TRACK - Push the beaded edge of the liner into the liner track.
Step 11
INSTALL RESIN TOP RAIL - Secure the Resin Top Rails onto the uprights.
Step 12
VIEW TOP COVERS - View the Top Covers. They are usually split into two sections: lower and upper. Also note that the covers for the oval ends are shaped differently than the covers for the flat sides.
Step 13
PLACE LOWER TOP COVERS - Place the lower half of the Top Cover onto an Upright Post and slide it up until it is fully engaged with the Resin Top Rails.
Step 14
SECURE LOWER TOP COVER - Secure the Lower Top Cover to the Upright Post with a single screw.
Step 15
PLACE UPPER TOP COVER - Place the Upper Top Cover over the top of the Upright Post so that it engages with the Lower Top Cover.
Step 16
SECURE UPPER TOP COVERS - Secure the Upper Top Cover to the Lower Top Cover with a single screw.
Step 17
REPEAT FOR OTHER TOP COVERS - Repeat the last four steps for the other Top Covers.
Step 18
FILL POOL TO 1 INCH - Begin filling the pool to a depth of 1 inch. As it is filling, back kick the liner corner seam into the corner of the pool to remove any remaining winkles in the liner floor. After the pool has filled to 1", you will not be able to move the liner.
Step 19
FILL POOL TO HALF FULL - After removing any floor winkles, fill the pool to half the pool depth.
Step 20
INSTALL SKIMMER - See your pool installation instructions for installing the pool Skimmer and pump connections. Note: you will have to have the pool at least half full to provide stability to the wall before adding the weight of the skimmer.
Step 21
INSTALL SAFETY LABEL 1 - Install the larger safety label on the outside of the pool where you enter the pool, Note: your warranty may be void if the safety labels are not installed.
Step 22
INSTALL SAFETY LABEL 2 - Install the smaller safety label across from the pool entry, inside the pool and just above the water level.
InyoPools Product Specialist Dennis R.Posted: 6/30/2017
Nena - Is your liner a little too short on the wall? If so, the weight of the water may be pulling the beaded liner out of its track. You might have to add more sand on the bottom of the pool and/or a heavy pad to bring the bottom level up. Also, check that the bead fits snuggly into the liner track. You may need to replace the track.
Reply
NenaPosted: 6/29/2017
I purchased a beaded liner and have had it come off 4 times in 1 month. 3 times we reinstalled it ourselves and the 4th we hired a professional, it is now coming off again any idea why?
Reply
InyoPools Product Specialist Dennis R.Posted: 10/2/2016
MAT - No, you would have a foot of extra liner around the circumference of the pool that you could not tuck in. You may have to buy a custom liner. Call our number at 888-367-38-3082 and talk to one of our service reps about your options.
Reply
MATPosted: 9/29/2016
.for an oval 24x13 f. above gr. pool, can i use a 24x14 liner?..without problem?[ wrinkles] Thanks
Reply
InyoPools Product Specialist Dennis R.Posted: 7/10/2016
100 degrees - No, the liner will not shrink. In fact, it will be more pliable and will stretch easier.
Reply
AnonymousPosted: 7/8/2016
It is over 100dagress here well the liner shrink
Reply
InyoPools Product Specialist Dennis R.Posted: 5/31/2016
bottom filter – Unfortunately, we do not have a video of that procedure.
Reply
AnonymousPosted: 5/28/2016
hi we have a bottom filter do you have a video on how to make the cut for that thats what we are most nervous about
Reply
InyoPools Product Specialist Dennis R.Posted: 5/23/2016
shay - The weight of the water in a filled pool should help flatten these "pits" out.
Reply
shayPosted: 5/19/2016
if you are in the pool walking around you leave pits in the bottom
Reply


InyoPools Product Specialist Dennis R. Posted: 6/30/2017
Nena - Is your liner a little too short on the wall? If so, the weight of the water may be pulling the beaded liner out of its track. You might have to add more sand on the bottom of the pool and/or a heavy pad to bring the bottom level up. Also, check that the bead fits snuggly into the liner track. You may need to replace the track.Reply
Nena Posted: 6/29/2017
I purchased a beaded liner and have had it come off 4 times in 1 month. 3 times we reinstalled it ourselves and the 4th we hired a professional, it is now coming off again any idea why?Reply
InyoPools Product Specialist Dennis R. Posted: 10/2/2016
MAT - No, you would have a foot of extra liner around the circumference of the pool that you could not tuck in. You may have to buy a custom liner. Call our number at 888-367-38-3082 and talk to one of our service reps about your options.Reply
MAT Posted: 9/29/2016
.for an oval 24x13 f. above gr. pool, can i use a 24x14 liner?..without problem?[ wrinkles]Thanks
Reply
InyoPools Product Specialist Dennis R. Posted: 7/10/2016
100 degrees - No, the liner will not shrink. In fact, it will be more pliable and will stretch easier.Reply
Anonymous Posted: 7/8/2016
It is over 100dagress here well the liner shrinkReply
InyoPools Product Specialist Dennis R. Posted: 5/31/2016
bottom filter – Unfortunately, we do not have a video of that procedure.Reply
Anonymous Posted: 5/28/2016
hi we have a bottom filter do you have a video on how to make the cut for that thats what we are most nervous aboutReply
InyoPools Product Specialist Dennis R. Posted: 5/23/2016
shay - The weight of the water in a filled pool should help flatten these "pits" out.Reply
shay Posted: 5/19/2016
if you are in the pool walking around you leave pits in the bottomReply