How To Replace the Navigator Pool Cleaner Gear Box Assembly

WRITTEN BY: 

  4.6 out of 5 stars on 5 ratings
(Click on a star to add your rating)

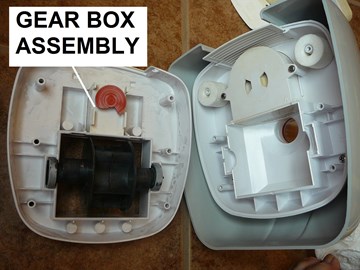
If your Hayward Navigator Pool Cleaner stops turning and gets hung up in a corner, you will want to check the Navigator's Gear Box Assembly inside the Navigator Cleaner. The Gear Box is one of the principle elements used in controlling the path of the Navigator. Occassionally you might get a small piece of hard debris in the Gear Box that clogs up the gears and keeps the Navigator from shifting left and right. This guide shows you how to access and replace the Hayward Navigator Pool Cleaner Gear Box.

Step by Step

Top

Step 1

TOOLS YOU WILL NEED -
1) Phillips screwdrivers- small and medium. 
2) A work area where you can spread out. TIP: It is very important that you are careful when taking this apart. If you lay all the pieces out in a row as you remove them, it will be easier to put back together. 
3) Three small Tupperware or paper bowls to put parts and small pieces in. Label them #1 – #3 with a magic marker.

Step 2

REVIEW PARTS LIST - Here is a parts list for the inside of a Hayward Navigator Cleaner. For a larger parts list click here Navigator Part List. The Gear Box Assembly is shown on the middle of the picture. To order the assembly click here: "Gear Box Assembly".

Step 3

REMOVE COVER ASSEMBLY -  Turn the Navigator upside down and remove the Cover Assembly in the center. The screw will not come out all the way but you should be able to lift it out.

Step 4

REMOVE CORNER SCREWS - Remove the four corner screws that hold the Middle Body and Lower Body together. You may have to hold the front flap back to access the front screws. Put the screws and plug into the #1 container.

Step 5

SEPARATE MIDDLE BODY AND LOWER BODY - Pull the two sections apart. Once apart, they will look like this; the Middle Body on the left; and the Lower Body on the right. Set the Lower Body aside.

Step 6

REMOVE BUMPER SCREWS - Returning to the Middle Body, remove the four screws on the bumper and put them in container #2.

Step 7

REMOVE BUMPER - Lift off the bumper and set it aside.

Step 8

SPLIT MIDDLE BODY - We will now divide the Middle Body into its two sections: the Lower Middle Body and the Upper Middle Body. Remove the two screws, as shown on the picture, and put them in the same container. They are smaller than the others, so remember that when putting it back together.

Step 9

SEPARATE MIDDLE BODY SECTIONS - Gently lift the Lower Middle Body away from the Upper Middle Body and turn it over. The names seem off, but remember that the Navigator is on its back. If the Navigator was placed right side up, this Lower Middle Body would be on the bottom.

Step 10

INSPECT LOWER MIDDLE BODY - When you turn the Lower Middle Body over it should look like this. Sometimes the little red 3/4 circle show here (the Spinner) and the Main Turbine fall off their mountings and end up in the other section. Remember this when you are putting the two sections back together. Carefully lift out the red Spinner and the white washer that's behind it and put them in container #3.

Step 11

REMOVE GEAR BOX ASSEMBLY - Lift the Gear Box Assembly out of the Lower Middle Body. It should come out easily.

Step 12

TEST GEAR BOX ASSEMBLY - Blow into the little square hole on the angled end. The gears should make a high spinning sound. If not, or it sounds off, carefully remove the top and see if there is any debris inside of it. If you do open this, be careful that the gears don’t spill out. (I once found a small copper wire in one). If any of the gears are damaged, you will have to purchase a new Gear Box Assembly.

Step 13

REPLACE GEAR BOX ASSEMBLY - Put the repasired or new Gear Box Assembly back in place. The little tab will be facing out towards the back of the assembly.

Step 14

REPLACE RED SPINNER - If the Red Spinner and washer fell off in disassembly, replace them. From container #3 put the white washer around the small square of the Gear Box and the red spinner on top of that (it doesn’t matter which way it faces).

Step 15

REPLACE MAIN TURBINE - If the Main Turbine fell out of its bay during disassembly, put the Main Turbine back into its bay in the Lower Middle Body. Remember to match up the  LEFT and RIGHT markings on the Main Turbine and Lower Middle Body Assembly.

Step 16

COMBINE MIDDLE BODY - Put the Middle Body back together by placing the Upper Middle Body on top of the Lower Middle Body. This can get a little tricky because the Rear Screen HAS TO slip into little grooves. Be sure to place the Upper Middle Body on top of the Lower Middle Body to keep the Spinner from falling off its post.

Step 17

SECURE MIDDLE BODY SECTIONS - Hold the sections together and carefully turn the combined Middle Body over and secure it using the two smaller screws from container #2. DO NOT put the last four screws in yet. They secure the Bumper in the next step.

Step 18

REPLACE BUMPER - Put the Bumper on top of the Middle Body using the remaining four screws from container #2.

Step 19

JOIN LOWER BODY TO MIDDLE BODY - Put the Lower Body back on taking care that the black wheels fit snuggly on the outside of the turbines. DO NOT FORCE. It should just drop in but you may have to wiggle it a bit.

Step 20

REPLACE CORNER SCREWS - Use the screws from container #1 and secure the Lower Body to the Middle Body.

Step 21

REPLACE COVER ASSEMBLY - Replace the Cover Assembly and sequre it with the single screw.

Step 22

TEST GEARS - Turn the Cleaner upright and with the top of the cone gear protruding from the top of the vacuum, pull up on it and turn it. You should hear a nice slow spinning sound coming from the Navigator. If you hear any kind of crunchy sounds or the mechanism doesn’t sound right, then you did something wrong and will have to take it apart (that’s how I leaned!). However, before doing so, put it in your pool and see how it works.SHARE THIS ARTICLE:

Comments

Top
(1 to 3 of 3)

Anonymous  Posted: 5/7/2016 

It's working again..Good instructions.
 Reply

InyoPools Product Specialist  Posted: 5/17/2015 

case - Good idea. We will put that on our list of future HTGs.
 Reply

 Posted: 5/16/2015 

Thanks for instructions. These navigators have lots of costly parts to replace and lots of problemss go wrong with them. It would be helpful to post instructions of assembling the white gear box when it falls open or u want to check it.
 Reply