How to Troubleshoot a Dolphin Pool Cleaner

WRITTEN BY: 

  3.64 out of 5 stars on 22 ratings
(Click on a star to add your rating)

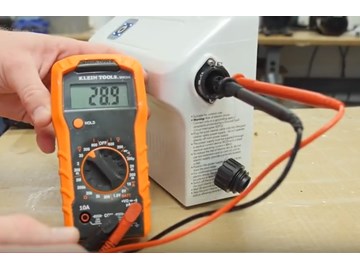
What do you do when your Maytronics Dolphin Pool Cleaners stops running or there are no lights on the Power Supply? This guide shows you how to troubleshoot the electrical circuits of the Maytronics Dolphin Pool Cleaners so you can isolate your problem and replace the failed parts or parts. Our primary tool for testing these electrical circuits is a multimeter/voltmeter so we will first cover some of the basics of how to use a multimeter.

Click Here to View Replacement Dolphin Pool Cleaner Parts 


Video

Step by Step

Top

Step 1

REVIEW MULTIMETER BASICS - This is a picture of a typical multimeter. Most multimeters have more functions than we will use, For this series of tests, we will only be using the AC or DC voltage and continuity test functions.

Step 2

DIAL METER FOR AC TEST - The AC side of the meter has two test ranges. If you are testing for voltages between 0 and 200V, you would set your meter to 200. If you are testing for voltages above 200V and up to 600V, you would set your meter to 600V. Since we will be testing for 120V from the wall socket, we will be setting the meter to 200.

Step 3

DIAL METER FOR DC TEST - The DC side of the meter has four test ranges. the upper limits of which are labeled 2, 20, 200, and 600. Since we will be testing for DC voltage of 29V after the Power Supply Transformer, we will be setting the meter at 200.

Step 4

DIAL METER FOR CONTINUITY TEST - A continuity test measures for a break in an electrical line, like the Dolphin Cleaner cable. When running this test, the POWER MUST BE OFF, and the meter should be set at the continuity setting as shown.

Step 5

OVERVIEW OF TESTS - This picture lists the 6 tests we will conduct to isolate your Dolphin electrical problems. Each of these tests may be broken down into a series of subtests such as Test 3a, Test 3b, etc, depending on the success or failure at each stage of the test.

Click Here to View Replacement Dolphin Pool Cleaner Parts

Step 6

TEST 1A - CHECK WALL OUTLET -The power at the outlet should be around 120V so set the meter for 200 on the AC side of the multimeter. Then place the two probes from the multimeter into the wall outlet. If you see a reading of between 120V and 130V, your wall outlet is good and you have successfully passed Step 1. Jump to Test 2A - Check Power Supply.

Step 7

TEST 1B - If you see 0V on your multimeter, check the following: Circuit Breaker may have tripped; the GFCI at your outlet has to be reset; or your outlet is bad and needs to be replaced.

Step 8

TEST 2A- CHECK POWER CORD - Pull the power plug out of the Power Supply to test the power cord between the wall outlet and the power supply.

Step 9

TEST 2B- Insert the two multimeter probes into the female end of the power cord  The meter should be set to 200V AC as used in Step 1. If the reading is between 120V and 130 V, the power cord is good and you can proceed to Test 3A.

Step 10

TEST 2C - If the reading on the meter is OV, Check for a break in the electrical wiring of the cord. Set the meter for a continuity check. PULL THE POWER CORD OUT OF THE WALL OUTLET. Place one probe in one of the holes in the female end of the power cord. Place the other probe on one of the leads on the other end of the cord that plugs into the wall outlet. If it reads 0V, move the probe to the other lead of the wall plug. There are two wires in the cord for hot and neutral. You want to make sure you are testing the ends of the same wire for continuity. Move the probes to the ends of the other wire and test it for continuity, If you don't have continuity on both wires, the cord is bad and needs to be replaced.

Step 11

TEST 3A - CHECK AMPHENOL PLUG - Reconnect the power cord to the Power Supply. Plug the power cord back into the wall and turn the Power Supply ON.

Step 12

TEST 3B - Set your multimeter to 200 on the DC side of the meter. Insert the two meter probes into the socket of the Amphenol Plug. The meter should read close to 29V DC. If you see 29V DC, the Amphenolotor Plug is good and you can go to Test 5A to check the Dolphin Motor.

Step 13

TEST 3C -  If you got 0V in the previous step, you will need to take a closer look at the Amphenol Plug.TURN THE POWER OFF. Then unscrew the Amphenol Plug with a Phillips head screwdriver and pull it out of the Power Supply.

Step 14

TEST 3D - Remove the Amphenol Plug from the wires with a small Allen wrench. Note how the wires are attached so you can replace them correctly when the plug is reattached.

Step 15

TEST 3E - To retest the voltage coming out of the Power Supply first TURN ON THE POWER. Then place the meter probes on the two raw wires. Be careful not to touch the probes across the wires or you will short them out. If you get 29V DC on the raw wire and you saw 0V DC when you tested the Amphenol Plug in Test 3B, you will need to run a continuity test on the plug itself. If you get 0V DC on the raw wire, you will have to test the fuse inside the Power Supply for continuity. Go to Test 4.

Step 16

TEST 3F- To test the Amphenol Plug for continuity, first make sure the meter is in continuity mode. Then place a probe on either side of the plug as shown. Make sure to test both of the two circuits through the plug. If continuity fails, you will have to replace the Amphenol Plug.

Step 17

TEST 4- CHECK POWER SUPPLY FUSE - If you have an older style Power Supply, it will have a fuse inside that can be checked for continuity to see if it failed. The older style Power Supplies have screws in the bottom plate that can be removed for access to the fuse. If the continuity check on the fuse is negative, replace the fuse. If the fuse tests positive, the Power supply has an internal problem and you will have to replace the Power Supply. If your Power Supply is newer (without screws), it does not have a fuse and you will have to replace the Power Supply.

Step 18

TEST 5A - TEST DOLPHIN MOTOR - To test for a bad motor you will have to disconnect the Cable from the top of the motor. To get to the end of the Cable, first TURN OFF POWER. Using a Phillips head screwdriver, unscrew the middle screw and lift off the Impeller cover.

Step 19

TEST 5A - Remove the Cleaner Cover by unscrewing the screws at each the 4 corners and lifting off the Cover.

Step 20

TEST 5B - Place the ends of a pair of needle-nose pliers into the holes on top of the Cable Retainer Plug. Twist the plug counter-clockwise until it comes out and then slide it down the Cable.

Step 21

TEST 5C - Pull the Cable out of the top of the motor. It may take a little effort.

Click Here to View Replacement Dolphin Pool Cleaner Parts 


Step 22

TEST 5D -  Set the meter to 200 DC and check that the Dolphin Cable is attached to the Power Supply. TURN ON THE POWER SUPPLY. Then place the meter probes into the plug on the motor end of the Cable. If the meter shows 29V, you are getting power to the motor. If the Pool Cleaner does not respond, your motor is bad. At this point, if the Cleaner is not still under warranty, it is usually cheaper to buy a new cleaner than sending the cleaner out for a motor replacement. If the meter shows 0V DC go to Test 6A. There is something wrong with the Cable.

Step 23

TEST 6A - CHECK THE DOLPHIN CABLE - If you have 29V DC coming out of the Power Supply into the Cable (See Step 3B) and 0V DC at the motor end of the Cable,  you will want to run a continuity check on each wire in the Cable to verify that the Cable is broken and needs to be replaced.Remember to unplug the Cable at the Power Supply end. If the continuity checks are successful, check that you are getting a good connection at the end of the plug on the Power Cable and that all of the pins are in the Power Supply plug.

Step 24

REASSEMBLY THE CLEANER - Plug the Cable back into the motor and secure it with the white Cable Retainer Plug. Don't over tighten. Reattach the Dolphin Cover and Impeller Cover. Reattach the Cable to the Power supply.

Step 25

PRECAUTION 1 - During the operation of your cleaner, Make sure that your pool is free of toys or small objects that can get lodged in your cleaner and burn up the motor.

Step 26

PRECAUTION 2 - When your cleaner is not in use, pull it out of the pool and keep it unplugged to avoid lightning and power surges.

Step 27

DOLPHIN CLEANER IS READY TO GO - For further information or clarification, please use the live chat feature or submit a support ticket

Click Here to View Replacement Dolphin Pool Cleaner Parts

Comments

Top
(41 to 59 of 59)

 Posted: 5/4/2020 

Mine worked until it just stopped yesterday. It comes on moves for a second than stops, moves backwards for a second than stops until I hit reset. Can anyone tell me what to do?
 Reply

InyoPools Product Specialist  Posted: 10/27/2020 

You need to begin the troubleshooting process, which is what we are highlighting in the above guide.
 Reply

 Posted: 4/22/2020 

I have followed guide and there is power into controller. The internal fuse is fine but it seems it wont turn on. The power button doesn't light up and no voltage across the four cable output
 Reply

 Posted: 4/11/2021 

Dolphin comes on but only one side is moving
 Reply

InyoPools Product Specialist  Posted: 4/16/2021 

The first place to check is the side panel and drive belt. Is the drive belt loose, stretched, or not in its groove? What type of Dolphin cleaner do you own.As with most things, the more information you can give us, the better we can help you.
 Reply

InyoPools Product Specialist  Posted: 4/24/2020 

Then it sounds like your transformer is bad if there is no power distribution at all.
 Reply

 Posted: 2/8/2020 

Push power button blue light comes on then it goes off
 Reply

InyoPools Product Specialist  Posted: 2/10/2020 

Hello - the guide provides some pretty in-depth troubleshooting regarding the power supply. Have you gone through any of the steps mentioned above?
 Reply

Anonymous  Posted: 5/18/2019 

My power supply fell in the water and everything stopped working. I bought a new power supply and it still doesn't work. The light is no illuminated upon plug in. I emailed the company a week ago and have heard nothing. My pool is a mess. Desperate for advice.
 Reply

InyoPools Product Specialist  Posted: 5/20/2019 

Have you tried replacing the blue cable's Amphenol plug that inserts into the power supply? 
 Reply

 Posted: 12/20/2018 

I followed all the steps and ensured 29V was going to motor. I replaced motor, but still having the same issue. Runs one way for 2-3 seconds, back for about 2-3 seconds. Then stops and nothing else. Any ideas? I have emailed Maytronics and am waiting for a response. I will update if I hear anything.
 Reply

InyoPools Product Specialist  Posted: 1/3/2019 

Hello Pablo - We'd be glad to assist you. What is the model of your Maytronics cleaner?
 Reply

 Posted: 2/17/2019 

I have the exact same problem with my M500. Runs in one direction for a few seconds, stops, back again for a few seconds, stops. Doesn't run again. Thought this was a top of the line unit. Any suggestions? thanks
 Reply

 Posted: 4/22/2020 

hi there, i have the same problem. did you ever find a fix? Thank You !
 Reply

 Posted: 5/2/2019 

hello. I have the same problem. It's starts, go in one direction, stop, go back, stop. I think a factory reset can be the solution. Do you know how do factory reset?
 Reply

InyoPools Product Specialist  Posted: 5/6/2019 

Unfortunately, Dolphin cleaners do not have a factory reset function. 
 Reply

InyoPools Product Specialist  Posted: 2/18/2019 

Hello Mundavian - The Dolphin cleaners do not operate well when the water is cold. Some of the manuals state that they will not work when the temp is below 54°. If that's not your problem, you may have a bad motor. You can use the troubleshooting tips in the guide above to diagnose the problem.
 Reply

 Posted: 8/16/2018 

Hello Tim - We contacted Maytronics to see if they had any more tips. They responded with "Best thing would be to have the consumer call into our customer service department and they would be able to walk them through a couple of trouble shooting steps. They can call 1-888-365-7446 x 1".
 Reply

 Posted: 8/16/2018 

Dolphin M3 Supreme. Had 29 DC at motor plug, so I replaced motor. Still have 29 DC, but Dolphin still does not move. Tracks manually move with a little resistance. Does not seem to go through diagnostic (upside down). Just curious if there are any other trouble shooting options.
 Reply