How To Wire a 115V SCG to a Century Variable Speed 270 Motor

WRITTEN BY: 

  5 out of 5 stars on 1 ratings
(Click on a star to add your rating)

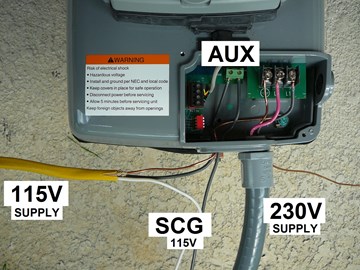
In general, a Salt Chlorine Generator (SCG) is designed to only operate when water is flowing (pump on) and when the water is flowing at an acceptable flow rate. This could be seen as a problem with a variable speed pump. When the pump is operating below the operating RPM threshold required for minimum water flow, the SCG should be turned off. The Century 270 Variable Speed (VS270) motor has a built-in Auxiliary Load relay that can be programmed to control the operation of a SCG. This guide shows you how to wire and program the Century 270 Variable Speed (VS270) motor to turn off a 115V SCG when the VS270 is operating below the RPM threshold required for the SCG. A SCG configured to run on 230V is wired differently to the VS270. See "How To Wire a 230V SCG to a Century Variable Speed 270 Motor". Note: the AUX load feature in the VS270 can be used to power any other 115V unit (heater).

Step by Step

Top

Step 1

TURN OFF POWER TO PUMP - Turn off electricity going to the pump motor at your circuit breaker. We assume that your pump has been installed and is operational, and that you are now adding at Salt Chlorine Generator to operate off the AUX Load relay in your pump.

Step 2

CHECK SCG CONFIGURATION - Check to see if your SCG is set up for 115V operation. If you have a Compupool SCG, see pages 13 and 14 of our guide on "How To Install an In-Line Salt Chlorine Generator" for specific information. For all other SCGs, check the owner's manual. If your AUX Load relay sends 115V to a SCG that is set up for 230-V, your SCG will show an error in its display panel

Step 3

REMOVE POWER COVER - Remove the two screws that secure the cover over the power connections to and from the pump. Lift off the cover.

Step 4

REMOVE AUX POWER CAP - Remove the single screw on the cap that covers the control wiring for the pump. Lift off the cap to provide access to the AUX Load port.

Step 5

REMOVE BOX PLUG - Remove the steel plug in the side of the power box to allow access for the SCG connections.

Step 6

SET UP WIRING - If the SCG is configured for 115V, it has to be supplied 115V power from a separate source than the 230V power to the Century. The Aux Load Relay is spliced into the 115V power line to act as an on/off switch for controlling power to the SCG.

Step 7

CONNECT SCG WIRES TO AUX TERMINALS - Connect the black wire from the 115V supply cable to terminal 1 of the AUX Load Relay. Connect the black wire from the SCG cable to TERMINAL 2 of the AUX Load Relay. Connect the ground from the 115V to the GREEN GROUND screw inside the Century 270VS terminal box. Connect the WHITE wire from the 115V supply cable to the white (or red) wire in the SCG cable. Note: We are showing the breakout of the individual wires for illustrative purposes. For a proper installation, you should bring the 115V supply cable and SCG cable into a separate junction box. Then bring the black lines out to the Aux Load
Relay. And connect the white lines inside the junction box.

Step 8

REPLACE AUX POWER CAP - Replace the AUX power Cap and re-secure it with the single screw. Note: you may have to adjust the wires to have them fit under the bottom edge of the cap.

Step 9

REPLACE POWER COVER - Replace the Power Cover and secure it with the two screws.

Step 10

ROTATE SELECTOR KNOB TO "SETUP" - Move the Selector Know from "OFF" to "SETUP" to prepare for programming the AUX Load.

Step 11

TURN ON POWER TO VS270 PUMP - Turn on the power to the pump at the circuit breaker. The green LED power light on the pump should illuminate.

Step 12

PROGRAM MINIMUM SPEED - The control is designed to turn on the AUX Load relay when the pump speed is above the MINIMUM ON SPEED (default is 2000 RPM). The Aux Load relay will stay closed as long as the pump's RPM is above the programmed MINIMUM ON SPEED. To set this limit, 1- press the right arrow one time to change to AUX Load settings. Then 2- press "SET" to enter the "change mode". 3- Press "+" or "-" to increase/decrease the MINIMUM ON SPEED. Now set the MAXIMUM RUN TIME below.

Step 13

PROGRAM MAXIMUM RUN TIME - The control can be programmed to limit the amount of time the AUX Load relay is closed in a 24-hour period. For example, if the pump runs at 3000 RPM for 8 hours and the AUX Load is programmed to run for a maximum of 6 hours, the relay will open after 6 hours. MAXIMUM RUN TIME is set right after setting MINIMUM ON SPEED. 1- Press the right arrow to change to MAXIMUM RUN TIME. Then 2- press "+" or "-" to increase/decrease the MAXIMUM RUN TIME

Step 14

SAVE PROGRAM VALUES - Press "SET" to save "MINIMUM ON SPEED" and "MAXIMUM RUN TIME"

Step 15

START PUMP - Rotate Selector Knob to "RUN" to start the pump.

Comments

Top

Be the first to add a comment