How To Build an In-Ground Pool

WRITTEN BY: 

  3.25 out of 5 stars on 32 ratings
(Click on a star to add your rating)

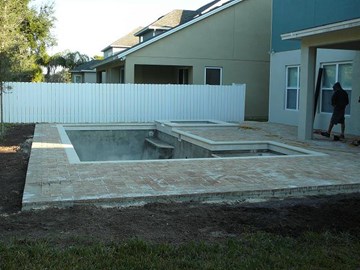
Ever wonder what it would take to build a pool in your back yard? A basic in-ground pool might include a rectangular pool with a side spa and side shallow bubble area. This guide takes you through the steps in building an average in-ground pool.

Click Here to Begin Picking Your Pool Equipment (Pump, Filter, Chlorinator, & More) 


Step by Step

Top

Step 1

Planning - Your first step in building an in-ground pool is to sit down with a professional pool builder. They will lay out a plan for you and get the necessary permits required to add on a pool. They can also line up the many subcontractors required to build the pool. These pools will take 2-3 months to build and will costs in the range of $35,000 to $50,000.

Click Here to Begin Picking Your Pool Equipment (Pump, Filter, Chlorinator, & More) 


Step 2

Ground Preparation - This step involves scraping and leveling the surface where your pool will be built. Any sod will have to be stripped off with a small bulldozer and carried off in a truck.

Step 3

Stake Out Pool - The forms defining the location and shape of the pool are leveled and secured. The top of the 2x4s will be the top edge of the pool.

Step 4

Dig Hole - A Bobcat is used to dig the pool within the area defined by the forms. One end has to be left open to allow access in and out of the hole. Squaring off the walls and corners is done by hand with a shovel.

Step 5

Lay Bottom Piping - After the hole is dug to the depth required, the bottom pipes are laid. This picture shows the dual drains for the spa. Not shown are the drain for the pool and the return line for the bubbler in the shallow beach area. This piping will become embedded in the pool floor.

Click Here to Begin Picking Your Pool Equipment (Pump, Filter, Chlorinator, & More)

Step 6

Secure Backing - A fiberglass steel mesh backing is stapled to the forms to create a flat surface on the outer side edge when the pool shell is spayed into the hole.

Step 7

Build Rebar - Steel reinforcing bars are bent and formed in a 5" x 6" spaced matrix to strengthen the wall and floor of the pool shell. This steel mesh will later be tied to grounding wires to provide part of the unified common ground for the electrical units used in and around the pool.

Step 8

Install Light Pots - This pool has two underwater lights, one in the pool, shown here, and one on the bottom of the spa. The light pots have to be installed and tested prior to spraying of the pool shell. Each light pot is grounded to the steel grid with a green grounding wire.

Step 9

Lay out Spa Side Plumbing - Some of the side piping for the spa will be enclosed in the pool shell so these pipes have to be installed at this point. They will supply water to the 5 spa jets planned for this spa.

Step 10

Inspection - This is the first set of county inspections. Prior to spraying in the pool shell, the county checks the pool shell reinforcement, the underground plumbing, and the pool shell /light grounding. Note: Type and frequency of inspections will vary between counties and states.

Click Here to Begin Picking Your Pool Equipment (Pump, Filter, Chlorinator, & More) 

Step 11

Spray in Gunite Shell - Many in-ground pool shells are made of gunite - a concrete type material composed of fly ash, cement, sand and some pea gravel. Gunite is often used because it is more flexible and is easier to apply then concrete. Gunite is brought in from the street through a pressure hose in a power form. Water is added at the nozzle and a paste form of gunite is sprayed into the hole and built up in layers to form a rough shell.

Step 12

Form Gunite - While the gunite is wet, it is smoothed with trowels and formed into the desired shapes.

Step 13

Remove Forms - After the gunite has dried in a couple of days, the forms are removed and the ground around the pool is leveled.

Step 14

Install Tile - One level of tile is applied the upper vertical edge of the pool to define the transition between the pool coping stone and the pool surface.

Step 15

Lay Down Piping Around Pool - This pool has 9 major trunk lines to carry water to and from the pool. Four line carry water to the pump from the 2 skimmers, the Spa drain and the suction cleaner. Five lines are used to return water from the pump/filter/chlorinator to the return jets, the spa jets and the bubbler. Two separate conduits are also laid to provide electrical wiring between the control box and the two pool lights.

Click Here to Begin Picking Your Pool Equipment (Pump, Filter, Chlorinator, & More)

Step 16

Dig Footers - A 9" trench is dug around the circumference of the pool to provide a footer for the screening. Reinforcing bars are laid in the trench and tied together to form a continuous length.

Step 17

Lay Bonding Wire - A heavy gage copper grounding wire is laid in the trench and connected to both the reinforcing bars in the trench and grounding wires connected to the rebar pool grid embedded in the pool shell.

Step 18

Inspection - At this stage of development the county conducts a pressure test of the plumbing. The county also inspects the deck and performs electrical tests on the underground conduit, the bonding grid and the pool lights/potting compound.

Step 19

Pour Screen Footers - The trench is filled with concrete to form a footer for the screening. The top of the footer is smoothed and leveled with a trowel.

Step 20

Install Pool Equipment - This pool has 1 HP pool pump, a 120 GPM cartridge filter, a CL200 chlorinator, a 1 HP air blower and five valves. The pump and filter are placed on a manufactured platform and the equipment is connected to the 9 trunk line coming from the pool.

Click Here to Begin Picking Your Pool Equipment (Pump, Filter, Chlorinator, & More)

Step 21

Lay Coping Stone - The top edge of the pool, spa, and beach area is leveled and smoothed with a concrete saw and coping stones are mortared in all along this edge.

Step 22

Lay Pavers - The surface around the pool is leveled with a layer of crushed stone and sand, and pavers are laid on top of this layer. Pavers are further leveled with a compactor. A row of pavers is mortared around the pool perimeter on top of the screening footer to keep the interior pavers in place.

Step 23

Erect Screen - The screening is brought in on a flatbed truck in 26 sections. These sections are assembled and secured to the screen footer and to the roof of the house.

Step 24

Install Safety Fence - A child's safety fence is installed. Holes are drilled into the pavers at about 4' spacings. Then inserts are placed into these holes to hold the fence poles.

Step 25

Apply Pool Surface - A fine pebbled compound is shoveled onto to the surface of the pool shell and smoothed and leveled with trowels to a uniform thickness. The surface is then brushed to expose the aggregate and produce an attractive slip resistant finish. Marbletite and PebbleTec are two of the common products used to surface pools.

Step 26

Final Inspection - The county performs a final inspection of the building, plumbing, and electrical.

Click Here to Begin Picking Your Pool Equipment (Pump, Filter, Chlorinator, & More) 


Comments

Top
(1 to 5 of 5)

 Posted: 4/18/2020 

Excellent resume of steps to build pool
 Reply

 Posted: 8/29/2017 

This was awesome! As I've watched my pool being built, I've wondered about the different tasks. Now I know why some things are done sooner and later.
 Reply

 Posted: 2/23/2017 

awesome information, I will not build the pool my self but gives me an idea of the process.

Thank you.

 Reply

 Posted: 1/19/2013 

I helped a lot thanks
 Reply

Anonymous  Posted: 7/19/2012 

Thanks, good information.
 Reply