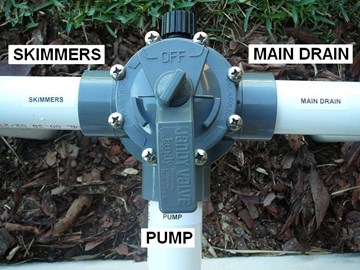
Any pool configuration has two basic piping systems: suction and return. The suction side consists of all the pipes coming from the pool to the pool pump. In a basic system, these include the pipes from the main drain and the skimmers. The return or discharge side consists of all pipes going from the pool pump back to the pool. In a basic system, these include lines to multiple pool jets. On the suction side, you will want to be able to control the flow of water coming from either the skimmers or the main drain. This is done with a diverter valve. This page will provide a step by step process for installing a diverter valve on the suction side of the pump.
Click here to view diverter valves.


Inyopools Posted: 12/27/2017
Cobus - Many people with long supply lines between the pool and the pump install a check valve in that line to keep water from draining back into the pool when the pump is shut off. For information on check valves, see our guide on "How To Select a Pool Check Valve – Overview”.Reply
Cobus Posted: 12/24/2017
Hi guys, I am writing from New Zealand. I love your stuff! Question: if the suction line is 17 meters from the pump and it take more than 5 minutes to try and get the pump to prime without any success, is it okay then to install a check valve or any other closed/open valve? I did everything in the book that I know to prime the pump, nothing work. What I see is that water flow out from the ceramic sealbetween pump and motor. MEANING AIR! That must be fixed and before I go that way, I need to know if it will be good to install a valve before the pump as itis along distance from skimmer to pump!Reply
InyoPools Product Specialist Dennis R. Posted: 6/22/2017
Kim - I'm not sure I understand your question. If you need to replace the diverter valve on you main drain line and you are asking how to turn off the water to the valve, just turn off the pump. It's the pump that is moving water through the valve.Reply
Kim Posted: 6/20/2017
This is great information. My question is that I have to replace the valve for the main drain. My main drain & skimmer are on two separate lines. How can we replace this. Alive with the water flowing? In other words, how can we eliminate the flow of water up to the main drain Valve! Is this possible? Thank youReply
InyoPools Product Specialist Dennis R. Posted: 3/31/2017
anonymous (diverter valve) - Yes. you can replace the inside of a standard diverter valve with a NeverLube Valve Assembly. See our guide on "How To Repair a Diverter Valve". And yes you can use MagicLube to grease the other standard valves.Reply
Anonymous Posted: 3/30/2017
I have the gray Jandy valves with the grease cup. The diverter is messed up on one of the valves...the rubber part on the front is stretched out in one corner. Would this cause water to leak or air to get I my system? Are the "never lube" diverters compatible with the existing equipment? I don't want to replace the entire valve, just the inside diverter.I used Magic Lube with them but it isn't the same as the blue, thicker stuff my installer used. What is the blue stuff and should I use that instead? My pool was built in 2014 so I'm not sure why the installer used this type of Jandy valve vs. the never lube, as I understand that type was out then. Thanks!
Reply
InyoPools Product Specialist Dennis R. Posted: 9/11/2016
Bill Smith - I think you are referring to the cap on the grease port. This is how you keep the valve greased in some of the older valves. It sounds like the cap needs to be replaced. See our guide on "How To Replace a Broken Grease Fitting On Your Diverter Valve".Reply
Bill Smith Posted: 9/9/2016
On the 3 port diverter valve there is a black knob on the front side. What is this for? Mine is real loose and will not tighten up.Reply
AJ Posted: 6/27/2016
Yep, that's exactly what happened on mine... Just installed a new VS Pentair Superflo and when I flipped it over to the Cleaner/Vac side, I immediately lost all water flow and the pump changed tones. I instantly turned off the pump and fortunately since I installed a new see thru flo-thru check valve with a union, I was able to take apart both the valve and the check valve section, grabbed a coat hander and bent it so that it would only pull debris through and was able to unblock the line. Works perfect now, tons of suction..Reply
InyoPools Product Specialist Dennis R. Posted: 5/5/2014
Paul - It's hard to isolate your problem without seeing the actual valve configuration, but it sounds like the pipe on the right side may be blocked with debris.Reply
Paul Posted: 5/2/2014
trying to learn, maybe someone can advise: I have this same set up plus in ground cleaning system. I shut off in ground portion to vacuum bottom of pool via skimmer. Jandy valve was lined up with pump, all okay. 2 pipes one on left and one on right marker as skimmers. I turned Jandy valve to the left to close off left skimmer for max suction for the right skimmer and pump shut down due "pump dry", no water. So I imagine if instead of turning valve to the left I turned it to the right the same thing would happen? Guess I always need to leave Jandy valve handle in pump direction, full open and only shut off in ground cleaning system when I want to use vacuum??????? Please advise. TIAReply
lcten Posted: 3/20/2011
Reading is fundamental. I learned something new today. Did not know at first that the Jandy valve was either or... just saved a bunch of money!!! Thanks a Million!!!Reply