How To Install a Pool Off-Line Chlorinator

WRITTEN BY: 

  3.81 out of 5 stars on 13 ratings
(Click on a star to add your rating)

Chlorinators allow you to add controlled amounts of chlorine into your pool. They are attached at the end of the return pipe to the pool after the filter and heater. To use, open the top of the mechanism, insert chlorine tablets, and then adjust the amount of the chlorine going into the pool. Typically, they are used in the summer when the pool is used more. There are two types of chlorinators: an in-line feeder which is attached directly into the plumbing system; and an off-line feeder which has two hoses to the chlorinator coming from and returning to the return pipe to the pool. This guide shows you how to install a PowerClean Ultra Off-Line Chlorinator.

Step by Step

Top

Step 1

Tools you will need: 1) Drill 2) Drill bits to match clamp hole 3) Concrete drill bit and bolts to attached chlorinator to filter base 4) Hose cutter or Xacto knife 5) Pliers to grasp hose 5) Ratchet wrench to tighten clamp bolts 6) Magic marker 7) Flat head screwdriver 8) Plumbing tape

Step 2

Turn off electricity going to the pump motor via your circuit breaker, not just the timer. You don’t want the pump to turn on when you are doing this.

Step 3

Determine where you want to put the chlorinator. There should be plenty of space so hoses can lie properly without being pinched. In these instructions, you will see that one hose wraps behind the filter housing (the hoses come with the product). NOTE: This plumbing photo shows a ball valve pre-installed on it. IGNORE THIS. It is a completely different project.

Step 4

Look at the photo above and this diagram carefully to determine where you will put the clamps. As shown, the hoses to and from the chlorinator have to be inserted after the filter and heater to avoid chlorine damage to the theses units.

Step 5

Place the 1st clamp on the pipe and make a mark where the hole will be drilled. The clamp does not have to be straight up. Rotate the clamp at an angle to allow for best positioning of hose. Mark with magic marker.

Step 6

Determine the proper size of the hole you are going to drill. The instructions should tell you but just in case, it has to be the right size for the tube coming out of the clamp.

Step 7

Set the bottom clamp on the pipe at the appropriate angle in order to give you a good line of sight on how to position the drill. Drill the hole but be very careful that you are drilling it at the same angle of the clamp. CAUTION: Don’t go through the other side… it’ll be a mess!

Step 8

Gently place the top clamp so that the tube fits properly in the hole. Then line up the bottom clamp and put the assembly together. It is important that you go back and forth from bolt to bolt rather than doing one side at a time. This ensures the pressure is constant. Don’t over-tighten clamp. If it leaks when you turn the pump on, you can always tighten it up.

Step 9

Do the same on with the 2nd clamp and set it 6” - 8” from clamp to clamp.

Step 10

Place the chlorinator where you want it. Don’t secure it into the concrete yet. You want to be sure everything sits properly. Be sure the FLOW ARROW is pointed in the right direction (see diagram above).

Step 11

Unscrew the outer hose cover and wrap plumbing tape, counter clockwise, 6 - 8 times on the threads beneath it. Feed the hose through it, and attach the hoses to the clamps. This can be tricky as new hoses are always hard to put on. TIPS: Put a screwdriver into the opening of the hose and twirl to stretch it out a bit. With a pair of pliers crunch the end of the hose to make it more pliable. Use the pliers help put the hose on.

Step 12

Attach a hose onto the other clamp.

Step 13

Now attach the hoses to the proper inlets of the Chlorinator. IMPORTANT: Review product instructions and the above diagrams to be sure you are putting the hose in the correct port. Allow the hoses to wrap comfortably around the filter if need be. You have plenty of hose and you don’t want to cut it to short as they may crimp and interfere with the flow of the water to the pool. (Cut hose a little at a time. It is easier to cut off more hose than to put it back on.) Tighten the hose clamps over the fitting.

Step 14

Turn on the pump and be sure there are no leaks and that the water is going into the chlorinator (you can see thought the clear top).

Step 15

Once you feel confident that the hoses are not crimped and the chlorinator is situated properly, TURN THE PUMP OFF and mount the base onto the concrete of the pump system. Some say is OK to leave it without securing it but keep in mind that if there is a storm or heavy winds, it could blow the system over.

Step 16

With the PUMP OFF, open the chlorinator; be sure water has gone into it; and carefully add tablets (wear gloves and eye protection). Put the top back on and be sure to put it on straight so you don’t strip the threads.

Step 17

The number of tablets in the feeder controls how much can be fed. - As a general rule, only put as much in the feeder as will be needed over the next week. If you fill a chlorinator all the way up, you run the risk of putting more chemicals than needed into your pool. This way you have some control over the maximum feed. For instance, a spa might only use less than a pound of chlorine per week, but the chlorinator will hold 6-8 lbs. of chlorine. If you were to fill it up, you would create a dangerous situation in the spa with very high chlorine levels and very low pH levels.

Comments

Top
(1 to 7 of 7)

 Posted: 9/20/2021 

What size is the line in hose? I just had the pool on the hose we bought spring a pin hole leak on that very hose so I am trying to figure out what size to get to replace it.
 Reply

InyoPools Product Specialist  Posted: 9/20/2021 

What is the make and model or model number of the chlorinator?
 Reply

InyoPools Product Specialist  Posted: 7/28/2013 

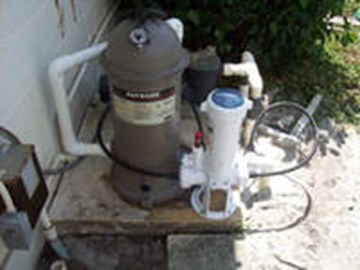
Position - The chlorinator has to be installed as the last unit before returning to the pool as shown in Step 4. It may be hard to see in these pictures but this chlorinator is installed after all other units in the return line. It definitely cannot be installed in the supply side.
 Reply

InyoPools Product Specialist  Posted: 7/28/2013 

Pictures - We are working on a zoom feature for the pictures. Until then, try expanding the whole screen by 150%-200% for a little bigger picture.
 Reply

Anonymous  Posted: 7/27/2013 

Looking at the photos it appears the chlorinator is being installed right next to the filter. IF the water comes from the pool into the pump, then the filter and then the heater where is this in the 'flow' of things? Is the positioning of the chlorinator really that important to be in the return line or can it be in the supply line (as it appears this one will be?)
 Reply

Anonymous  Posted: 7/27/2013 

Thanks for the walk through but he photos are too small to see what you are talking about. If the file sizes were larger clicking on them would render a much larger version and the details would be readily visible.
With that change this would be an ACE! Thanks for the instructions.

 Reply

 Posted: 6/4/2012 

Thank you
 Reply