How To Set Up In Ground Pool Equipment - Part 6 - Control

WRITTEN BY: 

  2.43 out of 5 stars on 7 ratings
(Click on a star to add your rating)

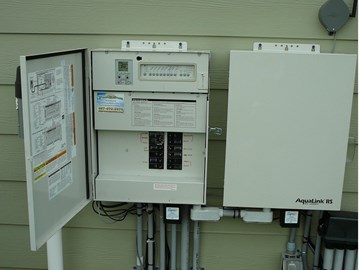
This guide is part 6 of a series on what pool equipment you would consider in building or expanding to a comprehensive pool system. This part shows you the variety of the functions that can be incorporated into a fairly comprehensive automated control system. We are featuring a Jandy Aqualink RS Control System. However much of this information can be applied to other control systems. Also most configurations of the Jandy Aqualink RS Control System are limited to the standard Aqualink system for 8 functions. This configuration shows two interlinked systems for handling up to 16

Step by Step

Top

Step 1

This picture shows the control panel inside one of the two Jandy Aqualink RS Power Centers for this pool's control system. There is a similar control panel in the other interlinked Jandy Aqualink RS Power Center. The smaller display at the left is associated with the salt chlorine generator used in this pool system. We will discuss this display later. The longer display has a series of twelve buttons to turn the associated pool equipment on/off for servicing outside. The actual programming of these functions is performed on a Jandy Touch Panel mounted inside the house. A picture of this Touch Panel is shown in the next step. The pool equipment controlled by each of the twelve buttons is discussed in subsequent steps.

Step 2

This is a picture of the Jandy Touch Panel mounted inside the house.

Step 3

The first button selects the operational mode of this Power Center. If set on "auto", all buttons in this Power Center are deactivated. Control is passed to the control panel inside the house. This is normal operational mode. Setting the operational mode to "service" activates the buttons in this Power Center. This mode is used to test pool function outside next to the equipment. Setting the operational mode to "time out" turns the Power Center off.

Step 4

The next four buttons on the Power Center control panel are labeled: Filter Pump, Air Blower, Fountain, and Deck Light.

Step 5

Filter Pump - turns the main pool circulation pump on/off - This pool system uses a Jandy 2 HP variable speed E-Pump to circulate pool water through the pool and the spa.

Step 6

Air Blower- turns the air blower on/off to inject air into the Spa jets.

Step 7

Fountain - turns the water feature pump on/off which controls water to the waterfall, the four (4) laminars and two (2) bubblers in the sun shelf. This pump is a Hayward 3 HP super II Pump - single speed. The default mode for the water feature pump is to have all three features on when the pump is activated.

Step 8

The next 4 buttons are labeled Water Feature, Water Feature, Aux 6 and Aux 7. Aux 6 and 7 are spares for future development.

Step 9

The amount of water supplied to each of the water features is regulated by three (3) automated valves, [# 3, 4 & 5], integrated into the return lines from the water feature pump. Control of these valves is automated by valve actuators which can be controlled at this box or by a program in the Jandy Touch Panel mounted inside the house.

Step 10

Water Feature (1) - Waterfall only. Rotates Valves 3, 4, and 5, discussed above, so that only the Waterfall is on. Water to the Bubbles and the Laminars is shut off.

Step 11

Water Feature (2) - Bubblers only. Rotates Valves 3, 4, and 5 so that only the Bubblers are on. Water to the Waterfall and the Laminars is shut off.

Step 12

The last three buttons on this control panel control the Heaters, Solar and the computer actuated Valves.

Step 13

On this system when the "Heater" button is pushed, it activates two heaters. The first is a Jandy EE-Ti Heat Pump for long term more efficient heating. The second is a Laars Propane Heater to heat the Spa quicker. Though programming on the in-house Touch Panel, the heaters can be used separately or together and they can be used to heat the Spa, the Pool or both. This is a picture of the Jandy EE-T1 Heat Pump. As a note, some of the Jandy EE-TI Heat Pumps can be reversed and used as chillers to actually cool your pool if it becomes too hot.

Step 14

This is a picture of the Laars Propane Heater.

Step 15

The Solar button is not used in this system, but we have the option of adding and controlling solar panels for heating the pool.

Step 16

The "Valve" button toggles through 4 settings to control the flow of water to the Spa or Pool. Mode 1 is "Pool Mode". In this mode all water from the main circulation pump flows to the pool. The actuators on top of valves 1 and 2 in the picture are commanded to turn with the handles all the way to the left shutting off the water from the Spa on valve 1 and to the Spa on valve 2.

Step 17

The other Valve modes are: [2] Spa Mode - water to/from pool is shut off; [3] Spa Drain - Valve 1 is open for the Spa to allow water to drain from the Spa and Valve 2 is open to the Pool to return water to the pool; [4] Spa Fill - Valve 1 is closed for the Spa drain and Valve 2 is open to the Spa to allow returning water to flow into the Spa.

Step 18

This is a picture of the small display panel for the salt chlorine generator display. By selecting one of the series of buttons on this display, you can see the chlorine productions rate, the salt level and temperature of the pool. You can also change the chlorine production rate at this panel, but this function is usually performed at the Touch Panel inside the house.

Step 19

This picture shows the salt chlorine generator associated with the display panel above. This pool system uses a Nature 2 Fusion Soft System to automatically dispense pool minerals and chlorine.

Step 20

This picture shows the other control panel inside the second interconnected Jandy Aqualink RS Power Center. The display has a series of nine buttons to turn the associated pool equipment on/off for servicing outside. As before, the actual programming of these functions is performed on a Jandy Touch Panel mounted inside the house. The pool equipment controlled by each of the nine buttons is discussed in the following steps.

Step 21

The first button selects the operational mode of this Power Center as discussed before on the first panel. Modes are: Auto, Service, and Time Out.

Step 22

The next four buttons on the Power Center control panel are labeled: Spa Light, Pool Light, Pond, and Pond Light.

Step 23

Spa Light - turns the multi-color light in the Spa on/off. The light color sequence is programmed on the Touch Panel inside the house.

Step 24

Pool Light - turns the multi-color Pool lights on/off. The light sequence is programmed on the Touch Panel inside the house. Through this panel the pool light color program can be synced with the Spa lights so that they all play the same program.

Step 25

Pond - turns on/off the small circulation pump on the bottom of the pond.

Step 26

Pond Light - turns on/off the lights around the pond.

Step 27

The last 4 buttons control the RS16 and RS2/14 functions labeled: Laminar Light, Aux B6, Yard Light, and Yard Light.

Step 28

Laminar Light - This is a night time shot of the Laminars with their light illuminated.

Step 29

Aux B6 - This is a night time shot of the Bubblers with their light illuminated.

Step 30

Yard Light - turns on/off the front yard perimeter lights.

Step 31

Yard Light - turns on/off the back yard perimeter lights.

Step 32

This concludes our guide on setting up equipment for in ground pool control. Click here to return to the Overview for other pool equipment options.

Comments

Top
(1 to 3 of 3)

InyoPools Product Specialist  Posted: 9/11/2016 

mikeabram - You can cut the wires between the circuit breaker box and the pump and insert a switch box near the pump. You could mount the switch box on a 4x4 post buried in the ground. You will probably have to replace the wire cable between the pump and the switch to make up the wire length lost when inserting the switch. See our guide on " How To Lengthen an Existing Pool Light Fixture Cord". This is for a light application but the idea is the same. Just replace the junction box with a switch box.
 Reply

 Posted: 9/8/2016 

i just replaced my pool motor its running but it want shut off just keeps running i have to shut the breaker off to stop the motor from running is it any way i can wire this to shut off by my switch
 Reply

 Posted: 8/28/2016 

Very comprehensive and yet simple.
 Reply