How To Install a Pentair Triton 2 Side Valve Sand Filter

WRITTEN BY: 

  2.56 out of 5 stars on 9 ratings
(Click on a star to add your rating)

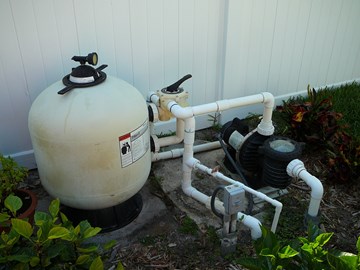
This guide describes the steps required to install a Pentair Triton 2 Side Valve Sand Filter. The flow of water to and from a sand filter is generally controlled by a Multiport Valve (MPV). The valve can be mounted on the top of the filter tank or on the side of the tank. This guide describes the Installation of a side-mounted version. Although this guide is specific to a Pentair Triton 2 Side Valve Sand Filter, many of the steps discussed can be applied, in general, to other side mounted filters.

Click here to view multiport valves.

Step by Step

Top

Step 1

BUY SAND - Before starting the installation, you will need to purchase sand. Use only high rate No. 20 Silica Sand. An example is pictured at left. Check the manufacturer to determine the amount required. This unit (Pentair Triton 2 TR-60) uses seven 50 lb bags of sand - 350 lbs total.  You can also purchase our superior to sand Click here for our Sand Alternative.

Click here to view sand alternatives.

Step 2

PROVIDE STABLE FOUNDATION - The pool filter should be installed on a permanent and level concrete slab not more than 6 feet above the pool water level. Position the pool sand filter so that the piping connections, multiport valve and drain are convenient and accessible for operation and maintenance.

Step 3

POSITION FILTER - When installing the pool sand filter, you will connect it right after the pump. Pool water will come in through the pool pump, be filtered through the sand filter and returned back to the pool. If you have a chlorinator, it would be installed between the filter and the return pipe. If you have a pool heater, the pool filter will release water to the heater before going to the chlorinator. The Filter Tank rests on a tank base called a Tank Foot. Place the Tank Foot on the Filter slab and then place the Filter tank on the Filter Foot.

Click here to view sand filters.

Click here to view chlorinators. 

Click here to view pool pumps.

Step 4

ATTACH MULTIPORT VALVE - Secure the Multiport Valve (MPT) to the two ports on the side of the Filter Tank. The collars on the MPV should screw easily onto the tank ports. Make sure the O-rings on the Valves are in place and clean. Apply a thin layer of silicone lubricant to the O-rings.

Click here to view Magic Lube O-ring Lubricant.

Step 5

CONNECT PUMP TO MPV - Using PVC piping and fittings, connect the "PUMP" port of the MPV to the discharge port on the top of the pump. For instructions on gluing fixture together see our guide on "How To Glue Pool Fixtures Together'.

Step 6

CONNECT MPV TO RETURN LINE - Next connect the "RETURN" port of the MPT to the pool piping going back to the return ports of the pool.

Step 7

CONNECT MPV TO WASTE LINE - Finally, connect the "WASTE" port on the MPT to the waste line of your system. This line may be solid piping of a flexible plastic hose going to a draining area.

Step 8

TAPE BRASS ADAPTER - Put 2-3 layers of plumber's Teflon tape on the threads of the Brass Adapter screwed on top of the Cover Lid. Wrap the tape in a clockwise direction so it will stay on as you screw the Assembly on. If the Brass Adapter is not attached to the Cover Lid, attach it with a nut and washer on the underside of the Cover Lid. Also, an O-ring needs to be is inserted between the Adapter and the top of the Cover Lid to seal the hole in the Cover Lid.

Click here to view teflon tape.

Step 9

ATTACH AIR BLEEDER ASSEMBLY - Screw the Air Bleeder Assembly into the Brass Adapter in a clockwise direction. Use an open end wrench to tighten the last 1/2 turn. Do not over tighten.

Step 10

ATTACH PRESSURE GAUGE - Put 2-3 layers of plumber's Teflon tape on the threads of the new Pressure Gauge. Wrap the tape in a clockwise direction so it will stay on as you screw the Gauge on. Then thread the Pressure Gauge into the Air Relief Valve in a clockwise direction. Use an open-end wrench to tighten the last 1/2 turn. Do not overtighten.

Click here to view pressure gauges.

Step 11

VIEW BAFFLE AND AIR RELIEF TUBE - With the Cover Lid off the top of the Filter, you can see the Baffle and the Air Relief Tube. The Baffle distributes the water from the pump over the top surface of the sand. The Air Relief Tube connects to the bottom of the tank and relieves any air that is caught in the top of the tank. Remove shipping straps used to support the Baffle during shipping.

Step 12

CHECK AIR RELIEF SCREEN - The top of the Air Relief Tube is covered with a screen to prevent sand from clogging the Tube. Check that the screen in pushed onto the tube as far as it will go.

Step 13

PUSH BAFFLE ASIDE - Move the Baffle away from the opening in the tank by pushing it aside horizontally. You should be able to push it so that the tank opening is completely open and you can easily pour in the sand.

Click here to view filter parts.

Step 14

CHECK INTERNAL PIPING - Check to see that the internals piping and adapters are fully assembled and tight.

Step 15

CHECK LATERALS - Look at and feel each of the laterals to see if any are damaged. If necessary, remove the questionable laterals and replace them. See our guide on "How to replace Laterals in a Pentair Triton 2 Side Valve Sand Filter".

Step 16

CHECK DRAIN PLUG - Check to see that the Drain Plug is screwed in place. If not, lubricate the Drain Plug O-ring and screw the Drain Plug into the tank.

Click here to view Magic Lube O-ring Lubricant.

Step 17

ADD WATER TO TANK - Fill tank about 1/2 way full with water to provide a cushion when the sand is poured in. This will help protect the laterals.

Step 18

ADD SAND - To add sand, place a bag on top of the filter and cut out a large corner at the bottom of the bag nearest the hole in the top of the filter tank.

Step 19

ROTATE BAFFLE BACK - Push the baffle back until it is positioned in the center of the tank opening. Make sure the screen of the air vent tube is tucked under the top of the tank

Step 20

CLEAN LID GROOVE - Clean any sand or other debris out of the threads of the Cover Lid and tank.

Step 21

LUBRICATE O-RING - Lubricate the Cover Lid O-ring lightly with a silicon-based lubricant.

Click here to view Magic Lube O-ring Lubricant.

Step 22

ATTACH COVER LID - Screw the Cover Lid into the top of the filter tank using the large hex wrench. Make sure the threads line up. If it becomes hard to turn, back the Cover Lid off and rethread it. Take care that you do not cross-thread the  Cover Lid. Failure to install the Cover Lid correctly can cause the Lid to blow off and could cause severe bodily injury and property damage.

Step 23

SET TO BACKWASH - Rotate the multiport handle to "Backwash".

Step 24

TURN ON PUMP - Turn on the power to the pump.

Step 25

CLOSE RELIEF VALVE - When a steady stream of water shoots out of the relief valve, turn the valve off. Run the filter in Backwash mode for 2-3 minutes.

Step 26

TURN OFF PUMP - Shut off the power to the pump.

Click here to view sand filters.


Step 27

SET TO RINSE - Rotate the Multiport Valve Handle to "Rinse".

Step 28

TURN ON PUMP - Turn on the pump and operate in "RINSE" mode for 30 seconds.

Step 29

TURN OFF PUMP - Shut off the power to the pump.

Step 30

SET TO FILTER - Rotate the Multiport Valve Handle to "Filter".

Step 31

TURN PUMP ON - You filter should be operational. Note the filter pressure. In the future, when it goes 10 psi higher, it will be time to backwash the filter again.

Comments

Top
(1 to 2 of 2)

InyoPools Product Specialist  Posted: 6/24/2017 

Zepher - The "free board" space between the top of the sand and the top of the filter tank is open space to allow the sand to be lifted up during backwash. For information on replacing a lateral, see our guide on "How To Replace Laterals in a Pentair Triton 2 Side Valve Sand Filter".
 Reply

 Posted: 6/22/2017 

This would be helpful, but did not address how far up to fill tank with sand. The manual stresses a "free board" space at the top section of the tank. It stresses the impotence of providing this space precisely to the dimension listed in the manual. It isn't clear what the free board is. Open space, nothing? Simply not filling the tank with sand beyond the bottom of the free board line?

Everything else is clear except replacing any laterals. Can these actually be reached inside the tank? I have a Triton II TR 100.

I was planning to have a few on hand as suggested, and just carefully feel the ones in place. All seems to be good (no evidence of breakage - sand getting into the pool). But can a person really reach these things?

I was going TO CALL Pentair but that is at least a 45min hold time.

Thanks

 Reply