How To Replace the Governor on an AO Smith Motor

WRITTEN BY: 

  4 out of 5 stars on 2 ratings
(Click on a star to add your rating)

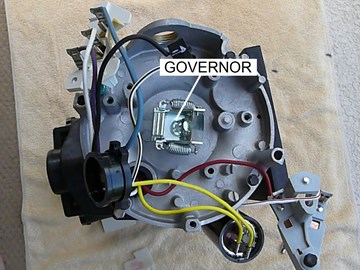
This guide shows you how to replace a damaged Governor on a typical A.O. Smith Motor. This Governor is only used with motors that have a start circuitry to boost starting torque. See our overview guide on "How To Replace AO Smith Motor Parts - Overview" to see how the Governor operates with the other electrical components.

Things You'll Need

Step by Step

Top

Step 1

REMOVE ELECTRICAL COVER - Remove the two screws that secure the electrical cover on the electrical end of the motor. Lift off the cover.

Step 2

LOCATE GOVERNOR - This picture shows the location of the Governor within the electrical components of the motor.

Step 3

REMOVE START SWITCH - To access the governor, first remove the Start Switch as shown. It is secured with a single screw. Push it aside. It does not have to be disconnected from its wires.

Step 4

MOVE CAPACITOR - Next, release the motor capacitor from its bracket by removing the single screw at the top of the bracket. Push the capacitor to the side as shown. It does not have to be disconnected.

Step 5

REMOVE GOVERNOR SPRINGS - Now, using a pair of small needle nose pliers, slip the loops of the governor springs off of their post and remove the springs.

Step 6

REMOVE GOVERNOR WEIGHT - Remove the governor weight that pivot inside the governor bracket. You may have to apply slight pressure with the needle nose pliers to spread the bracket enough to slip out the weight.

Step 7

REMOVE GOVERNOR BRACKET - The screw (right-hand threads) that secures the governor bracket to the shaft should now be visible. Remove the screw and take out the bracket. You will have to slide a wrench onto the flat part of the motor shaft to keep the shaft from rotating.

Step 8

VIEW DISASSEMBLED REAR END - From this picture you can see the motor shaft without the Governor attached.

Step 9

DISASSEMBLE NEW GOVERNER - Take the new Governor apart to be able to attach the Governor Bracket to the motor. Remove Springs; remove Governor Weight.

Step 10

ATTACH NEW GOVERNOR BRACKET - Screw the Governor Bracket back onto the motor shaft. Slip a flat open-ended wrench on to the flat part of the motor shaft to keep the shaft from rotating.

Step 11

ATTACH GOVERNOR WEIGHT - Force the Governor Weight back into the Governor Bracket. You may have to spread the sides of the Bracket slightly to slide the Weight into its pivot holes.

Step 12

ATTACH GOVERNOR SPRINGS - Using a pair of small needle nose pliers, reattach the Springs on the posts of the Bracket and Weight.

Step 13

SECURE CAPACITOR - Replace the Capacitor and screw the holding bracket down with the single screw.

Step 14

SECURE START SWITCH - Reattach the Start Switch with the single screw. If your motor is produced before November 2001, this Start Switch may have to be adjusted for optimum operation. See our guide on "How To Adjust the V-Switch on a Hayward Super Pump Motor". After November 2001, the A.O Smith motors were produced with a no-adjust Switch.

Step 15

REPLACE ELECTRICAL COVER - Replace the electrical cover at the rear of the motor and secure it with two screws.

Comments

Top
(1 to 8 of 8)

 Posted: 5/18/2022 

I wish I saw this before I removed it. My shaft was frozen and I needed to spin it. I removed the governor, actually I could not figure out how to access the screw and did as you write, I spread the points to remove the governor. I thought there is no way they would design this where you had to take it apart to access the screw to remove it. The engineer should be fired.
 Reply

InyoPools Product Specialist  Posted: 5/23/2022 

Or at least reprimanded and required to retake a course or two.
 Reply

 Posted: 1/21/2021 

Is it necessary to unhook all electrical wiring before replacing the governor switch??
 Reply

InyoPools Product Specialist  Posted: 1/22/2021 

I always prefer to do that, on top of closing the breaker. But I tend to err on the side of caution. You can also discharge the capacitor with a screwdriver and a towel to prevent the chance of shock.
 Reply

InyoPools Product Specialist  Posted: 1/17/2017 

governor screw - Unfortunately, we don't have information on governor parts. I'd suggest taking the screw into a hardware store and try matching it to their screw sizing display.
 Reply

Anonymous  Posted: 1/16/2017 

Looks like I may have damaged the threads on the governor screw and or shaft of motor when removing the back bearing with my puller. Do you know what size the screw is? I tried a new 10-32 but doesn't seem to fit.
 Reply

 Posted: 10/12/2015 

governor - Here's the link to A.O Smith motor parts. The governor is item #4.
 Reply

Anonymous  Posted: 10/12/2015 

Need to buy a governor for AO Smith motor, cannot seem to find where to purchase..
 Reply