How To Replace the Sand in a Pentair Triton 2 Side Valve Sand Filter

WRITTEN BY: 

  3.49 out of 5 stars on 53 ratings
(Click on a star to add your rating)

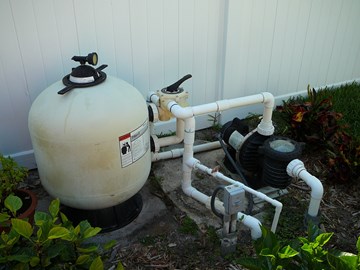
Every 5 - 7 years you will have to replace the sand in your sand filter. The sand actually wears out. The sharp edges of the sand particles become worn and rounded and don't capture the contaminates as well. Also the sand will start to ball up or the water will create channels thru the sand. You will notice that your pool water is not as clean or the interval between required backwashes is shorter. This guide shows you the steps required to replace the sand in a Pentair Triton 2 Side Valve Sand Filter.

Please click here to view the Pentair Triton 2 parts.  

Video

Step by Step

Top

Step 1

COLLECT MATERIAL - Before you start to change the sand in your filter, be sure to purchase any material or equipment you will need ahead of time. This might include sand, the O-ring between the valve and the tank, Teflon tape, lubricant. For the sand use only high rate No. 20 Silica Sand. An example is pictured at left. Check the manufacturer to determine the amount required. This unit (Pentair Triton 2 TR-60) uses 7 50 lb bags of sand - 350 lbs total. You can also purchase our superior to sand Click here for our Sand Alternative.

Please click here to view the ZeoSand alternative.  

Step 2

TURN OFF PUMP - Before you start to change the sand, make sure you TURN OFF THE POOL PUMP. For maximum safety turn off the power at the circuit breaker to the pump.

Step 3

RELIEVE PRESSURE - Next you will have to relieve the pressure that builds up in the filter during operation. To relieve pressure turn the relief valve on top of the filter counter-clockwise. Water may spray out initially as you see the pressure on the pressure gauge go to 0 psi.

Step 4

REMOVE DRAIN PLUG - Remove the drain plug at the bottom of the filter tank by twisting it counter-clockwise. This step will drain the water out of the sand in the tank.

Step 5

REMOVE CLOSURE LID - Using the Lid Wrench provided with the original purchase of the filter, twist the Lid off the top of the filter - twist counterclockwise.

Please click here and view key number 20 which are the lid removal tools. 

Step 6

VIEW BAFFLE AND AIR RELIEF TUBE - With the Lid off the top of the Filter, you will see the Baffle and the Air Relief Tube. The Baffle distributes the water from the pump over the top surface of the sand. The Air Relief Tube connects to the bottom of the tank and relieves any air that is caught in the top of the tank.

Step 7

CHECK AIR RELIEF SCREEN - The top of the Air Relief Tube is covered with a screen to prevent sand from clogging the Tube. Remove this screen and clean it. Clean off the top of the tube and blow through it to make sure it is clear.

Step 8

PUSH BAFFLE ASIDE - Move the Baffle away from the opening in the tank by pushing it aside horizontally. You should be able to push it so that the tank opening is completely open for maximum access to the sand.

Step 9

REMOVE SAND - Remove the old sand using a cup or small coffee can, or a medium to high powered wet vac. Dump the sand on a tarp for later disposal. Clear the sand down to the top of the laterals at the bottom of the tank. If you are using a cup to clear the sand, place a cloth on the edge of the tank opening to avoid fiberglass splinters.

Step 10

CLEAR LATERALS - When you get to the lateral, be careful removing the sand around and under the laterals as they are somewhat fragile and can be broken easily. Clear all the sand away from the lateral so you can inspect them.

Step 11

CLEAN TANK - Wash off the laterals and the bottom of the tank. Let the water drain out the drain port.

Step 12

CHECK LATERALS - Look at and feel each of the laterals to see if any are damaged. If necessary, remove the questionable laterals and replace them. See our guide on "How to replace Laterals in a Pentair Triton 2 Side Valve Sand Filter".

Step 13

REPLACE DRAIN PLUG - Once all the laterals have been checked and are in place, check and lubricate the Drain Plug's O-ring, then replace the filter Dain Plug.

Please click here to view the Magic Lube O Ring lubricant. 

Step 14

ADD WATER TO TANK - Fill tank about 1/2 way full with water to provide a cushion when the sand is poured in. This will help protect the laterals.

Step 15

REPLACE SAND - To replace the sand, place a bag on top of the filter and cut out a large corner at the bottom of the bag nearest the hole in the top of the filter tank.

Step 16

ROTATE BAFFLE BACK - Push the baffle back until it is positioned in the center of the tank opening.

Step 17

CHECK AIR VENT - Make sure the air vent tube is still connected through the baffle and the screen is attached securely at the end of the tube. The screen should be positioned close to the top of the tank.

Step 18

CLEAN LID GROOVE - Clean any sand or other debris out of the threads of the lid cover and tank.

Step 19

CHECK AND LUBRICATE O-RING - Check the Lid Cover O-ring for cracks or splits. Replace it is required and then lubricate it lightly with a silicon-based lubricant.

Please click here to view the Magic Lube O Ring lubricant. 

Step 20

REPLACE LID - Screw the Cover Lid into the top of the filter tank using the large hex wrench. Make sure the threads line up. If it becomes hard to turn, back the Lid off and rethread it.

Step 21

SET TO BACKWASH - Rotate the multiport handle to "Backwash".

Step 22

TURN ON PUMP - Turn on the power to the pump.

Step 23

CLOSE RELIEF VALVE - When a steady stream of water shoots out of the relief valve, turn the valve off. Run the filter in Backwash mode for 2-3 minutes.

Step 24

TURN OFF PUMP - Shut off the power to the pump.

Step 25

SET TO RINSE - Rotate the Multiport Valve Handle to "Rinse".

Step 26

TURN ON PUMP - Turn on the pump and operate in "rinse" mode for 30 seconds.

Step 27

TURN  PUMP OFF

Step 28

SET TO FILTER - Rotate the Multiport Valve Handle to "Filter".

Step 29

TURN PUMP ON - You filter should be operational. Note the filter pressure. In the future, when it goes 10 psi higher, it will be time to backwash the filter again..

Comments

Top
(41 to 44 of 44)

InyoPools Product Specialist  Posted: 7/24/2015 

stuck filter top - Thank you for your feedback. Sounds like the previous owner glued the top on and, in that case, about all you could do was cut the top off. As you said, you have to be very careful doing this so that you don't damage the threads in the tank top.
 Reply

Anonymous  Posted: 7/23/2015 

Thank you for answering. I actually ended up sawing it off with a sawzall (be very careful). Then I was about to hammer and get a screw driver in there to loosen it up then it twisted off. I obviously bought a new top and O ring. I always about to safe the pressure valve being cutting around it.
And it was glued with something black not sure why
.

 Reply

InyoPools Product Specialist  Posted: 7/23/2015 

stuck filter top - I would guess that this top has not been removed for years and is stuck on with mineral deposits. Try brushing some CLR around the top to break up the deposits. Try trapping around the top with a rubber mallet. Also, for a little more leverage try using a strap clamp to remove the top - counter-clockwise.
 Reply

Anonymous  Posted: 7/23/2015 

I cannot get the top off of my filter to remove the sand. I have the wrench and have tried for hours. I am 26 so have the strength. I just bought this house is it possible the previous owner glued it or something. Is there another way to get it off?
I have relived all psi pressure and bottom valve to let water leave already.

 Reply