How To Replace the Zodiac T5 Pool Cleaner Diaphragm

WRITTEN BY: 

  3.67 out of 5 stars on 3 ratings
(Click on a star to add your rating)

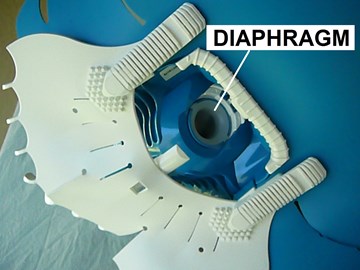
The Zodiac T5 Diaphragm is located inside the Engine Assembly. Its pulsing action generates the power required to drive and control the Zodiac X7 Cleaner. With time the Diaphragm will wear to the point where it has to be replaced. This guide shows you the steps required to replace this Diaphragm.

Step by Step

Top

Step 1

ORDER PARTS - The part you will need to order for this procedure is the Zodiac T5 Diaphragm. Click: DIAPHRAGM for our link to this part.

Step 2

UNSCREW HANDNUT - Unscrew the Handnut counter-clockwise.

Step 3

PULL OFF MAIN BODY COVER - Lift off the Main Body Cover by pulling it forward. You may have to play with it a bit to get it past the front collar. It helps to push down ion the back of the Cover as you are pulling it forward.

Step 4

SLIDE OUT ENGINE ASSEMBLY - Slide the Engine Assembly out through the front ring. The Engine Assembly should come out easily.

Step 5

SLIDE OFF THRUST WASHER - Take the Thrust Washer off of the Engine Assembly.

Step 6

REMOVE OUTER EXTENSION PIPE - Unscrew the Outer Extension Pipe from the Engine Assembly.

Step 7

REMOVE INNER EXTENSION PIPE - Separate the Inner Extension Pipe from the end of the Diaphragm by rocking it back and forth.

Step 8

REMOVE DIAPHRAGM - Pull the Diaphragm out of the other end. It may help to push it out from the pipe end first with your thumb.

Step 9

CONNECT NEW DIAPHRAGM TO PIPE - Work the smaller end of the Diaphragm onto the grooved end of the Inner Extension Pipe.

Step 10

PLACE INNER EXTENSION PIPE INSIDE CUP ASSEMBLY - Insert the Inner Extension Pipe with the Diaphragm attached into the nut end of the Cup Assembly.

Step 11

LINE UP DIAPHRAGM - Line up the tab on the top of the Diaphragm with the notch in the Cup Assembly.

Step 12

PULL IN DIAPHRAGM - Pull the Inner Extension Pipe straight through the Cup Assembly until the edge of the Diaphragm is visible. Do not twist or the Diaphragm may come off of the Pipe. Check that Notch is in place.

Step 13

REPLACE OUTER EXTENSION PIPE - Screw the Outer Extension Pipe onto the Cup Assembly.

Step 14

PLACE THRUST WASHER ON ENGINE ASSEMBLY - Place the Thrust Washer over the front end of the Engine Assembly. Note: the width of the Thrust Washer collars. The wider collar has to go on first.

Step 15

INSERT ENGINE ASSEMBLY INTO CLEANER - Place the Engine Assembly and Thrust Washer back through the front ring until it engages into the back ring fully.

Step 16

PLACE MAIN BODY COVER OVER MAIN ENGINE - Place the Main Body Cover over the front of the Engine Assembly and start to push it back to engage with the back of the Cleaner.

Step 17

ENGAGE MAIN BODY COVER - Insert the two tabs on the back of the Main Body Cover into the two slots in the back of the Cleaner. Make sure they are fully engaged.

Step 18

SCREW ON HANDNUT - Screw the Handnut into the front ring of the Body Assembly - clockwise.

Step 19

OPERATE CLEANER - Try spinning the Engine Assembly. If it spins freely, your Zodiac T5 Pool Cleaner is ready to operate.

Comments

Top
(1 to 8 of 8)

 Posted: 1/20/2019 

easy guide instrucxtions.......just needto put rather extreeme presssure to remove the outer ring!!!!
 Reply

 Posted: 8/21/2018 

Excellent instructions. Helped me find the mistake I made the first time round. Thanks
 Reply

 Posted: 3/10/2018 

Very clear instructions, gave me confidence in applying pressure to unscrew parts that seemed to be permanently joined
 Reply

 Posted: 6/28/2016 

Great instructions and clear pictures. This made the job simple! Thanks!
 Reply

InyoPools Product Specialist  Posted: 3/28/2016 

ValleyResident - My mistake. That should read TSP. It's a heavy duty cleaner you can buy at any hardware store.
 Reply

 Posted: 3/27/2016 

I have the same issue, I cannot unscrew the cup assembly. What is TCP?
 Reply

InyoPools Product Specialist  Posted: 3/26/2016 

Kchilt31 - The outer extension pipe should screw off fairly easily from the other half of the engine assembly. If it is corroded, try soaking the assembly in a weak solution of TCP for an hour.
 Reply

 Posted: 3/26/2016 

Why is it so difficult to remove the outer extension pipe? Any tips?
 Reply