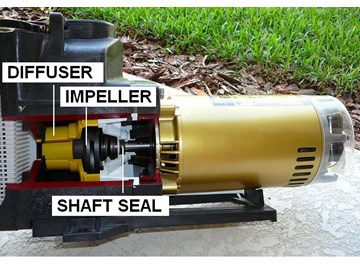
If you see water leaking out of the bottom of the pool pump assembly, it's a good indication that you may have to replace the shaft seal within the motor pump assembly. As shown in the pool pump cut away, the shaft seal is located in the motor pump assembly behind the impeller. Although this description is specific to a Hayward pool pump, many of the steps can apply to other models of pool pumps.
Click Here to View Replacement Pool Pump Parts


Jim Posted: 2/11/2016
Viewers be apprised that the impeller ring orientation shown in the video is incorrect. The broader, wider diameter end should be toward the pump end, not the motor end. I just had an email exchange with Inyo Pools outside of this blog and they confirm this. To clarify, I'm talking about the one piece, white, plastic impeller ring, not the impeller or seal.Reply
InyoPools Product Specialist Dennis R. Posted: 2/5/2016
bobthebuilder - We show using the plastic end of the screwdriver in the step by step guide. Like you say, I would not use a metal tool to press the seal into the plate as erroneously shown in the video. If you prefer using your finger, place a clean cloth over the ceramic seal face. The oil in your fingertip will cause the ceramic face to burn.Reply
bobthebuilder Posted: 2/4/2016
I have ordered a new motor and seal kit from INYOPOOLS and should be getting them today. I plan of doing the swap during the weekend. Your instructions are very clear and helpful. I do however have a question pertaining to the shaft seal replacement. You very strongly warn against touching the ceramic part as well as the graphite part (mating faces) with fingers. Instead you show seating of the ceramic seal using a screwdriver and pliers. On other sites, the warning is never to push the ceramic seal down using a screwdriver. Which is correct? As long a fingers are clean and free of grease etc, why is it not okay to touch the seal face? It seems that using metal tools to push down on the ceramic seal is more risky especially for inexperienced diy'ers. Please elaborate.Thanks,
Patrick
Reply
Anonymous Posted: 4/26/2019
You can use gloves or a paper towel to press the seal in place. If its a tool, it should be soft. It should not be a hard or sharp tool.Reply
InyoPools Product Specialist Dennis R. Posted: 8/31/2015
Texas - I would take the motor out again and make sure the two halves of the seal are seated correctly especially in the seal plate. Also check that the two ceramic surfaces are placed together. It is possible to flip one or the other.Reply
Texas Posted: 8/29/2015
I replaced the shaft seal and now when the pump motor runs, it makes a load high-pitched squeal like the ceramic bearings are rubbing together causing a whine. The motor and impeller turns freely with no binding or drag. Could the new ceramic shaft seal be defective? I didn't touch it with my bare hands. Very loud noise.Reply
InyoPools Product Specialist Dennis R. Posted: 8/20/2015
replace shaft seal - If you get the capacitor out of the way, you should be able reach the flat part of the shaft to secure it. If your shaft has a slot on the end of it to place a screwdriver, use a large screwdriver to secure the shaft.Reply
Anonymous Posted: 8/18/2015
I have a Hayward Super Pump 1/12 HP. I was trying to replace all the gaskets on it. Mine does not have a place for a wrench, just for a screw driver. I have not been able to take it a part. Any suggestion's? ThanksReply
InyoPools Product Specialist Dennis R. Posted: 7/29/2015
JJinYardleyPA - With that much noise, the motor's bearings are probably going. But you may want to check that the impeller is not rubbing against the inside of the pump or debris between the impeller and the side. See the first part of our guide on "How To Replace A Pool Pump Impeller" for instructions on getting to the impeller.Reply
JJinYardleyPA Posted: 7/28/2015
I have a Pentair pump, (ironically) the Whisperflo model, which can now be heard inside the house on the 2nd floor with the windows closed and our AC on. It is NOT leaking any water... do you think the noise is from the seal, from the motor / bearings, or the pump head / impeller? Thanks...Reply
InyoPools Product Specialist Dennis R. Posted: 7/27/2015
$400 mistake? - Not sure which metal tab broke off but I would guess it's not critical. Some of these tabs/posts are there to keep the wires from getting caught in the spinning governor under the switch. You would have to tuck that wire somewhere else.Reply
Anonymous Posted: 7/27/2015
I have a Hayward Super Pump. As I was putting in the wrench to hold the motor shaft, I had it at the wrong place. A small metal tab broke off above where the springs are, but it looks like the tab bumps up against a plastic piece for some reason. Did I just make a $400 mistake by breaking off this metal tab? If so, is there anything i can do to fix it now?Reply
InyoPools Product Specialist Dennis R. Posted: 7/22/2015
FrustratedPoolOwner - Yes, GOKIT3 or GOKIT3SALT are the GOKIT options for your Hayward Super Pump. If you have a salt water pool, I would recommend the salt version. The gaskets in that kit will hold up better against salt water. These kits come with all the gaskets and seals required for a motor replacement. I would replace the housing gasket first and see if that stops your leak. If not, then replace the shaft seal and other gaskets. Avoid running the pump dry (water level below skimmer etc). This will cause the shaft seal to fail and start spraying the motor.Reply
FrustratedPoolOwner Posted: 7/20/2015
My pump is a Hayward Super Pump Model# SP2610X15, and it is leaking from the bottom of the pump. It is only 14 months old (out of warranty by 2 months), so I hope this isn't a sign of things to come every year!! However, based on Google searches it looks like I am not alone. :-( Does the salt water cause this much corrosion to ruin the gaskets and shaft seal in such a short amount of time?I can't pinpoint if it's just leaking at the housing gasket or the shaft seal. Is there an easy way to tell? I've re-lubricated the housing and diffuser gaskets and made sure the bolts were tight; but haven't gone further into the motor yet until I decide what to order. Although the steps I described above have helped some, it is still leaking (more slowly than before) and I'm not getting as many air bubbles.
1. Is there something I'm overlooking that could be causing the leak besides what I've listed above?
2. Just to clarify, if I order the Tune Up Kit (GOKIT3/GOKIT3SALT), will it come with the shaft seal AND all the gaskets I will need to (hopefully) repair the leak?
3. What is the difference in the Salt Water Tune Up Kit and the regular version, besides one is made for salt water?
Thank you in advance for your time!
Reply
InyoPools Product Specialist Dennis R. Posted: 6/30/2015
Richard - The pressure on the shaft seal should be positive when the pump is running. If you could see the seal leaking, you would see it spraying onto the motor. Your suction leak is somewhere in the piping between the pool and the front end of the pump, before the impeller.Reply
Richard Posted: 6/29/2015
I have an Haward Super Pump 1HP. When I stop the pump, I can see the floor becoming wet under the pump between the basket and the motor. I presume my seal gasket is leaking. However when the pump runs it remains completely dry but my pump is sucking air. At run time is the pressure on the shaft seal positive or negative? A negative pressure would explain my problem but I have not seen that being described anywhere on the web. The drain plugs of the pump are not leaking this I am sure.Thanks
Richard
Reply
InyoPools Product Specialist Dennis R. Posted: 5/26/2015
silly question - Yes, some water will flow out of the top of the filter, but that will fill again when your prime the pump. If you have an above ground pool, make sure you also plug the return port. This is not an issue for an in-ground pool since the pump/filter is above the surface of the pool and not gravity fed.Reply
silly question Posted: 5/26/2015
I know this might be a silly question for some, but I am not certain if the water will flow out the motor when I remove it to replace the shaft seal.I can plug the skimmer, but can I stop the water from flowing from the sand filter?
Reply
InyoPools Product Specialist Dennis R. Posted: 4/15/2015
Mike - I am not familiar with this pump, but if it is like most pumps, the impeller has to be twisted off the motor shaft (counter-clockwise). Most set screws are there to prevent the impeller from twisting off during operation. Try twisting it off CCW with a strap wrench.Reply
Mike Posted: 4/14/2015
I am trying to replace the shaft seal on a Pyrex series A pump! I pulled the set screws out (2) and sprayed WD40 in the holes, I came back about a hour later and with a slide hammer puller, ( made for this ) tried the pull the impeller off. Won't move, tried several times. I tried to heat up the impeller and tried again. It won't come off. Any suggestionsReply
InyoPools Product Specialist Dennis R. Posted: 8/25/2014
No flow - Generally when something isn't working it has to do with what you just changed. Go back through your steps and check the parts that your removed to make sure they are good and that you placed them back like they were.Reply
Anonymous Posted: 8/23/2014
I just replace the shaft seal for our Hayward motor. The basket is full of water but it is not filling up the filter and circulating back into the pool??? Any suggestionsReply
InyoPools Product Specialist Dennis R. Posted: 7/5/2014
TheChlorinator - Did you replace the shaft seal with a new one? If so and you used all new gaskets, check and see if you have a crack in the pump housing where the motor and housing come together.Reply
TheChlorinator Posted: 7/4/2014
Hello - So I just went through and replaced the gasket, impeller, seals, etc. via a maintenance/go kit. I used your video which helped me every step of the way. Turned on the pump, still behaving the same. I had to work up enough water between the skimmer and drains/jets to get the pump to work, but the water is still coming out of the bottom pretty heavily, not dripping. It's more of a stream of water than a drip. Any ideas what I should try next? It's really hard to see where the leak is coming from since it's on the bottom, but it's definitely what seems like in the area of the bolts that connect the motor and stuff. Sorry I'm not so pool savvy. Any ideas?Reply
Anonymous Posted: 3/18/2021
Hi. Did you look at the diagram, see what else might be worn out? -- maybe the gasket that connects the strainer basket part, to the impeller housing part? though it sounds like maybe you put the new seal on, in the wrong direction or such? check all gaskets, and all parts for damage. refer to the company;s diagram that is here, and presented on touch screen monitors at some pool stores.Reply
InyoPools Product Specialist Dennis R. Posted: 6/18/2014
Newpool owner - Try applying a soapy solution on all the suction line connections [between the intake port of the pump and the pool]. If you see any bubbles being sucked in, you have a suction air leak.Reply
Newpoolowner Posted: 6/17/2014
When I open the pool this year the pump stated to suck air. It's fine for about 20 secs and then again air bubbles inside the pump strainer. I didn't have this problem last year. I hope it's not a cracked line, I am also not losing water. That I can see.Reply
InyoPools Product Specialist Dennis R. Posted: 6/6/2014
starite seal plate leak - Sounds like a good place to start, but if the pump is "very old", you might better put that money towards a new more cost efficient pump. Look for EE [Energy Efficient]. Saves about 20% in operating costs.Reply
starite seal plate leak Posted: 6/4/2014
I have a drip between motor and pump, and replaced the shaft seal and all O rings, but drip continues. Could it be a "warped" seal plate (it's very old)? If I buy/install new seal plate kit including shaft seal, is it likely to fix drip? Sta Rite dura glass/maxe glass pump. Seal plate kit C203-193P?Reply
InyoPools Product Specialist Dennis R. Posted: 5/13/2014
Craig - You don't have to lubricate the motor shaft seal. And definitely don't lubricate the surfaces of the shaft seal that come into contact with each other.Reply
Craig Posted: 5/12/2014
I didn't order any lubricant with new my shaft seal. Can I lubricate the pump motor shaft seal with silicone grease?Reply
InyoPools Product Specialist Dennis R. Posted: 4/14/2014
SAMUEL JOYE - Make sure all the gaskets are installed - like the diffuser gasket. If applicable, check the union on the suction side of the pump to make sure the o-ring is in place. Fill the strainer basket with water before you turn the pump on.Reply
SAMUEL JOYE Posted: 4/12/2014
I HAVE JUST REPLACED THE HOUSING ON MY HEYWARD POOL MOTOR, POOL WILL NOT PULL WATER FROM POOL. DOUBLE CHECKED FOR LEAKS NONE. REPLACE ALL NEW GASKETS. STILL WILL NOT PULL WATER TO FILTER. FILL HOUSING WITH WATER WITH WATER HOSE TO PRIME, STILL NO SUCTION. WHAT DID I DO WRONG?Reply
InyoPools Product Specialist Dennis R. Posted: 8/10/2013
new to this - If the leak is between the motor and the pump and you can see it spraying or dripping out at this junction, your housing gasket probably needs to be replaced. With this kind of leak you can still run your motor. If you have water dripping out of the bottom of the motor, your shaft seal is leaking and spraying water inside the motor. You should not run your motor with a bad shaft seal. See our guide on "How To Replace Pool Pump Gaskets" for more information.Reply
new to this Posted: 8/9/2013
My pool stopped pulling water. The repair person replaced something to do with the impeller, but now there is a leak from the bottom between the motor and the pump, which sounds like a shaft seal problem. The repair person says he cannot come until Monday (4 days from now)!QUESTION: Can I run the pump with the leak so my pool doesn't turn green while waiting for the repair person?
Reply
InyoPools Product Specialist Dennis R. Posted: 7/18/2013
GinaBeena33 - If the pump ran dry for any period of time and water is leaking under the motor, the shaft seal is probably damaged and will have to be replaced.Reply
GinaBeena33 Posted: 7/16/2013
My husband forgot to put enough water into the pool and while I was away the pool pump ran without enough water. Since I've been home, I have tried to reprime the pump. Right now, the pump turns on and it have plenty of water in the strainer housing. The pump is not sucking in water and not pushing it to the sand filter. I've noticed water leaking from the bottom of the pump coming from the metal spinning rod thing (sorry to get technical. Does this seem like a shaft seal situation, or should I be looking for something else? Thanks!Reply
InyoPools Product Specialist Dennis R. Posted: 5/22/2013
mnyrk - Here's the seal kit for your Leisure Bay Cyclone 200 pump. See this link. I would try replacing the seal first, but it sounds like you may have bearing problems that may also have to be replaced.Reply
mnyrk Posted: 5/21/2013
I have a Leisure Bay Cyclone 200 Pump/Filter assembly. The pump was hard starting this spring. I broke it free with pliers to get it spinning. Its working fine now, but the pump has a high pitched whine to it and it is leaking a tiny bit of water. Is there a seal in that pump/motor set that can be replaced to stop the noise?Reply
rgholloman Posted: 5/21/2013
Thank you yet againReply