How To Replace a Pool Motor Shaft Seal

WRITTEN BY: 

  4.12 out of 5 stars on 61 ratings
(Click on a star to add your rating)

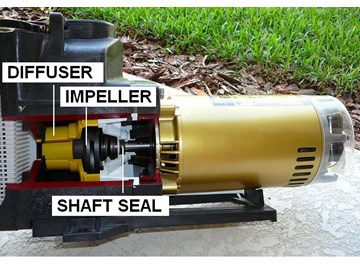
If you see water leaking out of the bottom of the pool pump assembly, it's a good indication that you may have to replace the shaft seal within the motor pump assembly. As shown in the pool pump cut away, the shaft seal is located in the motor pump assembly behind the impeller. Although this description is specific to a Hayward pool pump, many of the steps can apply to other models of pool pumps.

Click Here to View Replacement Pool Pump Parts 
 

Things You'll Need

Video

Step by Step

Top

Step 1

The first step is to turn off all power to the pool pump. For maximum safety turn off the power at the circuit breaker to the motor.

Click Here to View Replacement Pool Pump Parts 

Step 2

Next you will want to remove the motor pump assembly from the wet end housing. Remove the four 9/16" bolts that bind the motor pump assembly to the housing. Note: some Hayward pool pump models have six bolts.

Step 3

Now pull the assembly apart from the pool pump housing.

Step 4

After the assembly is out, you should see the pool pump diffuser and diffuser gasket on the end of the assembly. If you do not see the diffuser or its gasket, check inside the housing.

Step 5

If the pool pump diffuser came out with the assembly, pull the diffuser off the assembly. You may have to pry it off gently with a screwdriver. Now you will see the pool pump impeller. The shaft seal is behind the impeller so you will now have to remove the impeller.

Step 6

To remove the pool pump impeller you will twist the impeller off in a counter clockwise motion. The impeller cannot be freed from the motor shaft without first securing the motor shaft.

Step 7

Move to the other end of the motor shaft in the back of the motor assembly. Take off the two screws that hold the back cover onto the pool pump assembly.

Step 8

You will see the pool pump motor wiring and capacitor. You will have to remove the capacitor to gain access to the end of the motor shaft. Capacitors store power. To avoid a possible shock, lay a screwdriver across the two leads to short out the capacitor. These capacitors sometimes burst when shorted out, so it is a good practice to place a cloth over the capacitor and to wear eye protection.

Step 9

Now unscrew the single screw that hold the capacitor in place and push it out of the way. No need to disconnect capacitor from leads.

Step 10

Place a 7/16" wrench on the flat end of the pool pump motor shaft to secure the shaft from rotating.

Step 11

At the pool pump impeller end, twist off the impeller, counter clockwise. You may have to use a strap wrench to gently free up the impeller.

Step 12

Now you will see the motor shaft seal. One half on the pool pump impeller and the other half in the seal plate on the shaft.

Step 13

Inspect the threads on the inside of the pool pump impeller. If these are badly worn, you will have to replace the impeller.

Click Here to View Replacement Pool Pump Parts

Step 14

Stand the motor up on end and gently remove the white ceramic seal inside the seal plate. You may have to use a small screwdriver to gently pry out the seal. If the seal plate lifts off, it may be simpler to push the seal out of the seal plate from the other side.

Step 15

Set the new seal on the shaft inside the seal plate - white side up. Be very careful NOT TO TOUCH the white ceramic side of the seal with your hands. If necessary, gently seat the seal with the blunt end of a screwdriver.

Step 16

Grab the seal on the pool pump impeller and twist it off. Make a note of how the seal is positioned on the impeller so you know how to place the new seal. It is possible to place this seal upside down. Note: You may have to also have to remove the metal collar if the new shaft seal also has one. Several people have written in saying that the new seal won't fit because they were trying to place the new collar on top of  the old one.

Step 17

Now push the other half of the new seal onto the pool pump impeller. Place the new seal on in the same postion noted above. Again, DO NOT touch the bearing (top) surface of this seal.

Step 18

With the wrench securing the back end of the motor shaft, screw the pool pump impeller back onto the shaft (clockwise). Hand tight is sufficient.

Step 19

Inspect the diffuser gasket for wear. Replace if required. Put a thin coat of lubrication on the gasket.

Click Here to View Replacement Pool Pump Parts

Step 20

Snap on the pool pump diffuser - no screws are required. Ensure that the part of the diffuser labeled "TOP" is aligned with the "TOP" labeled on the seal plate.

Step 21

Slip the motor assembly into the housing.

Step 22

Replace the four bolts evenly. If bolts were numbered 1 though 4, replace bolts in this sequence - 1, 3, 2, 4 - to ensure that the motor is set properly inside the housing. Loosely tighten bolts in this sequence, then go back and tighten them down again in this sequence. If pool pump has 6 bolts, replace bolts in this sequence - 1, 3, 5, 2, 4, 6.

Step 23

Replace the capacitor on the backside of the assembly. Make sure the plastic strip is in place between the clip and capacitor so that the capacitor does not short out.

Step 24

Replace motor cover and secure with two screws.

Step 25

Prime pump by removing strainer lid and filling strainer with water. Replace lid.

Step 26

Reset circuit breakers and start pool pump.

Click Here to View Replacement Pool Pump Parts 

Comments

Top
(161 to 175 of 175)

Anonymous  Posted: 6/26/2011 

thanks very helpful cant mess up with these instructions
 Reply

 Posted: 6/1/2011 

Not only did I touch the ceramic surfaces, I lubed them with the included lube in the Go-Kit!!! Good thing I read this page to try and figure out O-ring placement or I would have never caught that. The Go-Kit should have a label warning right in it.

Great info on the website, just neeed more on the packaging.

 Reply

 Posted: 5/30/2011 

My Hayward super pump is making more noise than it did last season and is leaking. Due to the noise do you think I have a motor problem , and should I try replacing the seal or go ahead and replace the motor?
 Reply

InyoPools Product Specialist  Posted: 5/23/2011 

Most the time if you have a leak out of the bottom of the pool pump you are looking at a worn seal. There are sometimes when a crack forms some where in the pool pump housing, but I am guessing it is a worn seal.
 Reply

 Posted: 5/22/2011 

i just changed my pool motor because it was leaking and i had no choice but reaplace it, this happen about two months ago and i just notice watter leaking from the bottom of my new motor again help what should i do, it looks like if i have to reaplace the shaft seal again
 Reply

 Posted: 5/14/2011 

I used the go kit 3 & it fixed the leak on my hayward pump at the juncture of the pump motor and pump housing.

Thx for the great, illus. step-by-step instructions. Would have been lost w/out them. The Hayward owner's brochure instructions were completely inadequate in terms of changing out seals and gaskets.

Of course I touched the white porcelain on the shaft seal while removing from packaging & before reading your instructions, but swabbed off fingerprint oil w/rubbing alcohol.

 Reply

 Posted: 3/12/2011 

I have a Hayward North Star SP4007 pump. It is different from this but should be very similar. I held shaft and turn the impeller. It is very difficult. I turned several turns count clockwise, but there is no any sign of loose. Anything wrong? Any comments? Thanks.
 Reply

InyoPools Product Specialist  Posted: 1/22/2011 

Refer also to the picture in step 13. The end of the seal that should be up is the collared end - has a step up. Also the bearing surface that rubs on the other half of the seal is polished and has a shinier surface.
 Reply

Anonymous  Posted: 1/22/2011 

you mention in step 16 about the possibility of placing the seal upside down. Which is the correct position?
 Reply

InyoPools Product Specialist  Posted: 11/25/2010 

According to several manufactures, the oil on your fingertips will cause the surface of the ceramic seals to burn and eventually leak when operated under high speeds.
 Reply

 Posted: 11/24/2010 

Are you going to tell us why its so important not to touch the white surface?
 Reply

Anonymous  Posted: 9/23/2010 

I had purchased a replacement motor and the to go kit for my hayward super pump. Not only did you have one of the best prices, the shipment was fast! I had decided to switch out my own motor after I found the how to page on your web site. The local pool dealer wanted over $400 dollars to replace the motor and install.I was able to do it for half the price!
Thanks!!
Rob


 Reply

Anonymous  Posted: 9/14/2010 

9-14-10
Replaced the seal on my pump today, thanks to these GREAT instructions I had it done in 30 min.

 Reply

 Posted: 1/17/2010 

We are glad the page helped you. We do sell a seal kit for the Hayward Super II. Click Hayward Super II Seal Kit We also sell Seal Kits for all different types of pumps Click on Seal Kits
 Reply

 Posted: 1/15/2010 

Thank you soooooo much for the clear and easy to follow instructions. The photos aided the instructions greatly. My Hayward super ll pump is 7 yrs old, run it 24/7 365 days of the year. I think it would be best to replace the motor rather than have it repaired. Is there a seal kit available before I put the diffuser and impeller back on? Griz
 Reply