How to Replace a Maytronics Dolphin Pool Cleaner Cable - TOP Connect

WRITTEN BY: 

  4.6 out of 5 stars on 5 ratings
(Click on a star to add your rating)

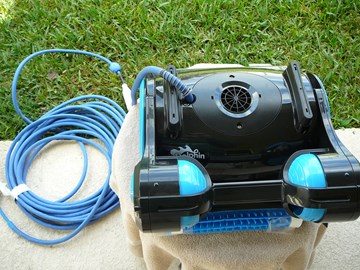
Your dog has chewed through your cable and you have to replace it. In the past, you would probably have had to send your Dolphin cleaner back to the Maytronics repair shop to have another cable attached. If you have one of the newer cleaners that feed the cable in from the TOP, the replacement process is much simpler. This guide shows you how to replace a Triton Dolphin Cleaner cable. Although this guide is tailored to a Triton Cleaner, most of the steps are applicable to the other TOP entry Dolphin Cleaners. Read our guide on "How to Select the Right Maytronics Dolphin Cleaner Replacement Cable" for more information on Dolphin cables. For a list of Dolphin Cleaners that use a top cable connector, see the parts list at the bottom of the product pages for Cable 9995872 and Cable 99958

Step by Step

Top

Step 1

ORDER PARTS - You have two options to select from for replacing your 18M (60') cable. Both have the solid, DIY, plug but one has a metal spring, 9995872-DIY and the other has a rubber spring, 9995873-DIY. Buy the one that matches your current cable.

Step 2

TURN OFF POWER - Before working on your Maytronics Dolphin Triton Robotic Cleaner, make sure you have disconnected all power to the unit.

Step 3

UNSCREW IMPELLER COVER - The Impeller cover is secured into the top of the Cover Assembly with 2 screws. Remove these screws with a Phillips head screwdriver. Do not use a power drill. You run the risk of stripping the threads. Set these screws aside. They are shorter than the rest of the screws you will be removing.

Click here to view Maytronics Dolphin models/parts. 

Step 4

LIFT OFF IMPELLER COVER - The Impeller Cover is in flush with the Cover Assembly. You may need to use a small screwdriver to gently pry it out of the Assembly. Note how the cover fits around the cable spring.

Step 5

UNSCREW COVER ASSEMBLY - Remove the 4 top corner screws that hold the top Cover Assembly to the Cleaner's chassis.

Step 6

LIFT OFF COVER ASSEMBLY - Lift the Cover Assembly up off of the top of the Cleaner. You will have to thread the Cover Assembly along the power cord to get it off far enough to work on.

Click here to view the Maytronics cables. 

Step 7

UNSCREW WHITE PLUG - Inset the ends of a pair of pliers in the holes on top of the white plug and unscrew the plug in a counter-clockwise direction.

Step 8

LIFT PLUG - Pull the white plug up and out of the socket and slide it down the cable.

Step 9

PULL OUT BLACK CONNECTOR - Using the cable pull the black connect and gasket straight up out of the socket. It will take a strong steady tug.

Step 10

VIEW PLUG GASKET - Here is a picture of what the black plug and watertight gasket look like once extracted.;

Click here to view Maytronics Dolphin models/parts. 

Step 11

REMOVE RETAINER CLAMP - Unscrew the clamp that holds the cable to the motor.

Step 12

PULL OLD CABLE OUT - Remove the old cable out of the cover assembly.

Step 13

DISCONNECT CABLE FROM BOX - Disconnect the other end of the cable from the power supply. Plug unscrews counter-clockwise

Step 14

THREAD NEW CABLE IN - Thread the new cable through the cover assembly from the top to the bottom.

Click here to view the Maytronics cables. 

Step 15

SEPARATE PLUG COMPONENTS - Spread out the three plug components at the end of the cable

Step 16

LUBRICATE O-RING - Lubricate the O-ring on the black connector.

Click here to view Magic Lube O ring Lubricant. 

Step 17

VIEW CONNECTOR - The connector has a groove on its side to line up with the ridge in the socket when you plug it in.

Step 18

INSERT CONNECTOR - Line the connector up with the socket groove and push it in as far as it will go.

Step 19

SLIDE DOWN GASKET - Slide the gasket down the cable into the socket until it is on top of the connector.

Step 20

SCREW ON WHITE CAP - Slide the white cap down the cable and screw it into the socket.

Click here to view Maytronics Dolphin models/parts. 

Step 21

TIGHTEN WITH PLIERS - Using a pair of pliers, screw the cap down until it is tight.

Step 22

SECURE RETAINER CLAMP - Replace the cable retainer clamp with two screws.

Step 23

POSITION  COVER ASSEMBLY - Position the cover assembly over the top of the cleaner body to line up with the four corner screws

Step 24

INSERT SPRING - Work the end of the cable spring into the cable slot provided in the top of the cover assembly.

Click here to view the Maytronics cables. 

Step 25

ENGAGE COVER TABS - There are two sets of cover tabs that line up and secure the cover assembly to the cleaner body. Make sure those sets are engaged on each side before screwing the cover assembly on.

Step 26

SCREW ON COVER ASSEMBLY - Secure the four screws that hold the Cover Assembly to the body.

Step 27

REPLACE IMPELLER COVER - Place the new Impeller Cover into the top of the Cover Assembly. Work it around the Floating Cord connection first then lay the other end down. Make sure the Cover is flush with the Cover Assembly.  Secure the two screws to hold the Impeller Cover to the Cover Assembly. Hand tighten with a manual screwdriver. DO NOT over tighten.

Step 28

ATTACH CABLE TO POWER BOX - Attach the free end of the cleaner cable to the side of the power unit. Push the cable plug onto the power supply socket and rotate the plug's locking ring in a clockwise direction to secure the plug.

Click here to view Maytronics Dolphin models/parts. 

Step 29

READY TO GO - Your Cleaner has a new cable and is ready to go.

Comments

Top
(1 to 9 of 9)

 Posted: 3/18/2022 

Is it possible to splice the cable. Dog chewed in half.
 Reply

InyoPools Product Specialist  Posted: 3/21/2022 

It may be possible, but I wouldn't consider it safe to do so.
 Reply

 Posted: 8/30/2020 

We have a Dolphin Active 30. Is it possible to replace the cord and not the swivel? Is there a way to plug a new cord into the swivel?
 Reply

InyoPools Product Specialist  Posted: 8/31/2020 

A replacement swivel can be purchased for the Dolphin Active 30, under the part number 99958811. But there does not appear to be an option for the blue cable without the swivel. So, if you have to replace the blue cable, you get a new swivel. I would replace the swivel along with the cable, just to have a completely brand new cable/tether link.
 Reply

 Posted: 7/28/2020 

Thanks for the post. I have a question.... my dog also chewed through my cable between the swivel and the power supply. Is it possible to replace the cable UK p to the swivel.... i.e without taking the cleaner apart Rgds Richard
 Reply

InyoPools Product Specialist  Posted: 8/24/2020 

I don't believe that is possible but I can check. What is the model name of your Dolphin cleaner?
 Reply

Anonymous  Posted: 6/17/2019 

Excellent instructions! Worked for my Dx3...Thanks!
 Reply

Anonymous  Posted: 9/23/2018 

Very good instructions. Took me 20 minutes to swap out the old cord for the new one on our DX3. Cleaner is back in the pool doing its thing. Thank you!!
 Reply

 Posted: 5/6/2018 

Thanks, it helped me feel confident. Turned into two-day job (Started late Friday finished Saturday afternoon). I ran into a Philips head that was striping. I bought a particular screw driver called a Box Philips head. It has a nut that allows a closed end to turn the screwdriver. Allowing me to push down on the screw and turn the closed end wrench. Dipped the end of the screwdriver in valve grinding compound screw started to turn, worked like a charm. /made the second mistake tested the connection before anchoring new swivel it hit the impeller, and it cracked. Super glued well but ordered a new one. Don't expect it to last. first time is always bad just like acid washing filter elements and cleaning salt cell. I have learned patients is truly a virtue.
 Reply