Part # B842
Warranty 1 Year
Manufacturer Code B2842
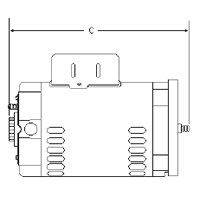
Dimensions 14" L x 8.5" W x 6.5" D
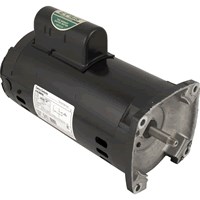
Century Centurion replacement motors for Pentair WhisperFlo, energy efficient, full rated pumps. Specifications: HP = 1.5, RPM = 3450, Voltage = 208-230, Amps = 9.6-8.8, Service Factor = 1.47, Frame = 56Y, Shaft = Threaded.
Note: NOT California or New York Title 20 Compliant.
California and New York Title 20 Compliant Option:


What is Service Factor?
Reply
Service Factor(SF) is a multiplier that when multiplied by the horsepower of the motor indicates the total permissible horsepower loading that may be carried when the motor is operating at rated voltage and frequency. The most important thing to remember when replacing a motor is that the replacement motor's horsepower times its service factor must be equal to or greater than the original motor's horsepower times its service factor. The Service Factor rating can be found on the motor label. See Step 4 of our How to Read a Pool Motor Label guide.
Reply
Why do I need to purchase a new shaft seal?
Reply
We strongly recommend replacing the shaft seal. The purpose of a shaft seal is to prevent water from running down the shaft of the motor and into the motor housing. Water will damage the bearings and cause the motor to fail. A new shaft seal should be installed whenever a motor is replaced. The motor manufacturer can deny the warranty if the motor fails to due to water damage from a faulty shaft seal. To find your shaft seal you will need to visit our Pool Pump Parts Page or the Spa Pump Parts Page and select your make and model.
Reply
Why should I purchase a Tune Up Kit?
Reply
A Tune Up Kit includes all of the essential replacement seals and gaskets for the pump. The seals and gaskets should be replaced when installing a new motor on your pump. New seals will prevent the pump from leaking water or losing the prime. A Tune Up Kit will protect your motor and ensure that the pump is working efficiently.
Reply
I'm trying to replace the motor on my pool pump but all these numbers and abbreviations on the motor label are really confusing me. What do they mean?
Reply
Replacing a pool pump motor is not as difficult as it seems. You can try looking here. If you need help figuring out what the information on your label means. If you are still having difficulty figuring it out you can call us at our toll free number or you can send us a photo of your motor label here.
Reply
I just finished replacing the shaft seal on my booster pump. As soon as I turned the pump on water was leaking from the shaft seal. Is it defective or am I doing something wrong?
Reply
Depending on the model, the installation of a booster pump shaft seal can be slightly different than a pool pump shaft seal. Some booster pump and pool pump shaft seals require that a silicone sealant be used on the outer areas of the metal seat of the shaft seal. The seal will need to be lightly hammered into the body of the pump. You can use a 1 inch PVC coupling or a piece of 1 1/4 inch PVC pipe and a rubber mallet. This procedure will apply to any pool pump or booster pump using a >PS-1000 style shaft seal.
Reply
Less than 1 hr
Screwdriver, Nut Drivers, Pliers, Socket Set
2 0
Disconnect power/ground/removed 8 bolts that hold flange to pump/took picts of wiring/removed wires/removed motor from flange/removed impeller/replaced seal-gasket/rewired new motor to harness/silicone on flange gasket/replaced bolts/power/done
1 to 2 hrs
Screwdriver, Pliers, Socket Set, Wrench Set
5 0
A couple of weeks ago the motor on our Whisperflo (model WFE-6 ) began squeeling loudly. I've heard the sound before on other motors and I knew that this one was done for. After a web search for the exact motor (AO Smith B2842) as shown on the motor info label I purchased one from INYOPools.com. I also bought the "Saltwater Tune Up Kit Pentair/Purex Whisperflo" which includes gaskets and lubricant for my model.
Steps for replacement
1. Ensure the breaker that powers the old motor has been turned off.
2. Close valves to stop incoming pool water from entering the pump.
3. Set the filter valve to the backwash or rinse setting.
4. Remove 6 bolts and 2 nuts (9/16" socket & Wrench) from the pump assembly and gently rock the motor to disconnect it and the collar from the pump assembly.
5. Use a hex wrench to remove the two small bolts from the impeller cover. The cover should come off easily.
6. Use a phillips head screwdriver to remove the "REVERSE THREADED" screw in the center of the impeller. It's REVERSE THREADED so a clockwise direction is used to take it out.
7. Use a flat head screwdriver to remove to screw on the cover that protects the back of the motor. Remove the cover.
8. Unscrew the impeller (normal thread so counter-clockwise) from the shaft of the motor. You can use the 9/16" open ended wrench to stabilize the motor shaft on the rear so that doesn't turn while removing the impeller.
9. Use 9/16" socket to remove the 4 bolts holding the motor housing to the pump collar remove the collar from the motor.
10. Take a picture of the wiring on the back of the motor to assist when putting it all back together.
11. Use a screwdriver to loosen the retaining screws and disconnect the wires and ground from the back of the motor.
12. Remove wires and protective conduit from the old motor.
13. Move conduit to the new motor, run wires through the conduit, and connect wiring as shown in picture from step 10 above. (Don't forget the grounding wire that should go directly to the ground near the pump.
14. Remove and replace metal backed seal (included in gasket kit) from the pump collar.
15. Remove and replace ceramic/rubber seal (included in gasket kit) from the impeller.
16. Lubricate and replace round and collar shaped gaskets on the collar and impeller cover.
17. Reverse steps to reinstall the collar, impeller, cover, etc. Tighten all.
18. Power on.
The Most Helpful Review
44 6
(5 out of 5 stars) Pool Filter Motor
Reviewed By: DreamBigGoGreen from Bowie, Maryland ()
Pros: Customer service, shipping time, price and product
Cons: None that I can think of
Best of all is the wonderful customer service help provided by Inyopools. The product was here in the time specified and the price was considerably less than the 5 other companies I checked with first. The product was as specified and ordered and hasn't given me any problems to date. It was installed about a month ago.
Was this review helpful to you?
The Most Recent Reviews
(5 out of 5 stars)
Reviewed By: Inyo Customer ()
Great replacement. No problems
Was this review helpful to you?
(5 out of 5 stars) great deal
Reviewed By: Inyo Customer ()
whisper quiet and great price.
Was this review helpful to you?
1 0
(5 out of 5 stars)
Reviewed By: Inyo Customer ()
4-years after purchase and this guy is still running whisper smooth.
Was this review helpful to you?
(5 out of 5 stars)
Reviewed By: Inyo Customer ()
Good service ship same day.
Was this review helpful to you?
(5 out of 5 stars) Easy to wire and works very well
Reviewed By: Inyo Customer ()
Easy to wire and work very well
Was this review helpful to you?
(5 out of 5 stars)
Reviewed By: Inyo Customer ()
Quick shipping! Working great and cheaper than previous pump.
Was this review helpful to you?
1 1
(5 out of 5 stars) Excellent product
Reviewed By: Anthony C. ()
Pros: Cost, shipping, performance
Cons: none
Fast shipping. Well packaged. Item works fine and is whisper quiet
Was this review helpful to you?